How to Change DNS Settings on iPhone & iPad
 When you point your iPhone or iPad at a web address (like osxdaily.com), iOS will perform a DNS lookup to send you to the proper location. DNS servers handle part of that lookup service, translating numerical IP addresses into the readable domain names we’re all more familiar with and associate with web sites and other internet addresses. Most internet service providers provide their own DNS servers, but let’s be honest, they’re not always the fastest, thus you can sometimes speed up your internet service or even resolve some networking issues by changing DNS settings to another set of servers. Changing the DNS settings in iOS are what we’re going to cover here, and the process is the same on any iPhone, iPad, or iPod touch.
Note that you must be connected to a wi-fi network in order to set a new DNS server or change the DNS settings in general. Without a wireless connection, there is either no DNS to change (in the case for a wi-fi only device), or, in the case of an iPhone, DNS is set by the cellular network provider and is unable to be customized until a wi-fi network has been joined.
How to Change DNS Settings in iOS
Setting DNS is the same in all versions of iOS and on all devices, though the general appearance will look a bit different from modern versions of iOS compared to older versions.
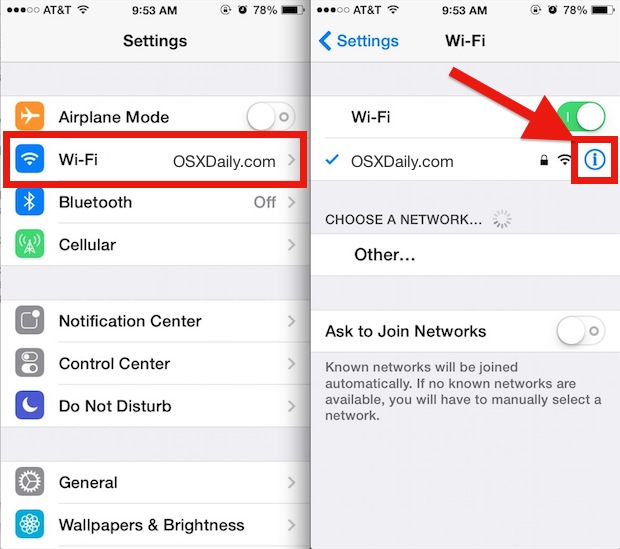
- Open the “Settings” app on the iOS device and tap on ‘Wi-Fi’ (the connected router name will be next to this)
- Locate the Wi-Fi router you are currently connected to in the list, this is determined by the checkmark appearing next to the name, and then tap on the (i) button to the right of the router name
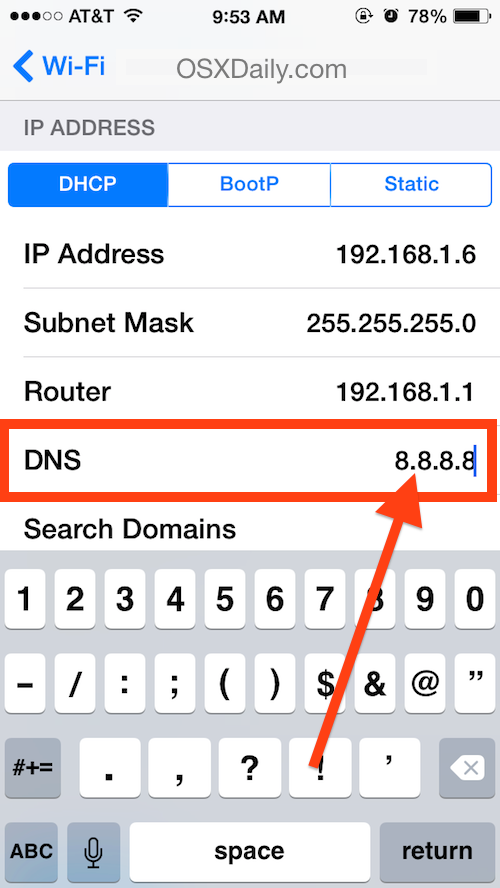
- Scroll down to the “DNS” section and tap on the numbers to the right – this will bring up the keyboard and you can enter in a new DNS IP address (in this example, we’re using Google DNS servers of 8.8.8.8)
- Tap on the “Back” button or exit out of Settings to set the DNS change


That’s it, iOS DNS settings have been successfully changed, but the change may not have taken effect yet…
Getting the DNS Change to Take Effect
You’ll likely want to reboot the iPhone, iPad, or iPod touch in order for the DNS change to take effect, otherwise the old DNS servers may be cached in iOS.
You can either do a hardware reboot by holding on the Power button to turn the device off and on again, or use one of the iOS Settings based software reboot methods if the physical buttons aren’t working or are inaccessible.
How to Know What DNS Servers to Use
Wi-Fi routers almost always dispense a DNS server automatically through DHCP, typically matching the routers IP address, and then they pull the DNS specifics from the ISP. This means you’ll often see something like “192.168.0.1” as the DNS setting when you first check it. If you aren’t experiencing any particular issues with your default settings, there is little reason to change them, unless you anticipate a performance boost by switching DNS to a faster service – more on that in a minute.
Users who want to use different DNS and who are not sure which DNS servers to use can either use ISP provided addresses, or opt to go for the public DNS services like the following:
Google Public DNS IP addresses:
- 8.8.8.8
- 8.8.4.4
OpenDNS IP addresses:
- 208.67.222.222
- 208.67.220.220
If you’re going to set a custom DNS, it’s generally a good idea to perform a DNS performance test with an app like NameBench to determine which is the fastest from your network and location, this requires using a Mac or Windows PC, but it is worthwhile and can result in better internet experiences and improved performance.


Important news is: “there’s an app for that” :) You can use this app: https://itunes.apple.com/us/app/dns-override/id1060830093?mt=8 which allows you to:
– select one DNS profile which will be applied to all Wi-Fi and cellular networks you connect to,
– set your own DNS configuration for cellular (this wasn’t possible without jailbreaking before),
– automatically keep your DNS servers up-to-date with your current IP (some DNS providers require this to function properly: OpenDNS, all SmartDNS providers)
The app has a built in list of popular DNS servers you can choose from. You can also create your own profiles and quickly switch depending on your needs.
Give it a try! It’s free to download and advanced features require an in-app purchase. More info: https://www.dnsoverride.com
Very good! Solved my wifi problems! Shame on Apple… IPad Air
Got a new iPad mini and I can’t get new DNS to stick at all. Keeps reverting back to original.
This used to work with iOS 8 but unfortunately always reverts back to default DNS when pressing the Back button since iOS 8.1
Some WiFi providers, like The Cloud in the UK, won’t work if you mess with the DNS. I had the OpenDNS servers set into my laptop network settings, but it wouldn’t work in the coffee shop I was in. The problem was that the redirect that the login script used would fail unless you were using the router supplied DNS. As OSX, and I’m guessing iOS as well, prefer defined DNS to inherited, having explicit entries can cause problems.
If you’re connecting to your home / office router via WiFi: DNS servers should be specified in the router settings, and every device on the local network should have its DNS pointing to the (internal) IP address of that router. Here’s an overview of using OpenDNS http://bit.ly/1kzfqsg and here’s a quick tutorial for configuring OpenDNS on a Linksys router http://bit.ly/1kzfyrP
If you’re using public WiFi — i.e., any WiFi access point other than your own: You shouldn’t be…unless you’re using a VPN to protect yourself.
I used to use Open DNS. I did not find it any faster and stopped using it because of some issues. I forget what those were, but when I switched to my internet provider’s DNS servers things worked much better.
Namebench is way out of date and incorrectly reports domains as hijacked causing unnecessary concerns and wasted time.
NameBench just queries DNS servers from your current location to determine which resolves domain names the fastest…
Sorry, NameBench is not available in the Netherlands for iPad
Technology left me at the bottom of the proverbial curve decades ago. Your article looked as though it would be interesting and even useful if I had an inkling whether, why, and when I would need to know this. I guess if I don’t understand it I don’t need to know. Thanks for many of your other postings though.