How to Sign Documents on iPhone & iPad from eMail Quickly

Have you ever had a contract, agreement, document, or service form emailed to your iPhone or iPad that you need to sign quickly? Perfect, because now you can digitally sign and return a document directly from the Mail app of iOS. The Mail signature feature lets you quickly sign a document attached to an email and send it back on it’s way without ever having to leave the mail app, the entire signing and returning process is very fast and easy thanks to the Markup feature set.
The Markup feature requires a modern version of iOS, meaning you’ll need iOS 9.0 or a later version installed on the iPhone, iPad, or iPod touch, though how you sign the document is slightly different depending on the version of iOS you have installed on the device (don’t worry, we’ll show you both). The rest is easy and handled in the email client, so if you want to try it out yourself just email yourself a PDF file, an image, or another document that could be signed – for testing purposes it doesn’t actually need to be an official contract or anything, as the Markup feature works with nearly all mail attachments. And yes, this works not only with attachments sent to you, but also to attachments you want to send out. Read on to learn how to use this great feature.
How to Sign Documents in Mail on iPhone and iPad for iOS 12
Assuming you have an attachment document to sign in an email on the iOS device, here’s what you do to digitally sign the document and send it out quickly:
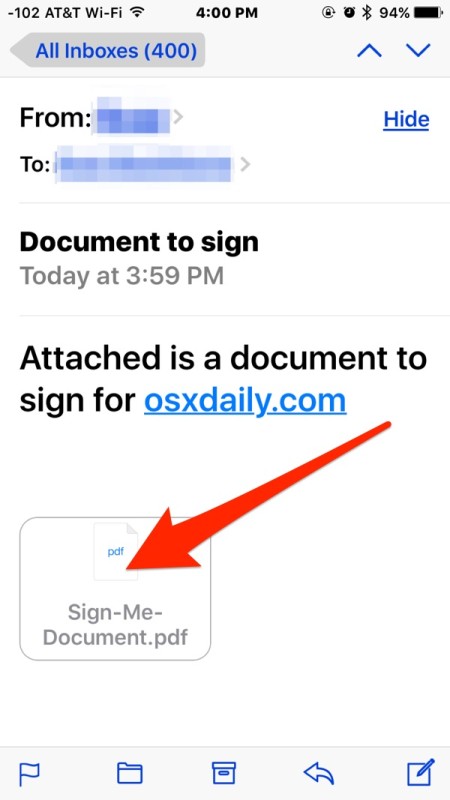
- Open the email containing the document to sign, then tap on the document to open it within Mail app (PDF files used in this example)
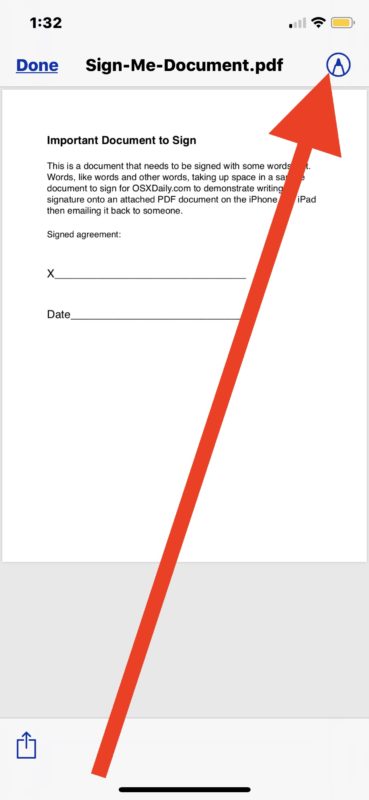
- Tap the Pen icon to enter Markup
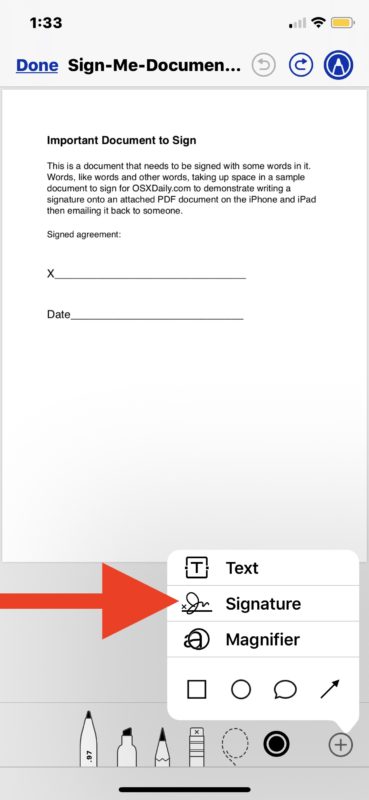
- Now you have two choices: you can use the pen tool to scribble a signature right away onto the document to sign it then tap Done and Send, or you can use the actual Signature tool to sign the document that way which is what we’re covering here
- To use the Signature tool, tap on the (+) plus button and then tap on “Signature”
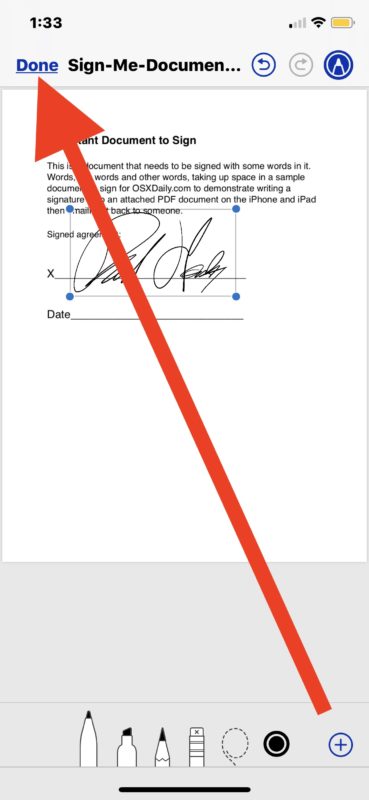
- Select the signature you wish to place on the document (if you don’t yet have one, choose Add Signature option) and use touch to put the signature into position, then tap on “Done”
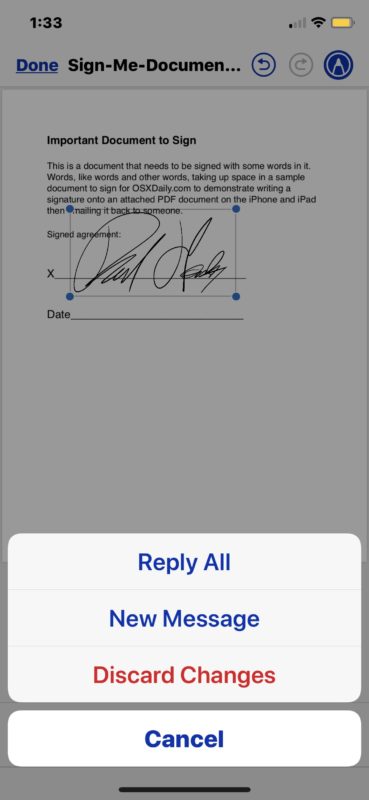
- Choose to “Reply” to reply to the existing email or “New Message” to send a new email, either will include the freshly signed document with the email
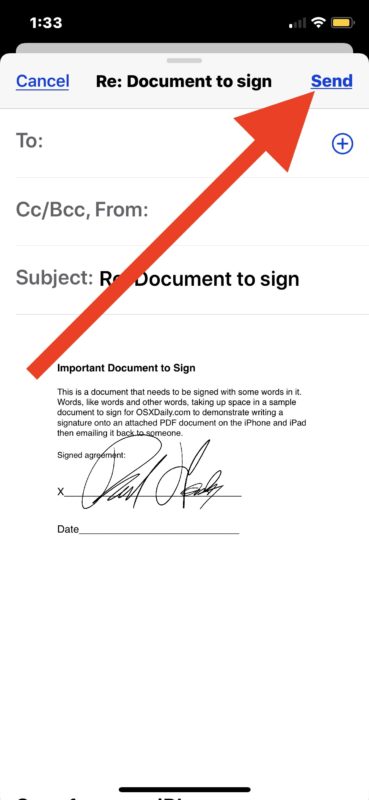
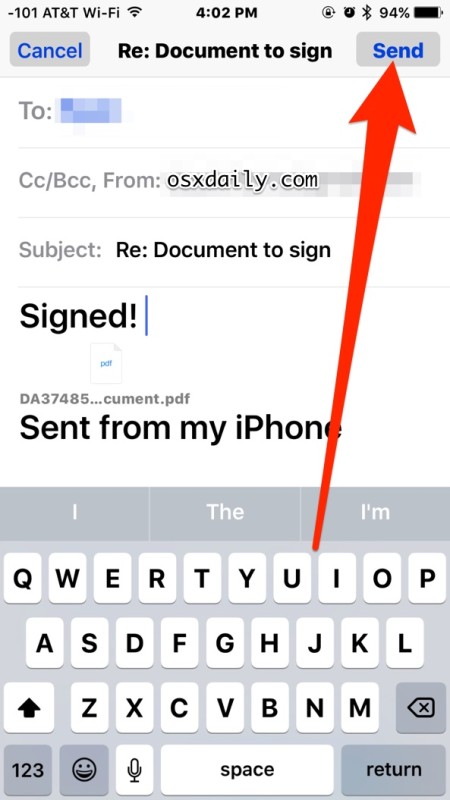
- Tap on “Send” to send the signed document from iOS Mail
Super easy, right? You can do the entire document signing, signature placement, everything right from the Mail app of iOS on the iPhone or iPad.
Whether or not you want to use the pen tool to scribble out a signature, or use the official Signature tool in Markup, is entirely up to you (and perhaps your penmanship, and whether or not you’re using a stylus or Apple Pencil), as both are able to be used as a signature for documents in email like this.
As mentioned earlier, how to sign a document from Mail app on iPhone or iPad depends on the iOS version. If the above steps are unfamiliar, use the methods below for earlier versions of iOS to sign documents using the same method, with a slightly different approach.
How to Digitally Sign Documents in Mail for iOS 11, iOS 10, iOS 9
- Open the email containing the document to sign, tap on the document attachment as usual to preview it within the Mail app (the document can be PDF or otherwise) then tap the toolbox icon
- Tap on the Signature button in the lower right corner of the Markup preview
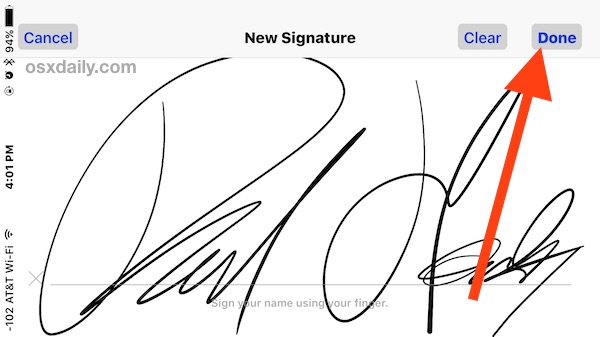
- Use a finger on the touch screen to sign the document as usual, then tap on “Done”
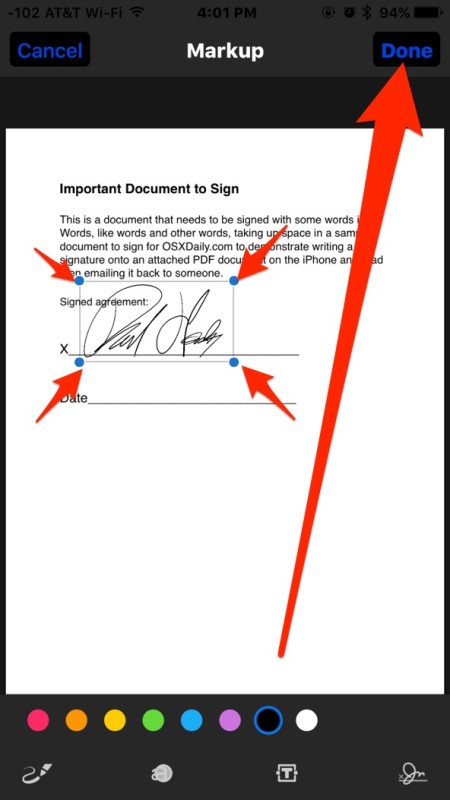
- Place the digital signature into the appropriate location on the document to sign, you can resize the signature if necessary by using the blue buttons to grow or shrink the signature, then tap on “Done” when finished to insert the signed document back into the same email as a reply
- Write the email reply as appropriate and tap the “Send” button to send the freshly signed document back on it’s way to the original sender

Is that easy or what? No need to print anything, no need to scan anything, and there’s no need to use the signature feature on the Mac either, the entire process can be handled in iOS. The document can be signed and returned in just a few seconds.
This is undeniably useful for iOS users of all sorts, but particularly for those who are out and about with their iPhone frequently and receive an agreement to sign and return. Whether it’s a work contract, a health insurance form, billing order, mortgage, deed, lease agreement, a non disclosure agreement, you name it and you can sign it quickly from iOS and return it faster than ever.
And yes, in case you were wondering, you can also attach a document to a fresh email, sign that, and send it on it’s way too, so you don’t have to just sign and return documents attached to existing emails. This means that if you have a PDF document attachment you saved to iCloud you could attach and sign that using the same markup feature as well.
Of course if you don’t have the latest versions of iOS, you can rely on the Mac to use a very similar feature and digitally sign documents using the Mac Trackpad in Mac OS X. The Mac approach is just as effective, and much earlier versions of the Mac Preview app even support scanning a signature with the Mac camera, meaning no matter what era of Apple hardware you’re using, you should find a solution for signing documents electronically and then returning them quickly, without ever having to use a printer, fax machine, or scanner.
Know of any other tricks with signing documents on the iPhone, iPad, or iPod touch? Share them with us in the comments!

The guide is a little outdated, but the essence is correct and relevant today. So thanks for the detailed guide and help.
This solution is no longer correct. Currently, using iOS 12, you touch the pencil in the top right, and then touch the plus symbol in the bottom right, and then press “Signature”.
The signing document tip is the same but the location of the signature tool depends on if you’re on an iPad or iPhone, and depending on what version of iOS you have. Nonetheless you can sign the documents in any modern iOS version, using the instructions appropriate the version you have.
Does anyone know where these signatures are saved and how we can back them up for future devices.
Can you please help me? I don’t see anything at the bottom of the screen when I open the PDF doc????
Hey there. Really cool tip but I’m having issues. I sign the document, drag it to the appropriate spot, hit “done”, and resend it back to the sender (which was myself using another email address for testing purposes). For whatever reason, the signature appears upside-down and at the top of my document, not at all where (or how) I originally placed it.
Any ideas?
After signing, pressing Done and send the PDF file to myself I receive the file with my signature in a different location and backwards!!!
Using iPhone 7 plus.
How can I avoid this problem?
What if attachment is in Microsoft word not in pdf
I can’t find the toolbox even when I scroll the document up. I have iOS 10.9, so I’m not sure why it’s not populating. Any ideas on why this could be happening
Hi my husband has an iPhone 6s Plus and it is updated, but since the 2nd last update his signature has not been working. It will come up just fine but once he sends off the document it gets back unsigned.
Any advice on this?
My signature box is moving to the bottom of the page as well…any tips for getting it to stay in place?
Guys thanks the wonderful tip but I can’t get it right, I’ve sent the “signed doc” five times already and all I get is “there’s no signature” please help I’m super desperate here registering my own company and I’m in the bundus someone pretty please help urgently😭😭😭😭😭
Hi Nikita, I am having the same problem, did you ever get an answer. Please help!
Be sure you tap on the “Done” button to save the the signature after you have added it to the document via email in iOS.
After I sign a document and click ‘done’, when I re-open it (or it is opened at the receiving end of the email), my signature has moved to the bottom right corner of the document. This does not happen for text box or for the marker tool, only for signature. Anyone know how to make that stop happening?
Shanna, we’re having same problem. Did you ever get a solution?
Every time I sign something when it sends to them it is backwards any idea how to fix this?
Thanks a lot!!! Spent 1 hour downloading some esignature apps couldn’t figure out the way and here it so simple!
Ok, I’ll answer my own question now that I’ve figured it out. To sign multiple pages and then only send once, you sign the first page, then with signature within 4 blue dots, just slide to next page and repeat process. Continue for all pages and hit Done and then Send. Enjoy!
How do I sign multiple pages and yet only hit send once ? It lets me sign or initial one page then only allows sending that one page.
Hey, did you notice in the screen shot that up there, top left, is the mobile phone signal strength in numbers rather than in the 5 dots format. Look it up…it’s a seriously geeky item.
This question has been asked but never answered. There is no toolbox icon when I open the attachment, so I can’t get to markup screen. Where’s the icon? (I have OS 9.2.1)
Change app email
Even easier – if you have signatures already created in Preview on the Mac, they are available to insert as above, no need to draw with your finger. At least, my Preview signatures (I have two, one with my full signature and one with just my initials) were readily available for use when I was trying out this feature in response to reading your article.
How do I store a signature on iOS so I can just insert as Geojd mentions?
Just add an email using the Signature inserter. It should save it automatically.
*signature, not email. My bad
Can you encrypt the files before sending back the signed documents?
If I get this newsletter daily, it means I signed up for it.
So why does the newsletter suggest I sign up for something I’ve already done?
This is about SIGNING a DOCUMENT that someone EMAILED to you. This has nothing to do with a newsletter unless you need to sign one and return it to the sender. This is a tip about signing documents in your email that need digital signatures, on the iPhone.
I’ve upgraded to version 9.1 on my iPhone 5 and when I click on an emailed attachment it still takes me straight into the attachment,with no sign of any toolbox icons. Am I missing something?
What iOS version is being used here?
Version 9.1 (13B143)
iOS 9.1 is in use in the screenshots, it’s the same with iOS 9.2 etc
I have Exchange and can’t find the mark up screen either.
It doesn’t work with word document…….just with pdf….
Rolis,
I agree with you. Even though the tip specifies “the document can be PDF or otherwise”, this won’t work with a DOCX file.
Works with PDF files, PNG files, JPG, TIFF, GIF, and others, anything that renders as an image. Can’t draw an image on a doc file and maintain the file format, thats probably why you encounter your issue with Microsoft files.
I’m not finding the mark up screen. Will this work with gmail?
Yes this works with any email configured with the Mail app of iOS, attach a document yourself or open a document from an attached email sent to you and you can access Markup
Ok, so, would this open up one more avenue for fraud? I mean, writing your signature with a finger instead of a pen makes it look really different. Who’s to say it’s really your signature or a forgery? Just saying.
By the way how can one add a date ? Most documents require both a date and a signature
Tap the text button in the Markup screen, it’s to the left of the signature button
just do it as if you are signing, but write the date instead of a signature, then add another with a real signature.
this way the date would be also handwritten and not a text
Great tip; never knew of that functionality
Great tip. Too bad there’s an elementary school grammar flaw. It’s is a contraction for “it is;” The possessive form is “its.” What you meant to write “… send it back on its way…” Where I went to school, that was an automatic D. In 5th grade.
Go away Peter. Your name speaks volumes about yourself.
Peter’s right. It’s an irritating error and they always make it.
Peter, I agree. I saw the typo and fell over in my chair, quit my job, and moved into the woods. I can’t use the iPhone signature feature ever after seeing that, this just ruins it for me. I call it quits and I threw away my iPhone, actually. Put it right into a trash compactor. Then, when I was reading about Donald Trump on a Fox News article yesterday, they had a typo too, they spelled the name of a city in Indiana wrong, so I wrote a 55 page essay to Rupert Murdoch and sent it to him my entire computer, the entire thing packed up in a box with the error front and center on the screen. It cost me $165 to ship it to Sir King Rupert who elects our leaders for us with his great graciousness, but it was worth it for that typo.
I am glad Peter was here to derail the topic to talk about grammar and typographical errors rather than the utility of the tip, who needs to digitally sign something when you can talk about an extra apostrophe erroneously included in a sentence? Oh I can’t believe it either! Peter, you and me are both emotionally stuck in 5th grade, let’s get in the sandbox together! No you can’t use my toys!!! No!!!!! You are wrong you are using the toy wrong!!! Peter is a big wrong head!!!!
Actually, in your last paragraph, it should be ” Peter, you and l are both…”.
Just saying.
Peter’s Brother, You have another typo in your comment. “I call it quits” should be “I called it quits”. We raised you much better than that! Head out to the wood shed and get the switch. Dad will be out shortly to correct the error of your ways…
PS. You’re grounded for a month.
Uh people,
For some reason when I click on the toolbox to go into “markup” all I get is a reply window to send the document. No “signature” tool at all.
???
What a great tip.
Excellent tip! Not sure if you mentioned this but there is a step between steps 1 and 2 where you need to tap a Toolbox icon in the lower right, that takes you into the Markup window where you can tap the Signature icon. At least on my iPhone that’s how it works.
Thanks again!
You’re right on the Toolbox icon – same here. THANKS!
Great tip! Had no idea this could be done.
Well this is great I had no idea the iPhone had such a feature. Great for business, thanks.