How to Mark Addresses Outside Domains in Mail for iPhone & iPad

Have you ever sent an email to or from an address at the wrong domain? Maybe you accidentally sent a personal email from your work account? The Mail app on iPhone and iPad includes a feature which can help you avoid that situation by marking any address outside of a specified domain as you compose or reply to an email message in iOS Mail. The great thing about marking addresses with domain specificity is applies to both addresses being sent to and your send from email address too, so it can help prevent you emailing the wrong person or from accidentally sending an email from the wrong From address in iOS too.
This is kind of a pro iOS email trick, and it’s most obviously useful for business and work related iOS devices, or for users who have added multiple email accounts on their iPhone or iPad with a mix of both personal and work or business email accounts on the same device. This feature is really easy to setup, let’s review how it works.
Quick explanation how this Mark Addresses eMail feature works in iOS
Wait, let’s take a step back; what does “Mark Addresses” in iOS mail do again? If you’re confused by how the mark address feature of iOS Mail works, let’s take a simple example;
Let’s say you are intending to email “example@osxdaily.com” but you accidentally type or autofill an alternate domain like “example@mailinator.com” – if “osxdaily.com” is your marked domain, then the “mailinator.com” example would be flagged/marked because it is not in the marked address list. iOS marks any domain or email address outside of the specified list in red, making it very obvious when you are sending emails outside of the specific domain approval list.
Sounds great for anyone juggling many business, personal, and multiple email accounts, and who wants to avoid sending something to or from the wrong email address, right? Let’s get this setup on your iPhone or iPad.
How to Mark Email Addresses Outside Specific Domains in Mail for iOS
- Open the Settings app on iPhone and then go to “Mail” settings
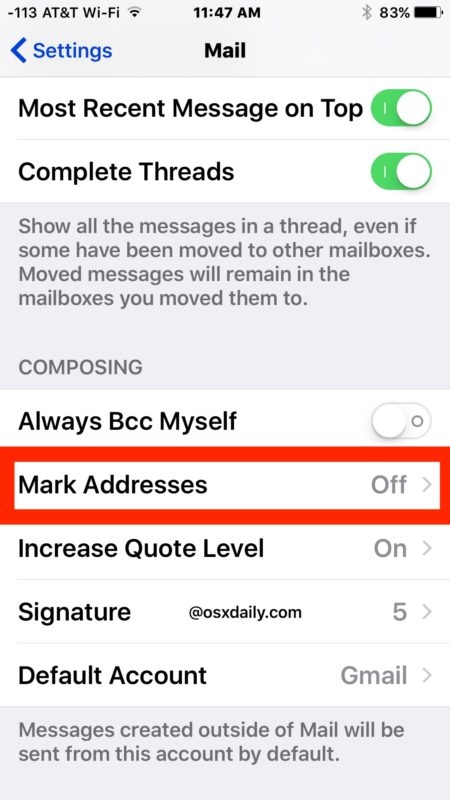
- Scroll down to the Composing section and tap on “Mark Addresses”
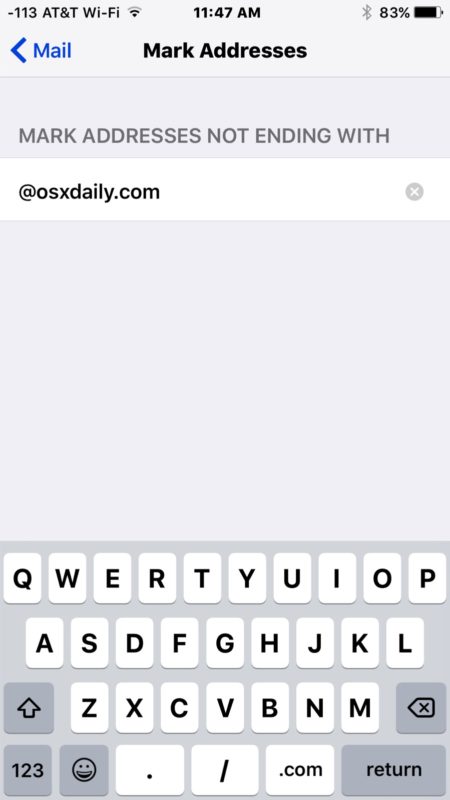
- Enter the domain(s) you want to exclude from being marked (for example if you want to flag every email that is not to/from osxdaily.com you would enter “osxdaily.com” as the domain) *
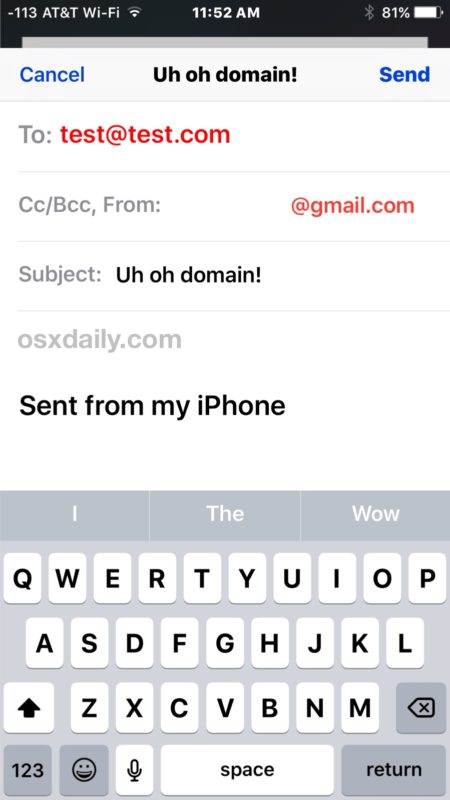
- Exit out of Settings when complete, any new email that is being sent to, replied, or sent from a domain outside that list will now be marked in bright red to make it obvious it is not in the domain list


Now when you send a new email it will be very obvious if a domain that is chosen which has not been approved in the aforementioned mark address list, as those addresses will be highlighted as red text:

To be clear, you can still send emails to domains not in the exclusion list, but it will just become much more obvious when you do so. This will mark an email address only, it does not prevent sending any messages that do not conform to the domain exclusion list.
This can help to avoid goofy situations like when you accidentally email a family member from your work email address, accidentally reply to a customer from a personal email account, or accidentally sending a competing employer an email from your current organization address, and the many other similar situations.
This trick can also be handy if you have an email account setup that only allows emails to be sent to and from particular domains, which is fairly common in secured internal email communications that aim to prevent any outside domain communication.
* You can setup one or multiple domains to exclude in the marked address list, simply separate them by commas like so: “osxdaily.com, icloud.com, outlook.com”
On a related note, if your iPhone or iPad is primarily a work or personal device, but you have multiple email accounts configured on it, it is a good idea to set the primary default email address on the iPhone or iPad so that new emails default to the primary use of that device. If it’s a personal device, defaulting to a personal email makes sense, if it’s a work device, defaulting to a work email makes sense. Remember you can change the From address during email composition in iOS very easily at any time.


Unable to get email messages. Maybe I will try the Apple store for help.just all of a sudden unable to get the envelope icon
Useful tip….but very confusing to read. People may in conversation use the word “e-mail” to refer to an e-mail message, an e-mail address, and an e-mail system, not to mention using it as a verb, but in writing—especially technical writing—you need to make the distinction clear. Once you have told us that the context is e-mail, I would stop using that word and replace it with “message,” “address,” “send” and other more specific terms to make the text easier to understand. I’d also drop the slang term “e-mails” in favour of “e-mail messages” (or simply “messages”) makes things much clearer.
Just a suggestion to make it easier for your readers.
“pro iOS email trick”? That’s a laugh and a half!!!!!!!!!
How about you pay attention and proofread your email before you send it? That would be the “pro” way.