How to Transfer All Data to iPhone XS / iPhone XS Max from an Old iPhone

If you just got an iPhone XS or iPhone XS Max, you almost certainly will want to migrate everything from your old iPhone to your new one, so that your all of your data, contacts, photos, messages, notes, apps, and all other personalized data and stuff is transferred over to use on your new iPhone XS / Max.
This walkthrough will show you the fastest way to get all of your data from an older iPhone to a new iPhone XS Max or iPhone XS with iTunes.
Our focus here will be on using iTunes and a computer to transfer data from one iPhone to another because for many people using a USB cable and iTunes will be the fastest method of backing up and transferring data. You could use iCloud if you want to and happen to have an incredibly fast and reliable internet connection, but for most people iTunes will offer the quickest setup with getting all data over to their new iPhone XS or iPhone xS Max.
To get started, you’ll need the latest version of iTunes (12.8 or 12.6.5) on a computer (Mac or Windows PC), a USB Lightning cable to connect the iPhones to the computer, an active internet connection, and enough free hard disk space on the computer to store the iPhone backup on the computer.
How to Transfer All Data to iPhone XS / iPhone XS Max from Old iPhone
In the examples here we will demonstrate transferring data from an iPhone Plus to a new iPhone XS using iTunes.
- Start by connecting the old iPhone model to the computer with a USB cable
- Launch iTunes on the computer, then choose the connected old iPhone by clicking on the tiny iPhone button near the top of the iTunes window to select the device
- Under the Summary section of the device in iTunes, look for the backup section and choose “This Computer” and be sure to check “Encrypt iPhone Backup”
- Now choose “Back Up Now” to create a fresh backup of the old iPhone connected to the computer – let this backup process complete
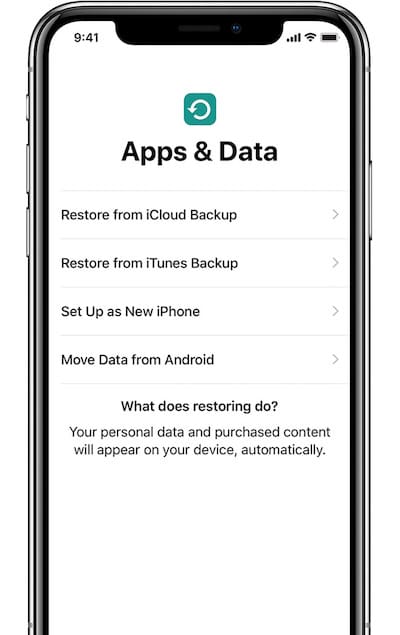
- Next, on your brand new iPhone XS or iPhone XS Max, start going through the onscreen setup steps as usual on the device, eventually you’ll get to the “Apps & Data” screen
- Select the “Restore from iTunes Backup” option at this screen, then connect the iPhone XS Max or iPhone XS to the computer running iTunes with a USB cable *
- In iTunes you will see a “Welcome to Your New iPhone” screen, choose the “Restore from this backup:” option and then choose the backup previously made of the old iPhone to iTunes, click “Continue” when the proper backup is selected
- The backup restoration process will begin, this can take a while depending on the size of the device size, expect somewhere around an hour per 100GB backup
- When the iTunes restore process has completed, complete the setup steps on the iPhone XS Max or iPhone XS, you’ll be using your new device with all data transferred over in no time

All of your data, messages, notes, photos, movies, videos, contacts, health data, settings, and everything else will have been successfully transferred to your new iPhone XS or iPhone XS Max.
One thing to note is that apps will re-download as part of this process, since apps are no longer backed up to iTunes by default on the main iTunes release track (iTunes 12.8) though you can use the alternate release track (iTunes 12.6.5) if you’d like.
Remember to use the “Encrypt iPhone backup” setting, as this preserves your Health data as well as passwords, logins, and other important details in the iTunes backup. If you fail to encrypt the backup, you will need to enter all passwords again, and your health data will be lost.
iCloud vs iTunes Restoring from Backups
* To be clear, while we’re using iTunes here, you can also use iCloud backups or the optional Quick Start setup process to complete the entire migration and data transfer from an old iPhone to a new iPhone XS Max / iPhone XS. But using iCloud has a potential disadvantage in that how long it takes to complete is entirely dependent on your internet connection speed. For example if you have a 100 GB iPhone backup stored in iCloud, then downloading and restoring that 100 GB from iCloud to an iPhone can take half a day or even several days to complete on many typical home-based US internet connections, and most people won’t want to wait nearly that long before they can use their new iPhone (a 3 mbit/s DSL internet connection will take roughly 80 hours to download 100 GB!). But if you happen to have some modern world internet connection because you’re in a region of the world that has decent internet infrastructure with 100 mbit/s internet speeds, then using iCloud is easy and suitable, the entire process is basically the same except you’ll choose an iCloud backup to restore from rather than iTunes. Nonetheless, due to the huge variability in internet speeds, iTunes is often faster for most iPhone users since it uses a wired USB connection to complete the data transfer process.
This obviously covers migrating from an older iPhone to a newer iPhone, but if you’re thinking about moving to iPhone from an Android then you can read how to migrate from Android to iPhone here.


Android version transfer to I phone
When transferring old data to new phone, will a bug that causes rapid battery discharge also transfer to the new phone?
No, almost certainly not. Transferring data from an old iPhone to new iPhone mostly copies your files, photos, movies, contacts, etc, and the apps are re-downloaded from App Store.
Can i know anyone successfully restored their itunes backup to iPhone XS using itunes version 12.6.5? Is there any error?
iCloud restore is fine for most, but kick it up a notch and use the Quick start transfer… it’s braindead simple if you have both devices. It’s just like setting up a new Apple Watch. In fact if you have an Apple Watch, you want to use this method so your activity data is transferred to your new device.
https://support.apple.com/en-us/HT201269#quick
The Quick Start approach is great if you have lightning speed internet (100 mbit/s or better), but it uses iCloud.
Using iCloud to restore a large backup is only practical for those with very fast internet connections, or those with a very small iCloud backup (under 10gb IMO).
For large backups it’s too slow and unreliable and it’s faster to use iTunes.