How to Transfer Videos from iPhone or iPad to Windows PC

Do you have videos stored on your iPhone or iPad that you want to transfer to your Windows PC? At first, you might think it’s going to be a hassle and the procedure requires the use of third-party applications, but that’s not the case here at all. As you’ll see it’s actually quite easy to transfer videos from an iPhone or iPad to a Windows PC.
The iPhone and iPad can simply act as a media storage device with limited functionality, but yet allows you to easily transfer photos and videos to your Windows machine within a matter of minutes. If you are interested in figuring out how this works, read on to learn how you can transfer videos from your iPhone or iPad to a computer running Microsoft Windows.
How to Transfer Videos from iPhone or iPad to Windows PC
First of all, you need to make sure you have the latest version of iTunes installed on your computer, even if you’re not going to use it for this procedure. The ability to import photos & videos to your PC requires iTunes 12.5.1 or later. Once you’ve installed or updated iTunes, simply follow the steps below to get started.
- Connect the iPhone or iPad to your Windows PC using the included USB to Lightning cable. You’ll have to unlock your device if you use a passcode. You might get a prompt to trust the computer that your device is connected to. Simply click “Trust”.

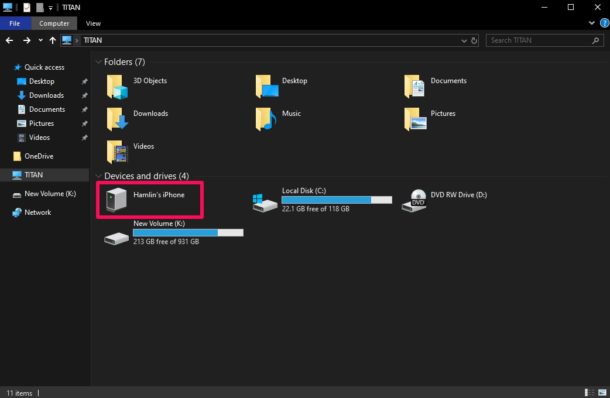
- Open “This PC” on your Windows computer. It’s indicated by an icon as shown below.
- Click on your iPhone or iPad as displayed in the screenshot below. Your device might be named after your Apple ID name.
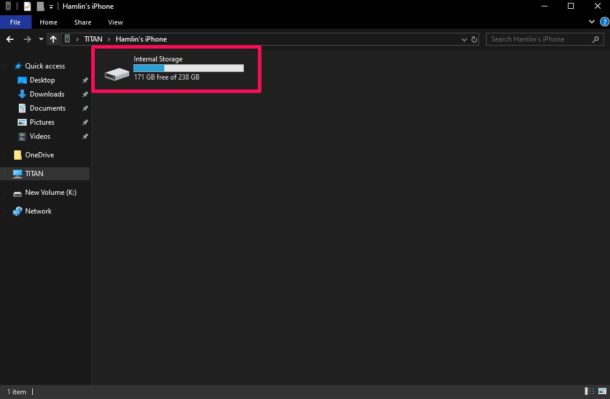
- Click on “Internal Storage” to view media files like photos and videos stored on your iPhone or iPad.
- Now, click on “DCIM” as shown below in the screenshot.
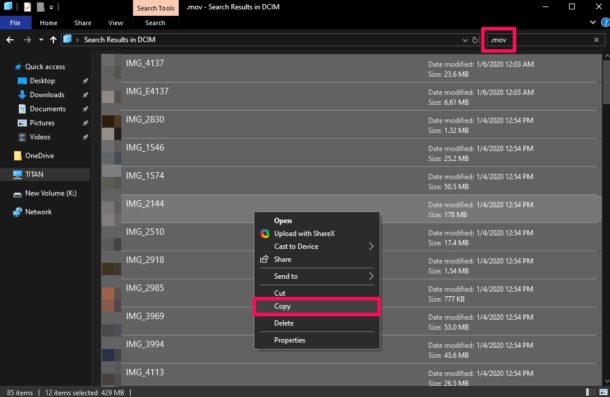
- As you can see here, there are plenty of folders that contain your media. These mostly include photos, and you’ll have a hard time browsing through all these folders individually to find the videos that you’re looking to import.
- To filter out the videos, type “.mov” in the search bar located at the top-right corner of the window and Windows Explorer will start searching for files with a .MOV extension. Similarly, you can use this technique to filter search other video formats like .mp4, .avi, etc.Once the search is complete, press and hold the left-click on your mouse and drag it over these files to select them. Once done, right-click and select “Copy”.
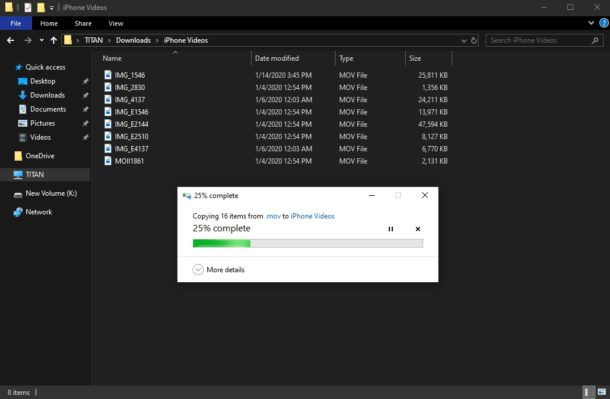
- Now, head over to the location where you want to store your video files. Right-click anywhere in the window and select “Paste” to import all the videos you selected from your iPhone or iPad’s storage.
- Depending on the size and number of video files that are being imported, it might take a few minutes for the transfer to complete. However, once it’s done, the video files will show up in the new location as displayed in the screenshot below.


That’s pretty much all you need to do in order to transfer video files from your iPhone or iPad to a Windows PC.
You can also copy pictures to the PC from iPhone using a similar trick.
Although you don’t technically need to use iTunes to complete this procedure, Apple’s support page recommends you to have the software installed, just in case your device doesn’t get recognized by Windows. This is perhaps related to the driver portion, and you can always update the iPhone driver in Windows manually if needed too.
That being said, using a wired connection to transfer content from your iPhone / iPad to Windows PC is gradually becoming a thing of the past as more and more internet services take over. With services like iCloud, Dropbox, and Google Drive, you don’t need to rely on a USB connection for moving data around, though you will need a fast internet connection.
If you want to go for a wireless approach, iCloud Photos is a great solution for many and it’s available at a low monthly fee. With iCloud Photos, iOS users can simply store all their photos on iCloud and access them on any Windows device (or otherwise) directly or even with just a web browser. You can even bulk download and store these photos & videos locally from iCloud if that’s what you prefer too.
We hope you were successful in importing all the videos stored on your iPhone and iPad to a Windows PC. What do you think of this process for transferring your iPhone media to your computer? Do you use the wired USB connection method or are you using iCloud or another cloud service instead? Let us know your thoughts in the comments.
