How to Fix macOS Big Sur Wi-Fi Problems
Are you having trouble connecting to Wi-Fi networks on your Mac after updating it to macOS Big Sur recently? Although connecting to Wi-Fi networks on a Mac is a fairly straightforward procedure for the most part, some users have reported issues with getting the internet to work over Wi-Fi after installing macOS Big Sur.
The most commonly reported macOS Big Sur-related Wi-Fi issues are that the connection drops frequently, won’t reliably connect to wi-fi, or the overall network performance is lacking. This could be due to several reasons ranging from Wi-Fi router issues, to software-related problems that you may be facing on your Mac after the update. Sometimes, improper DNS settings could also prevent you from accessing the internet.
If you’re one of those unlucky users who’re affected by this issue, you’ve come to the right place, run through the steps provided to troubleshoot and resolve Wi-Fi issues in macOS Big Sur.
Troubleshooting macOS Big Sur Wi-Fi Problems
Regardless of whether you own a MacBook, MacBook Pro, MacBook Air, Mac mini, iMac, or Mac Pro, you can follow these basic troubleshooting methods whenever you’re facing any connectivity-related issues on your macOS Big Sur machine. Before you go ahead with the following procedure, make sure to back up your Mac using Time Machine so that you don’t lose your settings and configuration files in case something goes wrong.
Some of the steps we’re about to discuss are simple, whereas the others require slightly more complicated tasks such as setting up a new network profile, moving system files, using custom network configurations, amongst other techniques that may be necessary to fix wireless connectivity.
1. Check for Any Software Updates & Restart Your Mac
Sometimes, buggy software can result in Wi-Fi connectivity issues on a Mac. Apple is usually quick to release a hotfix and address OS-related issues that have been reported by users. So, it’s always good to check for any available software updates from time to time.
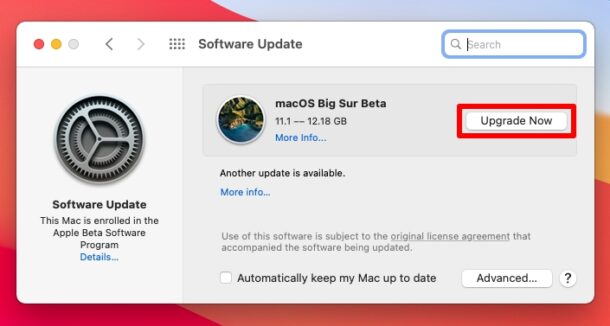
You can check if your Mac is running the latest version of macOS by going to System Preferences -> Software Update. If there’s a new macOS update available, choose to download and install it.
2: Reboot the Mac
Whether you have a new update or not, restart your Mac and see if it resolves the Wi-Fi issue you’re facing. You may find this silly, but most minor software-related bugs and glitches can be resolved by simply rebooting your device. There’s more than one way to reboot your Mac. You can click on the Apple logo from the menu bar and choose “Restart” from the dropdown menu. Or, you can hold the power button on your Mac to bring up the shutdown menu where you’ll find the option to restart your device as well.
3. Disconnect All USB Devices from the Mac
If you have any device connected to your Mac’s USB port like external storage devices, USB hubs, dongles, etc. unplug it and see if that fixes the issue. This step is recommended because – although somewhat rare – there’s always a possibility that your Wi-Fi connectivity issues are due to hardware interference with certain connected devices that emit radio frequency.
After disconnection, if you notice that your Wi-Fi connection is working fine, then you know it’s likely hardware interference from one of the USB devices. In such cases, you can try moving the USB device further away from your Mac to minimize interference, provided the cable is long enough. Also, if you’re connected to a 2.4 GHz Wi-Fi network, try switching to a 5 GHz network as it may have less interference than the lower frequency band.
4. Create A New Wi-Fi Configuration in macOS Big Sur
This might be a slightly more complicated method compared to the others, but all we’re going to do is remove existing configuration files to make new ones which usually fixes wireless network issues. So, follow the steps below carefully to avoid any confusion.
- Temporarily disable Wi-Fi on your Mac by clicking on the Control Center icon in the menu bar at the top-right corner of your screen.
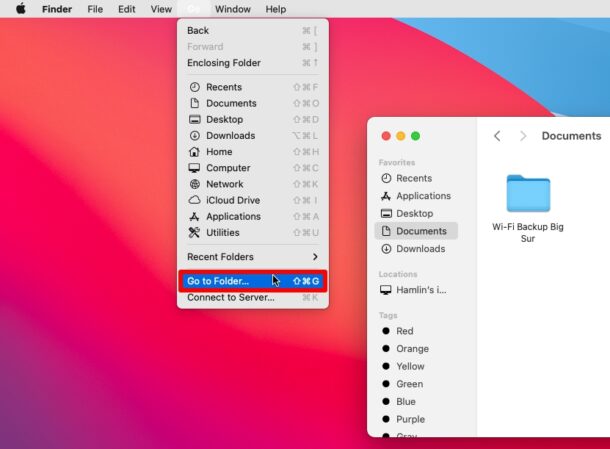
- Next, open Finder and head over to an easily accessible location. Make a new folder here and use a suitable name. Once you’re done, click on “Go” from the menu bar and choose “Go to Folder” from the dropdown menu to proceed.

- This should bring up a tiny window on your screen where you’ll be able to enter the path. Copy/Paste the following path and click on “Go”.
/Library/Preferences/SystemConfiguration/
- Next, find and select the following files in the SystemConfiguration folder.
“NetworkInterfaces.plist”
“com.apple.wifi.message-tracer.plist”
“com.apple.airport.preferences.plist”
“preferences.plist” - Once all these files are selected, move them to the new folder you created. Now, restart your Mac and then re-enable Wi-Fi from the macOS Control Center.
Try opening Safari and see if you’re able to browse the web without any issues. Wireless connectivity should be working fine by now. If this method didn’t help in your instance, you’ll have to proceed to the next troubleshooting step.
5. Create A New Network Location With Custom Settings
This might be the hardest troubleshooting step for most users. Here, we’ll be creating a new network location in macOS Big Sur using custom configuration settings for DNS and MTU as they can sometimes hinder internet connectivity. Let’s take a look at the necessary steps.
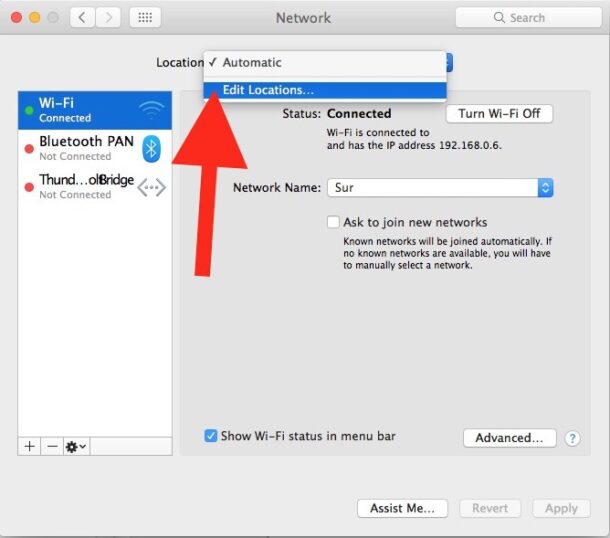
- Head over to “System Preferences” on your Mac from the Dock and click on “Network” to get started. Here, make sure “Wi-Fi” is selected on the left pane and pull down the Location setting. Click on “Edit Locations” from the dropdown menu.

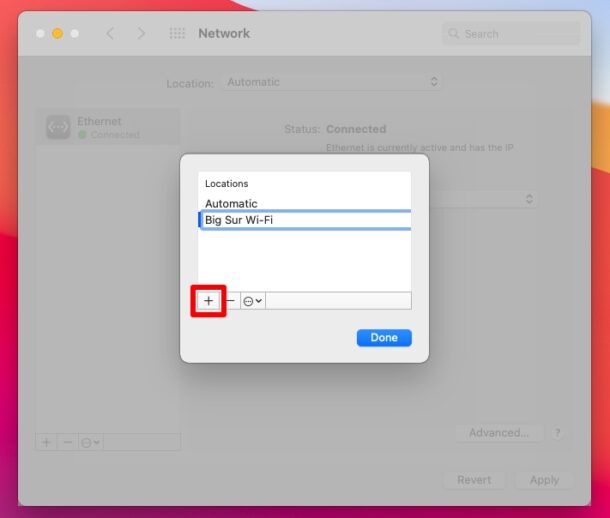
- Next, click on the “+” icon to manually create a new network location, and give it a suitable name like “Big Sur Wi-Fi” then click on “Done”.

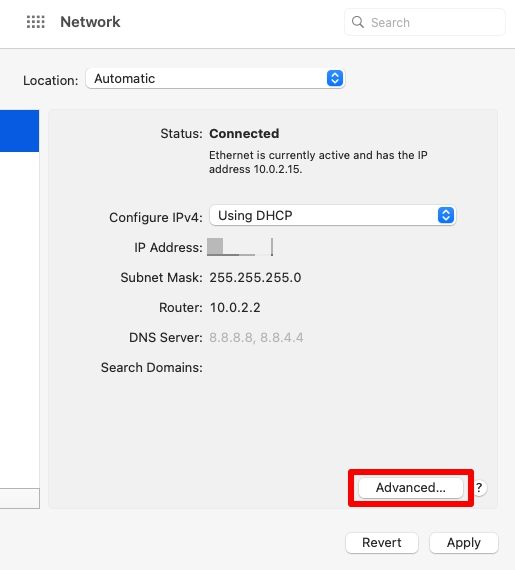
- Now, go back to the Network Preferences panel and click on “Advanced” as shown in the screenshot below.

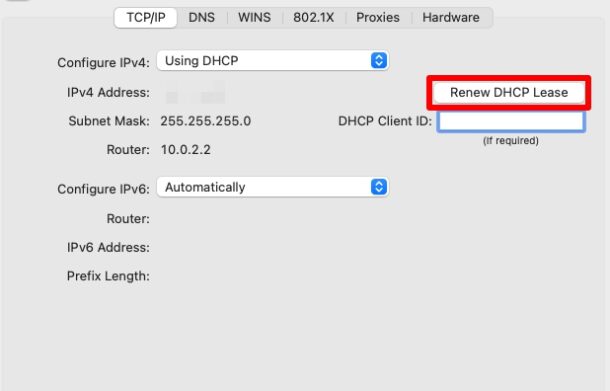
- Here, head over to the TCP/IP tab and click on “Renew DHCP Lease”.

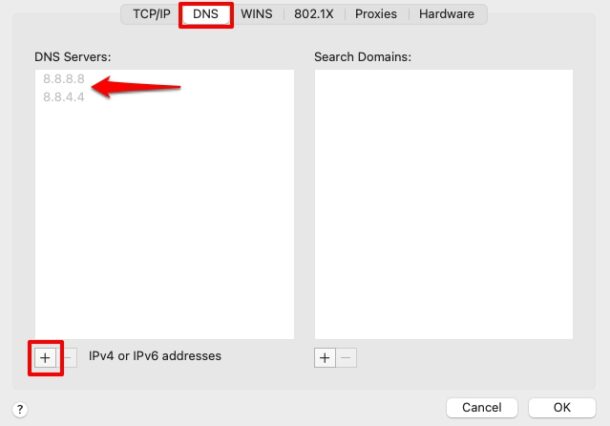
- Once you’re done, switch to the DNS tab and click on the “+” icon below the DNS Servers area. Now, manually enter 8.8.8.8 and 8.8.4.4 as the IP addresses for DNS servers as indicated below.

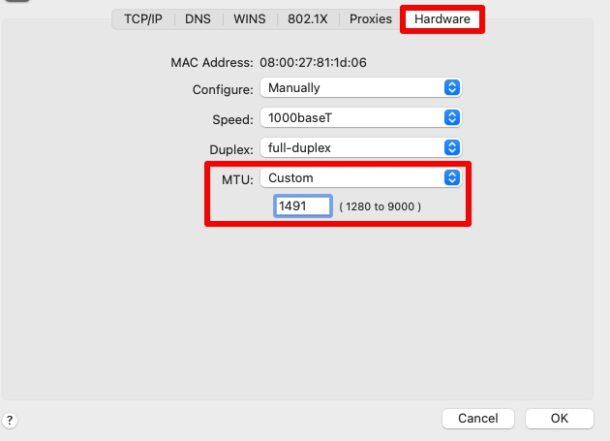
- Next, switch to the “Hardware” tab and change the “MTU” setting to “Custom”. Now, type in “1492” as the value for MTU and click “OK”.

Now, when you try to exit the Network Preferences panel, you’ll be prompted to Apply all the changes you’ve made. Choose “Apply” and reconnect to your Wi-Fi network to see if the issue has been resolved.
This is arguably one of the most effective methods of resolving software-based wi-fi issues on the Mac, so give it a try.
6. Reset the NVRAM on your Mac
For those who aren’t aware, NVRAM or Non-Volatile Random Access Memory is a small amount of memory utilized by your Mac to store certain settings for quick access. Resetting your Mac’s NVRAM is typically considered an effective troubleshooting method when your system is misbehaving.
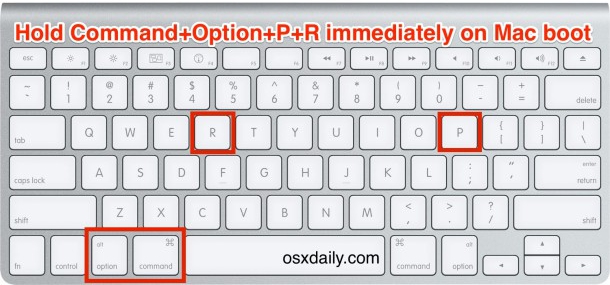
Resetting the NVRAM is a lot easier than you think. First, shut down the Mac and immediately after you turn it back on, simply press and hold Option + Command + P + R on your keyboard for about 20 seconds. This will reset both the NVRAM and PRAM. You can confirm this when the Apple logo appears and disappears for the second time while booting up.
7. Reset the SMC of your Mac
Resetting your Mac’s System Management Controller (SMC) can sometimes resolve issues related to Wi-Fi, power, batter, and other features. It may be necessary to restore normal lower-level system functionality to your Mac especially when you’re facing hardware-related problems.
The steps to reset your Mac’s SMC may vary depending on the model you own. To reset the SMC on MacBooks with Apple’s T2 Security Chip, press and hold Control + Option + Shift on your keyboard for 7 seconds and then press and hold the power button as well. If your Mac is on, it will turn off as you hold the keys, but keep pressing all four keys together for another 7 seconds and then release them. Wait for a few seconds before you power on your Mac again.
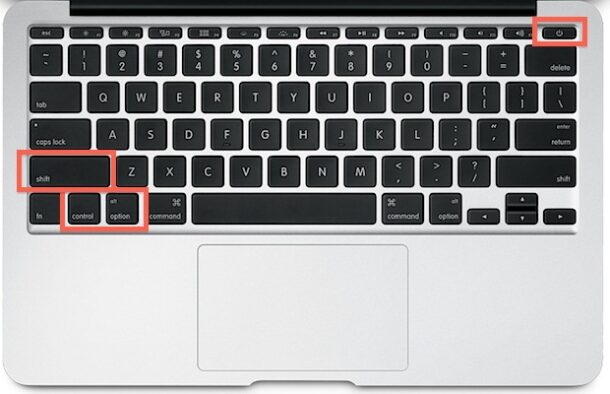
On the other hand, if you have an older MacBook without the T2 chip, press and hold Control + Option + Shift keys while also pressing the power button for about 10 seconds to reset the SMC.
The procedure is a lot easier on Mac Desktops with or without the T2 chip. Simply shut down your Mac and unplug the power cord. Now, wait 15 seconds and plug the power cord back in. Wait for at least 5 seconds before you turn on your Mac again.
8. Reset the Wi-Fi Router / Modem
If you’re still facing problems, it’s possible that the issue is with your Wi-Fi router or modem and not the Mac itself. Hardware or firmware-related issues with your Wi-Fi router could prevent you from accessing internet over the wireless network. However, you can try resetting your Wi-Fi router to see if it fixes the issue.
Typically, you can do this by pressing the router’s power button for a few seconds and then restarting it, but the exact process of resetting routers and modems can vary per manufacturer. Hence, it’s not realistically possible to cover all the various methods here. For a more normalized procedure, you can unplug the router or modem for about 20 seconds and then plug it back in again.
9. Try a Different Wi-Fi Network, or Personal Hotspot
Another option is to try a different wi-fi network entirely, or use Personal Hotspot from an iPhone or cellular iPad. If the Mac works with a different network, or with a personal hotspot, it’s certainly an indicator the issue is with the other wi-fi router, network, or provider, and you’d want to focus troubleshooting efforts on that side of things rather than the Mac.
You can also try using the same wi-fi network with a different device, like another Mac, a PC, iPhone, iPad, Android device, or something else – if those devices are working with the wi-fi network it suggests something is going on with the Mac, whereas if those devices also are not connecting to the internet successfully, it points to an issue with a particular wi-fi network or ISP.
–
Hopefully by now you have resolved any Wi-Fi connectivity issue you were facing on your Mac with macOS Big Sur.
If none of the above troubleshooting methods worked in your favor, you might want to contact your internet service provider (ISP) to check for any issues on their end. Server-side issues can also prevent you from accessing the internet over Wi-Fi. One of the best ways to check if it’s actually a Wi-Fi specific issue is by using an ethernet cable and establishing a wired connection with any of your other devices.
Do you use an iPhone or iPad as your primary mobile device? In that case, you may also be interested in taking a look at some of the basic troubleshooting steps you can follow whenever you’re facing Wi-Fi connectivity issues on iPhone and iPad devices.
We hope you were successful in getting your Wi-Fi connection to work properly on your Mac again. Which of the troubleshooting methods that we discussed here worked for you? Did you have another solution for Big Sur related Wi-Fi issues? Share your experiences, thoughts, and opinions in the comments below!


Sorry much of this i had tried and absolutely none of it worked. i have other laptops, this one gets a lot of use though but it is 10 years old and apple make good landfill, but you have no idea how irritating it is to to to a help site and be told this will fix your problem and it never does. I don’t mind if it might.
I have Catalina and my problem defies your suggestions in that i can log on with my cell network but not in my home network but every other device works perfectly with wifi and ethernet. this is an old MacBook air late 2010 i use in my garage and the second i am confirmed it is a hardware issue the thing is land fill but it seems so much like a software issue but unfixable. I will have try neutralising both laptop and router and then see…
I tried #4 on my 2009 iMac with patched sur MacOs Big Sur installed, but when I restarted my iMac, all I get is white screen which eventually gets to a flashing grey folder with a ?. I have tried rebooting in to all the other modes, but to no avail, it does recognize usb drives with “option” pressed after reboot, tries bootable Big Sur install from usb and only goes about quarter the way on the progress bar then shows a circle with a line on an angle through the middle, any ideas if I can cover from this and how, or am I just hooped, thanks for any help
Step four worked for me. Thanks very much.
Along with so many others, I want to thank you as number five was also the solution for me. But I do have one question: is there anything I need to do to return configuration back to “normal”? I did notice that almost immediately some of my previous webpage is required username and password again. Is there anything else I need to be thinking about?
Great fix. Had just updated to BigSur and internet showed connection, but was not. Once reviewing steps #4 fixed the issue!
Thank you!
Thank you! Number #5 seemed to make the connection much more stable for me!
Thank you so, so, so much for putting together this tutorial! I’ve been trying to figure out this issue for about a month now and #5 finally solved it for me.
Thank you SO much for putting together this tutorial! I’ve been trying to figure out this issue for about a month now and #5 finally solved it for me.
i’m running on catalina and still having these issues. i’ve never upgraded to big sur.
I upgraded to Big Sur from Catalina on my Mac Pro 6,1. After about 2-months, upon a reboot I couldn’t connect to any internet connection. I made my way through this article to Step 5. FINALLY, I am able to get back online. THANK YOU OSX Daily!
You are a star, thank you so much! Step 4 did the work.
I purchased a 2020 MacBook Pro M1 chip. For months I could not figure out why my WIFI connection kept on dropping. After I read this part “3. Disconnect All USB Devices from the Mac” I had realized I had my Rampage headphones connected through the All in 1 USB, HDMI dongle EarlDom, a cheep solution. After I read this article this was the first thing I tried, unplugging the dongle and tested the connection. low and behold it was fixed. Now I have to figure out what frequency this dongle is transmitting and why it was blocking the WFI connection. Thanks OSXDAILY.
Bought a used MB Pro Retina 13″ A1502 then upgraded to Big Sur. Everything worked except I couldn’t get to internet. Got all the way through #4 tip above then got stuck on #5. The comment above regarding deleting Norton led me to delete all my security Apps. Viola! Back on the internet. Thanks everyone!
I would suggest downloading patched sur from github, it comes with drivers for wifi
Patched Sur is intended to have Big Sur run on unsupported Macs so that’s sort of a separate issue (though I’m sure they can have wi-fi problems since it’s not supported hardware), whereas most wi-fi issues with Big Sur are fortunately resolved with the steps outlined in this tutorial to create a new configuration.
Have you heard of this helping general issues with wi-fi?
@everyone:
a simple reboot always temporarilly fix the problem. So all of these receipes seem to work but they won’t stand on the long erm.
They don’t address the core of the problem which isn’t in the SMC, the NVRAM, the preferences, but just related to the upgrade to Big Sur.
As long as Αpple doesn’t officially announce they understood the bug and fix it in Big Sur, my personnal advice is to downgrade to Catalina. Without touching anything all of a sudden Wi-Fi will work again and for a long time without regular reboot.
[ where I’m talking from: 30 years experience on MacOS & network architecture ]
Step 6 worked for me. I think it’s tied to going from hotspot and back to WiFi. Anyways I kept getting a NO INTERNET message when I opened a browser. This step worked for me. Thank you so so much!
Suggestion no. 4 worked for me, immediately.
I had tried some of these methods, a few of which are repeated on other websites, but none indicated any success. This after weeks of having to restart my MacBook Air over and over to access the Internet. There were no issues with the router or the signal. I could access the Internet from my phone or other devices, using the same Wifi connection. It had to be the recently installed Big Sur.
Once I followed the instructions in Suggestion 4, which were clear and easy to do, PROBLEM SOLVED. THANKS!
Glad this helped solve your wi-fi issues, Raymond!
Thanks!
No. 4 seems to be the solution for my MacBook air. However, was I suppose to delete the files in the SystemConfiguration once they got moved to the new folder? I didn’t by the way, but I’m curious to know how it works. Moving the files was just like making a copy.
Also, do I have to keep the new folder?
Once again, thank you for these tips! Very useful.
Resetting the NVRAM worked for me. There was a program, in my particular case Palo Alto, that was incompatible and it was casing network issues.
Let me know how does the downgrade work for you!
Exactly Geoff. This is getting ridiculous on my end. I now have to reboot my laptop every time I try to resume my work from an earlier session which requires a lot of time as I have to save, close, then open numerous files . This is now reminding me of Windows Vista which was a complete flop. This Big Sur upgrade has left a sour taste in my mouth and I can sadly claim that my deep trust in everything Apple does has been extremely shaken in its foundation.
I tried all the steps to the end but still no joy. I think the problem is in the mac / big sur because my phone works well on wifi in the house at the same location. I’m considering downgrading to an earlier mac operating system.
I tried this up until setting up a new wi-fi location – step 5 and it seems to have worked! Thanks very much.
I followed your steps to get my WiFi to work with Big Sur and a new router. Thanks for your help.
Solution 4 worked for me, but once the items moved to the new folder, I deleted the 4 files in /SystemConfiguration
Step 5 solved the problem perfectly! Thanks :)
I had no wifi after updating to Big Sur but the step 5 of this article did the trick! Thank you soooo much!!!!
Thank you……did I say Thank you….😊.
Thank you! Your suggestion 4 worked for me. Greatly appreciated.
Got all the way to the NVRAM and PRAM reset solution, until I got connectivity back. My WiFi was connected, but no internet. Until i did that reset. I wasted 1/2 day messing with WiFi settings before I found this guide. Big ups to Hamlin!
Running MacBook Pro Retina early 2015. Internet constantly dropping out since Big Sur installed. Deleted Norton 360 AntiVirus, having read that Mac doesn’t really need any extra protection, and now I am having no more connection problems.
Haven’t had any issues with Wifi before Big Sur.
None of the above fixes weren’t helpful.
Also the performance after Big Sur slowed down significantly.
Great update!
Thank you for this!
I installed Big Sur and have fixed one issue, only to have so many more issues.
Constant problems with applications giving me the beach ball of death and never recovering. I have rebooted more from the time I upgraded about a week ago, more so then using Windows and the way it updates, with constant reboots.
Rebooting on its own is a new thing. Come back from lunch and my iMac 2019 40GB machine has crashed and rebooted.
I would not advise anyone to upgrade to Big Sur, yet.
I have a 2020macbook pro, and wifi frequently disconnected after upgrading to big sur. it couldn’t reconnect, and I had to restart the whole system to make it connect to my network.
The only step that worked listed above was to completely reset my router, and give it a new name/login credentials.
After I did that, I didn’t experience disconnects.
(I doubt that it was the routers fault, as all the other devices in the house connected just fine when the MacBook dropped the connection.)
This WIFI problem has been an issue with every OSX/macOS release.
Step 4 seems to have done the trick for me. Thanks!!
The easiest way to get the wi-fi working is to use the Mojave-Big Sur hybrid wi-fi driver.
https://github.com/barrykn/big-sur-micropatcher
the patcher can be found here, and detailed installation instructions are at the bottom of the page.
That’s for unsupported Macs however, not something you’d want to apply to a Mac that officially supports Big Sure
It works well on both supported and unsupported macs
I upgraded to Big Sur on my 2019 Mac mini from Catalina. It seemed to upgrade just fine, but I just did not like Big Sur and went back to Catalina. I was looking forward to moving past Catalina, but Big Sur isn’t it.
how do I revert my mac back to Catalina? I’m a novice when it comes to macs.
I have an older Mac (2012) that supposedly Big Sur was not suppose to run in. There are multiple sites that get around this limitation. I successfully installed EXCEPT WiFi won’t connect when I try to enable it. any ideas? I found one site that said the driver might need an upgrade but I have no idea where to get “it” or how to update it.
Thanks