How to Install macOS Big Sur in VirtualBox on Windows
Are you interested in running macOS Big Sur or Monterey from a Windows PC? If you don’t want to spend money on a Mac, you can use a virtual machine and still try out macOS, thanks to VirtualBox.
Before you start making assumptions, this is not a super-complicated Hackintosh setup. Instead, you will be running VirtualBox natively on your Windows computer and installing macOS as a guest operating system within VirtualBox. Unlike a Hackintosh, you don’t need any special hardware to get macOS up and running on your computer. With VirtualBox, you can install multiple operating systems on a single computer and seamlessly switch between them as you desire. The operating systems basically run within an application, which virtualizes the hardware, and the OS itself doesn’t know the difference.
If you’re interested in running macOS Big Sur or macOS Monterey in Windows using VirtualBox, then read along.
Requirements for Running macOS in VirtualBox
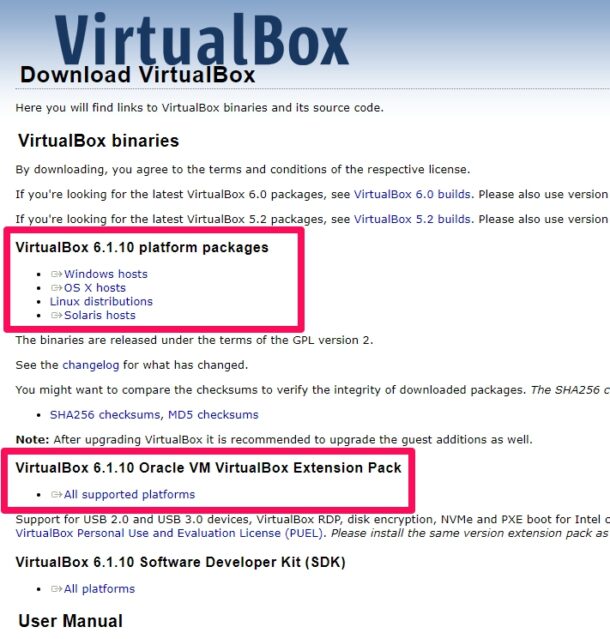
This is going to be a pretty long procedure, but we’ll make it as simple as possible. However, before you get started, you’ll need to download VirtualBox and some additional essential files. The following links should be helpful to download the files necessary to get macOS Big Sur up and running on your VirtualBox virtual machine without any issues. However, you’ll need to obtain the ISO file for the latest version of macOS Big Sur by yourself. You can also use a different macOS version, provided you have an ISO of that release too.
- Download VirtualBox for Windows
- Download VirtualBox Extension Pack
- VirtualBox Code
- macOS Screen Resolution Code for VirtualBox
Performance will depend on how fast the computer is that is running VirtualBox, so obviously the better the PC the better that macOS will run virtualized on it.
How to Install macOS Big Sur Using VirtualBox on Windows
Now that you have all the necessary files downloaded to your computer, you’re ready to go ahead with the procedure. This tutorial is detailed for educational purposes only.
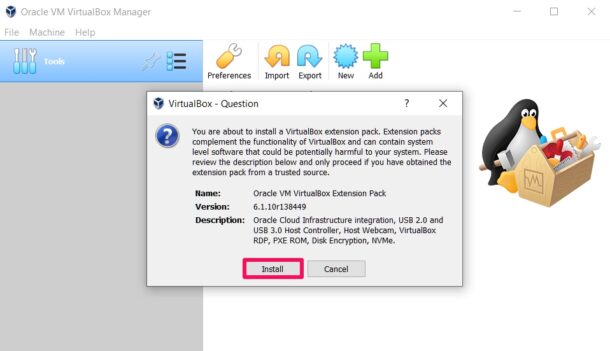
- Install the VirtualBox software on your computer. After that, click on the VirtualBox Extension Pack file that you downloaded.

- Clicking on the extension pack will open VirtualBox on Windows with a pop-up prompting you about the installation. Click on “Install” to finish this step.
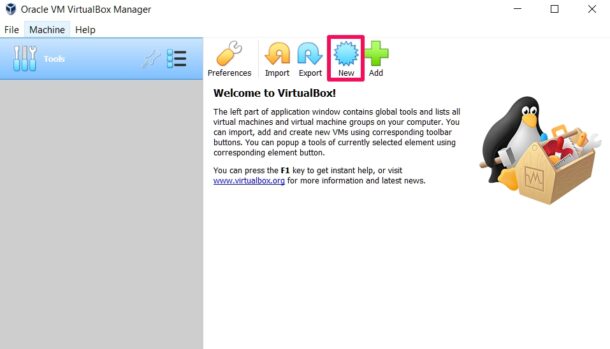
- You’ve successfully installed the extension pack. Now, you’re ready to create your virtual machine. Click on “New” in the VirtualBox software.
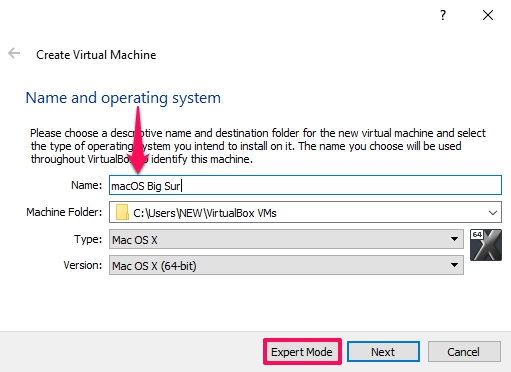
- Here, give a valid name for your virtual machine. For example, “macOS Big Sur” as shown below. Make sure the type is set to Mac OS X and the 64-bit version is selected. Once you’re done, click on “Expert mode” to proceed to the next step.
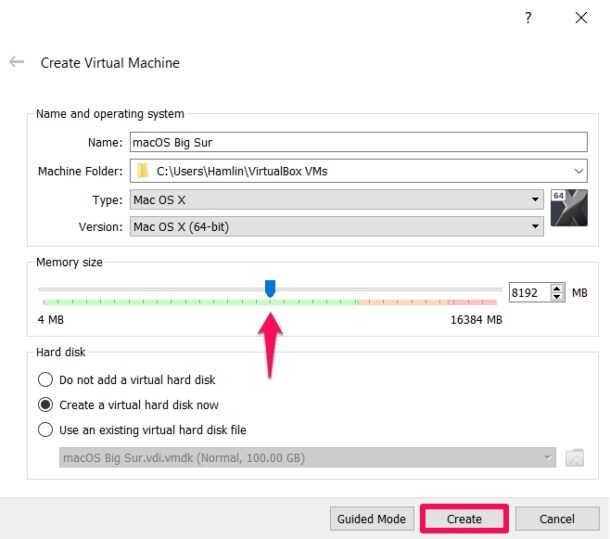
- In this step, you’ll be selecting the memory size or RAM that will be allocated for your virtual machine. It’s recommended to set half of your total system RAM for the guest OS. Make sure, “Create a virtual hard disk now” is selected and then click on “Create”.
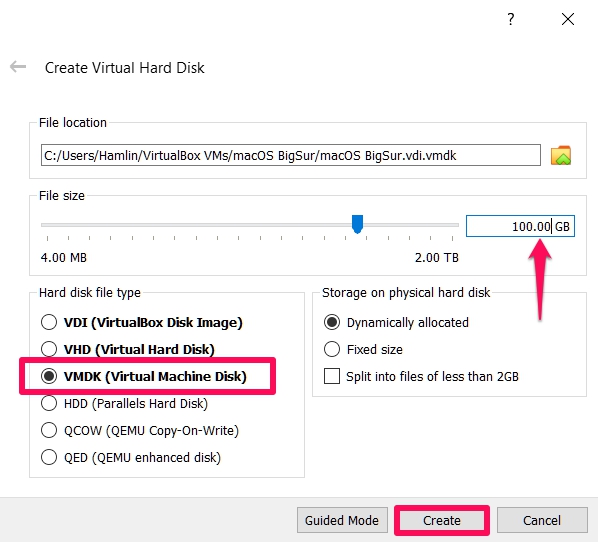
- Now, use the slider to set the virtual hard disk size according to your preference. Although this depends on how much free storage space you have on your computer, we recommend you to allocate 100 GB for the virtual machine. Select “VMDK (Virtual Machine Disk)” for the hard disk file type and click on “Create”.
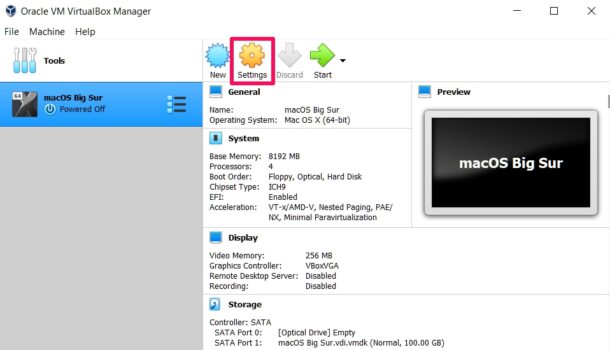
- Now, click on “Settings” in VirtualBox as shown in the screenshot below.
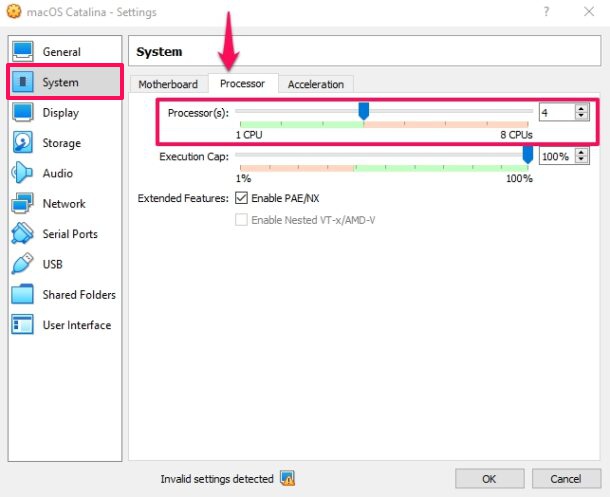
- Head over to the “System” category and click on “Processor” from the top menu. You’ll be able to use the slider to adjust processor allocation. It’s recommended to allocate half of your processor’s core count for the virtual machine. Keep in mind that if you have a 4 core/8 thread processor, it will show up in VirtualBox as 8 CPU cores. In that case, you can set 4 cores for processor allocation.
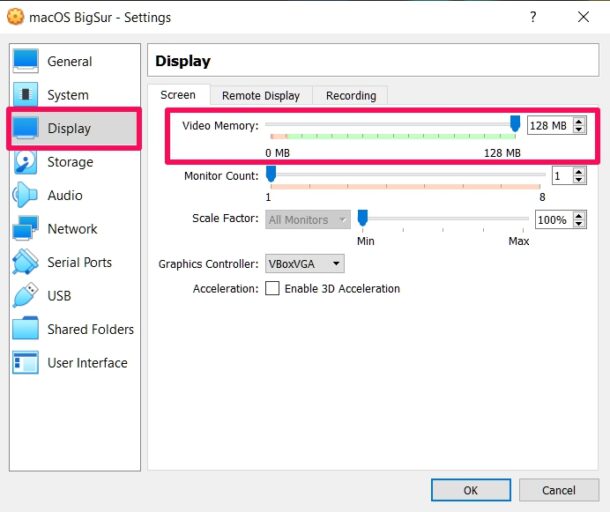
- Next, click on “Display” from the left pane and move the slider all the way to the right for “Video Memory”.
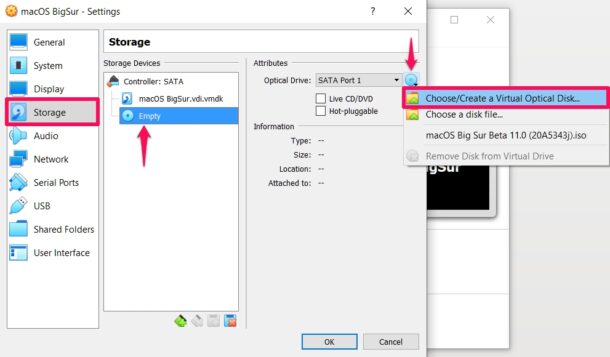
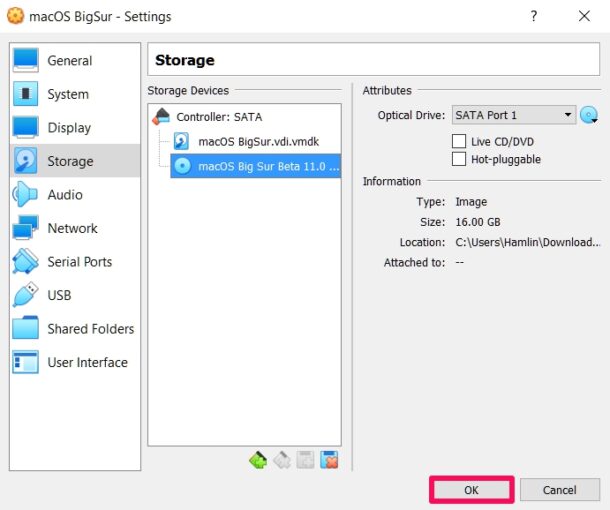
- Now, go to the “Storage” category and click on “Empty” under Storage Devices. Then, click on the optical disk icon on the right and choose “Create a Virtual Optical Disk” from the dropdown menu.
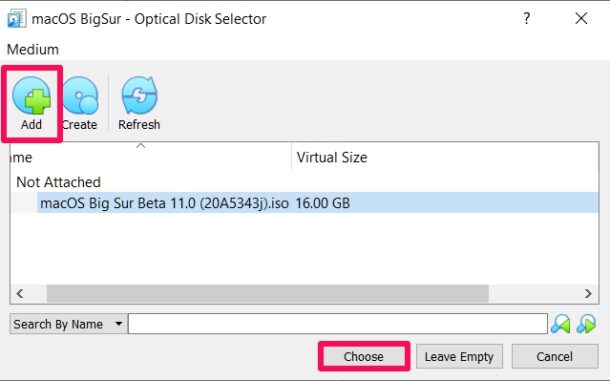
- You can click on “Add” to browse for the macOS Big Sur ISO file that you download using File Explorer. Select the ISO file and click on “Choose”.
- Now, click on “OK” to exit VirtualBox settings and close the VirtualBox application as well.
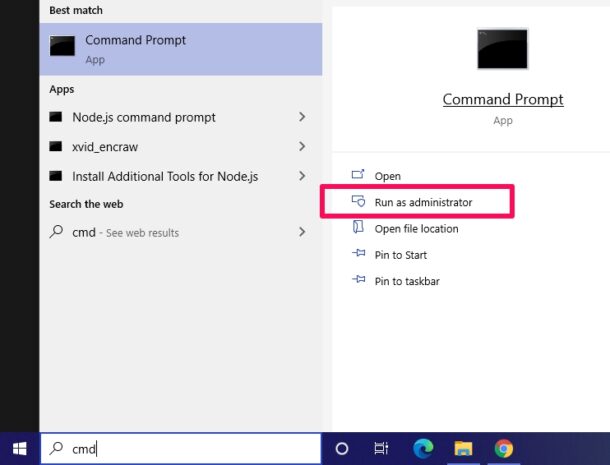
- Open “Command Prompt” on your PC. Be sure to run Command Prompt as an administrator.
- Now, open the VBox Code text file in Notepad. Copy/Paste the first command line in Command Prompt and hit “Enter”.
- Next, you’ll need to paste the remaining lines, but before that, you will need to replace “Your Virtual Machine Name” with the name you used while setting up your machine in VirtualBox. For example, it’s “macOS Big Sur” in this instance. After replacing it, copy/paste all the remaining lines in Command Prompt and hit “Enter”.
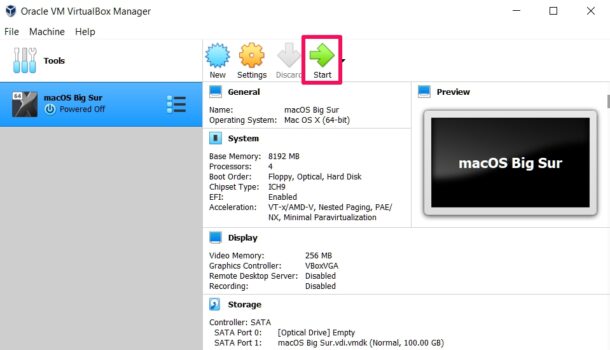
- Now, open VirtualBox again and click on “Start”. Wait a couple of minutes for VirtualBox to perform the operation. You should be able to see the macOS installation progress in VirtualBox now. This is going to take several minutes to complete, but once it’s done, you can follow the on-screen instructions to set up your Mac, which is similar to setting up any new Apple device.
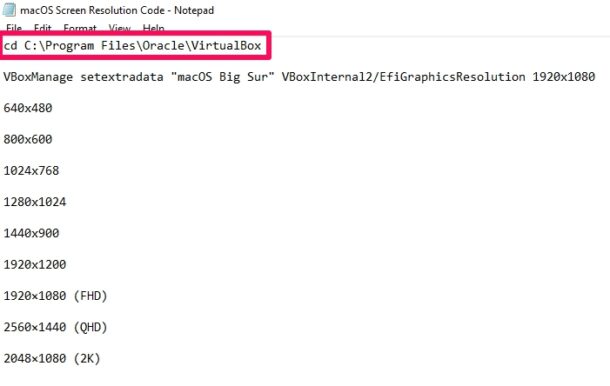
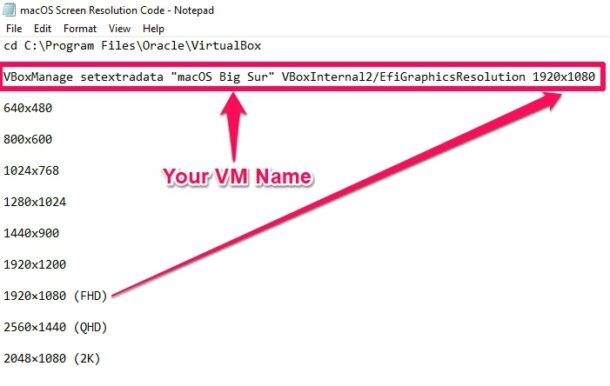
- Although you got macOS up and running on your computer, we’re not quite finished yet. The default resolution of macOS or any guest OS that you install on VirtualBox is 1024×768, which is probably not what you want. However, this can be changed using the macOS screen resolution code. Close VirtualBox, run Command Prompt as an administrator, and copy/paste the first line from the screen resolution code file. Click “Enter”.
- Now, make sure you use your VM name and replace the resolution value in the second line of code according to your monitor resolution or personal preference. Then, copy/paste this line in Command Prompt. Hit “Enter” and exit CMD.


The next time you start your virtual machine, VirtualBox will load up macOS, and at a higher screen resolution.
Here’s a reality check. Don’t expect your macOS virtual machine to operate anywhere nearly as fast as an actual Mac, or Windows natively running on a computer. A sluggish experience is to be expected. The performance of the virtual machine will also be heavily dependent on your system hardware.
That being said, installing macOS on a Windows computer virtually is so much easier with software like VirtualBox and could come a long way in helping you decide if you want to switch to a Mac. You can connect your iOS devices to your Virtual Mac just like a real Mac, try out various software, apps, and a lot more.
This procedure primarily focuses on macOS Big Sur, but it works the same with other recent releases of macOS too, provided you have the ISO file for that particular version. If you want to update the macOS installed in your virtual machine to the latest software, you can update the system software just like you normally would on an actual Mac.
Likewise, VirtualBox can also be used to virtually install and run Windows on a Mac. The process is fairly similar if you have the required files, mainly the Windows ISO and VirtualBox.
Did you get macOS running in VirtualBox on Windows? What are your thoughts on this process and how it all works? Let us know your experiences and thoughts in the comments.

Thank you!
:)
Hey ! I need help !
My machine is starting, but it stop at this point :
** In Memory Panic Stackshot Succeeded ** Bytes Traced 4470 (Uncompressed 10544) **
Attempting system restart…
MACH Reboot
PLS HELP , I AM ALSO GETTING THIS ISSUE
I worked my through the “easy” setup and is trying with Ventura – I get stucked where it wants to find a mouse/trackpad and nothing I do will trick it into knowing there is a mouse installed – any tricks? I have added my mouse and keyboard :(
I encountered this also. You need to enable USB 3.0 xHCI Controller for this guest virtual machine.
Hi, I am using Virtualbox 6.1.34
When I start the VM I get a dos screen looking like that:
UEFI Interactive Shell v2.2
EDK II
UEFI v2.70 (GEDK II, 0x00010000)
Mapping table
BLK0: Alias(s):
PciRoot (0x0)/Pci(0x1F, 0x2)/Sata(0x0, 0xFFFF,0x0)
BLK1: Alias(s):
PciRoot (0x0)/Pci(0x1F, 0x2)/Sata(0x1, 0xFFFF,0x0)
Press ESC in 1 seconds to skip startup.nsh or any other key to continue.
Shell>
—
I would appreciate any help.
Just type in exit, then down arrow twice to the boot options and choose the Virtual CD drive or something like that. I am not looking at the screen right now.
For those who get stuck in a installation boot loop:
– Stop the VM
– Decrease the number of processors to 2
– Start the VM and finish the installation process.
– Try to get back your VM processors to 4 (or more).
this appears to have resolved my problems to at least get the installation going. thank you!
I followed this tutorial and get almost all errors mentioned in the comments. It was also the comments that helped me to solve and now I am installing the macOS 13 Ventura, thank you all.
Now, I am in the installation process. It starts, the progress bar goes for 15 ou 20 minutes then it restarts.
It happened for about 5 or 6 times and it seems the installation process is in infinite loop.
Should I wait?
Does anyone experienced this problem?
same problem
I got a E_FAIL becuse virtualbox failed to query SMC value from the host but I put in the commands to enable smc from the VirtualBox code.txt what do I do
Same issue
Where is the VBOX CODE file??????
https://techrechard.com/wp-content/uploads/2020/12/VirtualBox-Code-by-Techrechard.txt
idk but heres one i found online
Code for Virtualbox 5.x.x or higher:
cd "C:\Program Files\Oracle\VirtualBox\"VBoxManage.exe modifyvm "Virtual Machine Name" --cpuidset 00000001 000106e5 00100800 0098e3fd bfebfbff
VBoxManage setextradata "Virtual Machine Name" "VBoxInternal/Devices/efi/0/Config/DmiSystemProduct" "iMac11,3"
VBoxManage setextradata "Virtual Machine Name" "VBoxInternal/Devices/efi/0/Config/DmiSystemVersion" "1.0"
VBoxManage setextradata "Virtual Machine Name" "VBoxInternal/Devices/efi/0/Config/DmiBoardProduct" "Iloveapple"
VBoxManage setextradata "Virtual Machine Name" "VBoxInternal/Devices/smc/0/Config/DeviceKey" "ourhardworkbythesewordsguardedpleasedontsteal(c)AppleComputerInc"
VBoxManage setextradata "Virtual Machine Name" "VBoxInternal/Devices/smc/0/Config/GetKeyFromRealSMC" 1
Code for Virtualbox 4.x.x:
cd "C:\Program Files\Oracle\VirtualBox\"VBoxManage.exe modifyvm "Virtual Machine Name" --cpuidset 00000001 000306a9 04100800 7fbae3ff bfebfbff
VBoxManage setextradata "Virtual Machine Name" "VBoxInternal/Devices/efi/0/Config/DmiSystemProduct" "MacBookPro11,3"
VBoxManage setextradata "Virtual Machine Name" "VBoxInternal/Devices/efi/0/Config/DmiSystemVersion" "1.0"
VBoxManage setextradata "Virtual Machine Name" "VBoxInternal/Devices/efi/0/Config/DmiBoardProduct" "Iloveapple"
VBoxManage setextradata "Virtual Machine Name" "VBoxInternal/Devices/smc/0/Config/DeviceKey" "ourhardworkbythesewordsguardedpleasedontsteal(c)AppleComputerInc"
VBoxManage setextradata "Virtual Machine Name" "VBoxInternal/Devices/smc/0/Config/GetKeyFromRealSMC" 1
I was wondering if there are any newer –cpuidset values for MacBook Pro and iMac Pro systems. The ones seen in these posts and other Websites are getting a bit old. I am able to get the newer MacOSs (Big Sur, Monterey) to install, but I am unable to login to my Apple ID. I get the message ICLOUD_UNSUPPORTED_DEVICE.
Is is possible that using an updated –cpuidset or other parameters could fix this error? I’m using GenSMBIOS (found on other websites) to generate the Serial numbers and other DMI* values.
O
I came across this site while wondering what Apple has to offer those attempting this.
https://developer.apple.com/documentation/virtualization/installing_macos_on_a_virtual_machine
Looks like the answers are tucked away inside Unix calls?
As well as this necessary tidbit –
Important
Loading a restore image requires the app to have the –
com.apple.security.virtualization
entitlement.
Down the page there are some seeming useful code dealing with the necessary objects.
Anyone want to assist in decrypting this?
Want it working?
Try this:
https://pastebin.com/nmnnTidL
Use the RAW Code field.
The Blog here adds qoutation marks and sluggy spacings.
many, many, many thanks…….
I have VirtualBox 6.2.32 on Windows 11 (AMD Ryzon 5950)
I have succesfully installed VB-ExtensionPack 6.1.32
When I start the VM I get a dos screen looking like that:
UEFI Interactive Shell v2.2
EDK II
UEFI v2.70 (GEDK II, 0x00010000)
Mapping table
BLK0: Alias(s):
PciRoot (0x0)/Pci(0x1F, 0x2)/Sata(0x0, 0xFFFF,0x0)
BLK1: Alias(s):
PciRoot (0x0)/Pci(0x1F, 0x2)/Sata(0x1, 0xFFFF,0x0)
Press ESC in 1 seconds to skip startup.nsh or any other key to continue.
Shell>
—
I would appreciate any help.
IM ALSO STUCK ON THIS ISSUE, PLEASE HELP IF YOU FIND A SOLUTION
In the general settings of the virtual machine change it to mac 64 bit
im on 64 bit and its still broken sadly
Failed to open a session for the virtual machine macOS.
Failed to construct device ‘usb-ehci’ instance #0 (VERR_PDM_DEVHLP_VERSION_MISMATCH).
Result Code: E_FAIL (0x80004005)
Component: ConsoleWrap
Interface: IConsole {872da645-4a9b-1727-bee2-5585105b9eed}
Install the virtual box extension pack
https://www.virtualbox.org/wiki/Downloads
Very helpful, thank you
It was quite tedious and I’ve done Virtual Box installs before. Had to research why there was no disk to select to install the OS. Also had to rewrite the commands to include a .\ at the beginning and figure out that the quotes should be left off. Everything else was fairly seamless.
Did you run DiskUtility and erase the disk (format)? That is what I had to do just want to confirm (-:
Same problem, Disk to install Mac OS not showing, I entered Diskutility, erase and format disk, then I could start Mac OS installation.
Try with two dashes before cpu-profile, e.g.
VBoxManage modifyvm “CHANGEME_NAMEOFVM” -–cpu-profile “Intel Xeon X5482 3.20GHz”
I followed the instructions but got:
Failed to query SMC value from the host
(VERR_INVALID_HANDLE)
Result Code:
E_FAIL (0x80004005)
Component:
ConsoleWrap
Interface:
IConsole {872da645-4a9b-1727-bee2-5585105b9eed}
any idea on what I did wrong?
take a look at
https://www.wintips.org/fix-virtualbox-error-call-to-whvsetuppartition-failed-error_success/
once I removed the Virtual Machine Platform package that got added likely in some update that microsoft pushed out, all my MacOS vm’s started to work perfectly.
Run this and work fine
VBoxManage.exe setextradata “Your macOS VM Name Here!!!” “VBoxInternal/Devices/smc/0/Config/GetKeyFromRealSMC” 0
for windows: install hyper-V in the windows features, restart
then in the cmd run as administrator and use your own virtual machine name instead Mac Mojave for the code below, try option one if it still doesnt work try option 2
//option1
cd “C:\Program Files\Oracle\VirtualBox\”
VBoxManage.exe modifyvm “Mac Mojave” –cpuidset 00000001 000106e5 00100800 0098e3fd bfebfbff
VBoxManage setextradata “Mac Mojave” “VBoxInternal/Devices/efi/0/Config/DmiSystemProduct” “iMac19,1”
VBoxManage setextradata “Mac Mojave” “VBoxInternal/Devices/efi/0/Config/DmiSystemVersion” “1.0”
VBoxManage setextradata “Mac Mojave” “VBoxInternal/Devices/efi/0/Config/DmiBoardProduct” “Mac-2BD1B31983FE1663”
VBoxManage setextradata “Mac Mojave” “VBoxInternal/Devices/smc/0/Config/DeviceKey” “ourhardworkbythesewordsguardedpleasedontsteal(c)AppleComputerInc”
VBoxManage setextradata “Mac Mojave” “VBoxInternal/Devices/smc/0/Config/GetKeyFromRealSMC” 0
//option2
cd “C:\Program Files\Oracle\VirtualBox\”
VBoxManage.exe modifyvm “Mac Mojave” –cpuidset 00000001 000106e5 00100800 0098e3fd bfebfbff
VBoxManage modifyvm “Mac Mojave” –cpu-profile “Intel Xeon X5482 3.20GHz”
VBoxManage setextradata “Mac Mojave” “VBoxInternal/Devices/efi/0/Config/DmiSystemProduct” “iMac19,1”
VBoxManage setextradata “Mac Mojave” “VBoxInternal/Devices/efi/0/Config/DmiSystemVersion” “1.0”
VBoxManage setextradata “Mac Mojave” “VBoxInternal/Devices/efi/0/Config/DmiBoardProduct” “Mac-2BD1B31983FE1663”
VBoxManage setextradata “Mac Mojave” “VBoxInternal/Devices/smc/0/Config/DeviceKey” “ourhardworkbythesewordsguardedpleasedontsteal(c)AppleComputerInc”
VBoxManage setextradata “Mac Mojave” “VBoxInternal/Devices/smc/0/Config/GetKeyFromRealSMC” 0
install hyper V restart
than try one of the below options
put your own virtual box name
in the cmd (run as admin)
//option1
cd “C:\Program Files\Oracle\VirtualBox\”
VBoxManage.exe modifyvm “Mac Mojave” –cpuidset 00000001 000106e5 00100800 0098e3fd bfebfbff
VBoxManage setextradata “Mac Mojave” “VBoxInternal/Devices/efi/0/Config/DmiSystemProduct” “iMac19,1”
VBoxManage setextradata “Mac Mojave” “VBoxInternal/Devices/efi/0/Config/DmiSystemVersion” “1.0”
VBoxManage setextradata “Mac Mojave” “VBoxInternal/Devices/efi/0/Config/DmiBoardProduct” “Mac-2BD1B31983FE1663”
VBoxManage setextradata “Mac Mojave” “VBoxInternal/Devices/smc/0/Config/DeviceKey” “ourhardworkbythesewordsguardedpleasedontsteal(c)AppleComputerInc”
VBoxManage setextradata “Mac Mojave” “VBoxInternal/Devices/smc/0/Config/GetKeyFromRealSMC” 0
//option2
cd “C:\Program Files\Oracle\VirtualBox\”
VBoxManage.exe modifyvm “Mac Mojave” –cpuidset 00000001 000106e5 00100800 0098e3fd bfebfbff
VBoxManage modifyvm “Mac Mojave” –cpu-profile “Intel Xeon X5482 3.20GHz”
VBoxManage setextradata “Mac Mojave” “VBoxInternal/Devices/efi/0/Config/DmiSystemProduct” “iMac19,1”
VBoxManage setextradata “Mac Mojave” “VBoxInternal/Devices/efi/0/Config/DmiSystemVersion” “1.0”
VBoxManage setextradata “Mac Mojave” “VBoxInternal/Devices/efi/0/Config/DmiBoardProduct” “Mac-2BD1B31983FE1663”
VBoxManage setextradata “Mac Mojave” “VBoxInternal/Devices/smc/0/Config/DeviceKey” “ourhardworkbythesewordsguardedpleasedontsteal(c)AppleComputerInc”
VBoxManage setextradata “Mac Mojave” “VBoxInternal/Devices/smc/0/Config/GetKeyFromRealSMC” 0
I did the way you said (changed that var from 1 to 0) but
at the start of the VM i keeps stuck on a text screen forever…
Same here im just stuck in the text screen for ever. Do u know how to fix it?
Same here im just stuck in the text screen for ever. Do u know how to fix it?c
I think I found a fix if you’re using Windows 11 Host
1. Close the Vmachine and Vbox
2. Open CMD as administrator
3. enter this command: bcdedit /set hypervisorlaunchtype off
4. restart your PC
Apparently the Hyper-V on windows 11 latest version slows down VBOX drastically making everything seem like it’s taking forever to load
That fix solve for me too
thanks for shared
Changing the 1 to 0 worked for me.
Hi,
I followed the procedure, and I use the latest VirtualBox release (with the latest Extension Pack). On the first boot, I get this error (before seeing any Mac OS installation screen).:
NEM failed to map page(s) into the VM. (VERR_NEM_MAP_PAGES_FAILED).
Fehlercode:
E_FAIL (0x80004005)
Komponente:
ConsoleWrap
Interface:
IConsole {872da645-4a9b-1727-bee2-5585105b9eed}
Hi,
I followed the procedure, and I use the latest VirtualBox release (with the latest Extension Pack). On the first boot, I get this error (before seeing any Mac OS installation screen).:
Failed to open a session for the virtual machine MacOSX.
Failed to query SMC value from the host (VERR_INVALID_HANDLE).
Result Code: E_FAIL (0x80004005)
Component: ConsoleWrap
Interface: IConsole {872da645-4a9b-1727-bee2-5585105b9eed}
I gave the VM 16 GB RAM (I have 32 on my system), 8 CPU Cores.
My system:
3.60 gigahertz AMD Ryzen 7 3700X 8-Core
512 kilobyte primary memory cache
4096 kilobyte secondary memory cache
32768 kilobyte tertiary memory cache
64-bit ready
Multi-core (8 total)
Hyper-threaded (16 total)
Board: ASUSTeK COMPUTER INC. GA15DH 1.0
Bus Clock: 100 megahertz
UEFI: American Megatrends Inc. GA15DH.300 12/04/2019
32702 Megabytes Usable Installed Memory
Any idea?
Thank you very much!
Same for me and i haven’t found the solution yet
Did you fix it?
Also having this issue! :*(
The same with me..
Same problem
Failed to open a session for the virtual machine macOS Big Sur.
Failed to query SMC value from the host (VERR_INVALID_HANDLE).
Result Code: E_FAIL (0x80004005)
Component: ConsoleWrap
Interface: IConsole {872da645-4a9b-1727-bee2-5585105b9eed}
Be it with Hyper-V enabled or disabled. I’m starting to think it’s a hardware limitation
I got this error after the update to VirtualBox 6.1.32. Nothing on the internet solved my problem so I uninstalled VB and installed 6.1.10 and everything worked :) Hope that helps.
You need to change from 1 to 0 for this command line:
VBoxManage.exe setextradata “Your macOS VM Name Here!!!” “VBoxInternal/Devices/smc/0/Config/GetKeyFromRealSMC” 0
Value 1 will cause the SMC error message, so change it to 0.
You are right, worked like a charm, thanks.
……..
VBoxManage setextradata “vbname” “VBoxInternal/Devices/efi/0/Config/DmiBoardProduct” “Mac-2BD1B31983FE1663”
VBoxManage setextradata “vbname” “VBoxInternal/Devices/smc/0/Config/GetKeyFromRealSMC” 0
Thank you so much bro,
i was looking for solution long time ago
broooo you are amzing thank you very much ❤️❤️❤️❤️
I did the way you said (changed that var from 1 to 0) but
at the start of the VM i keeps stuck on a text screen forever…
Hey, same. Did you ever figure it out?
Did you find any solution?
Same issue. Did you resolve?
My OS is Windows 11. CPU is Tiger Lake.
Did not help me:
VBoxManage setextradata “vbname” “VBoxInternal/Devices/smc/0/Config/GetKeyFromRealSMC” 0
Steps that helped me:
1. Install vbox 6.1.10
2. Go to Windows Security -> Device security -> Core isolation details. Disable Memory integrity.
3. Open command line as admin and run command: bcdedit /set hypervisorlaunchtype off
4. Restart PC
5. MacOs should run successfully
6. Update VirtualBox to the latest version 6.1.32
Thank you, It worked with me.
bro the only response that worked. the memory integrity was the f***ing solution
Holyyyy crap. Finally! You are amazing my friend
It works Perfectly fine
hi, where can i change this settings?
got al set up, but now stuck on this error
regard
Eric
Thanks, it worked for me.
thank you <3
Worked like a charm
Thank you, it’s works :D :D :D
Confirming this worked.
funcionó a la perfección el detalle de cambiar el 1 por el 0 en la linea que dijiste, gracias!!
Than you!! you’re a life saver!
Genio!!! Funcionó a la perfección!! Yo venía de windows 8,1 y reinstalé todo en windows 10, busqué mucho el el tema del windows 10 pero nada funcionaba.
La imagen ya la tenía funcionando en windows 8.1 con VM versión 6.1.16
Y con esto pude hacerla funcionar en windows 10 con VM 6.1.32.
Muchas gracias por el aporte!
Thank you
same for me, no solution so far
If you have windows 11 and this problem:
run CMD as Admin
type: “bcdedit /set hypervisorlaunchtype off”
restart
and try again. so it was fixed on my
I’ve got it all set up and running, however it only works with 1 cpu which makes it very slow. I have seen others with this issue but havnt found a resolution yet
Anyone have any ideas on how to solve this one?
If you only have a dual core processor, that means you only have one physical processor, and thus can only select one cpu in the processor settings in virtual box. I have 12 cores, and therefore only have 6 physical processors, which means I’m limited to 6 in virtual box. This is normal.
it worked i installed it with this guide
after updating the new extension 🤣😍😂
yeah, before the new extension it didn’t work
Error downloading update when installing on formatted disk. What’s the problem? Workaround?
Stuck at [EB|#LOG:EXITBS:START]
Cpu: AMD A8 7600
Same here. Stuck at #[EBILOG:EXITBS:START]
Also stuck at #[EBILOG:EXITBS:START]
Same here. AMD Ryzen 5
You need to make sure you have
VBoxManage modifyvm “Mac OS X Big Sur” –cpu-profile “Intel Xeon X5482 3.20GHz”
on AMD processors.
I had same issue until I added this.
It doesn’t work for me. I get “VBoxManage.exe: error: Unknown option: -cpu-profile”.
Try with two dashes before cpu-profile, e.g.
VBoxManage modifyvm “CHANGEME_NAMEOFVM” -–cpu-profile “Intel Xeon X5482 3.20GHz”
Thanks for the tip
This is it. This is the answer.
10/10 Best post
I do not get a disk to install Big Sur on when starting the VM up after running the settings. No disks are displayed to install it on. Any suggestions
Same issue here but after a while remember that is necessary to give format to the virtual drive.
Instead of go to install BigSur, select Disk Utility on the first screen, select you virtual hard drive and click on “erase” to give it format as AFPS, the format admitted to install BigSur.
Thanks for all the small helps – finally worked for Ryzen 5 3600 with this: (check the output of your cmd file in Powershell Admin – there should be no error – I had trouble with quotation marks of different kinds)
cd “C:\Program Files\Oracle\VirtualBox\”
VBoxManage.exe modifyvm “Your VM Name” –cpuidset 00000001 000106e5 00100800 0098e3fd bfebfbff
VBoxManage modifyvm “Your VM Name” –cpu-profile “Intel Xeon X5482 3.20GHz”
VBoxManage setextradata “Your VM Name” “VBoxInternal/Devices/efi/0/Config/DmiSystemProduct” “iMac19,1”
VBoxManage setextradata “Your VM Name” “VBoxInternal/Devices/efi/0/Config/DmiSystemVersion” “1.0”
VBoxManage setextradata “Your VM Name” “VBoxInternal/Devices/efi/0/Config/DmiBoardProduct” “Mac-2BD1B31983FE1663”
VBoxManage setextradata “Your VM Name” “VBoxInternal/Devices/smc/0/Config/DeviceKey” “ourhardworkbythesewordsguardedpleasedontsteal(c)AppleComputerInc”
VBoxManage setextradata “Your VM Name” “VBoxInternal/Devices/smc/0/Config/GetKeyFromRealSMC” 0
Does it have video acceleration like normal guest os’es? If it does, good performance is to be expected. But if it doesn’t, can you do anything with the vm?
In the past, Apple did not allow MacOS to run on any hardware but their own. This included running in VMs. This was explictly stated in the license agreement.
Has Apple changed their stance on this?
Last attempts in Q1 2021 as soon as you logged in with your Apple ID, it would blow up the install rendering it unusable. I have built install of BigSur 10.16 working on VMWare workstation, haven’t and won’t put creds in for Apple ID. Due to this it virtualizing Mac OS is extremely limited in capability and benefit for the outcome. Would be nice if this changed.
The only box ‘Big Sur’ needs to be in is a pine one, buried under 6 feet of reinforced, high tensile concrete.
Being a Mac user from Day 1, ‘Big Sur’ is positively the worst upgrade from Apple I have ever experienced in terms of the flow-on effects and complications it has created on my system.
And I even waited until 11.4, usually by which all the major issues would have been sorted. ‘Big Sur’ would be unremarkable if it came out of Redmond, but it comes out of Cupertino, and Mac users frankly expect better.
I’ve become so disillusioned that I’m now calling it, ‘Big Suc’.
I actually think Big Sur is OK compared to say Catalina, but Mojave is the best modern release out there. El Capitan and Mavericks were pretty good too. Still nothing is as fast or clean as Snow Leopard. I have a 12 year old Mac running Snow Leopard still and it feels much faster than my M1 Mac, obviously because the M1 with macOS Big Shhhh is bogged down by so many silly things that we don’t need or want. I wish we could turn it all off for a Pro Mode and make it fast and lean again.
Anyway I would not expect good performance in virtualization. Hopefully the M1 Mac gains Boot Camp with Windows ARM soon.
I have not tried Parallels yet myself.
We fail to mention that without graphics acceleration the experience will be abysmal. A virtual machine is also not “natively” running. Native would be installing a true Hackintosh.