How to Remove Phone Number for iMessage & FaceTime on iPhone & iPad
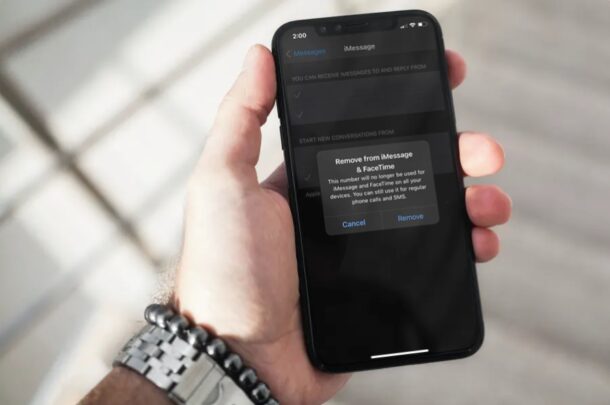
Want to remove a phone number used by iMessage or FaceTime on iPhone or iPad? If you use iMessage and FaceTime, you might be interested in updating or removing the phone number you used with your account at some point – perhaps you had a second line you are no longer using, or maybe you no longer use a particular phone number for example. So let’s go over the process of updating and removing phone numbers used by iMessage and FaceTime in iOS and ipadOS.
Most of us are already aware of how popular Apple’s FaceTime and iMessage services are among Apple users, as they offer a free and convenient way to communicate with other iPhone, iPad, and Mac owners. If you’re using an iPhone, your phone number is used to activate iMessage and FaceTime by default. However, you can use your Apple ID for these services as well, and once you set this up, you can remove your phone number without worrying about deactivation.
How to Remove / Update Phone Number used by iMessage & FaceTime on iPhone & iPad
Updating or removing your phone number for iMessage and FaceTime is a pretty simple and straightforward procedure on iOS/iPadOS devices. Just follow the steps below to get started.
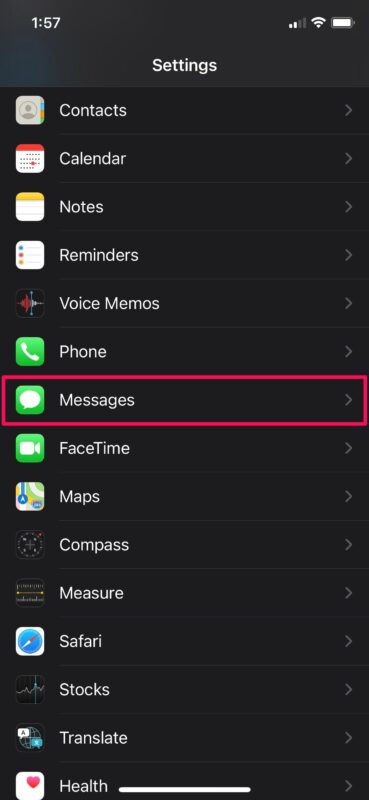
- Head over to “Settings” from the home screen of your iPhone or iPad.

- In the settings menu, scroll down and tap on “Messages” to change the settings for iMessage.

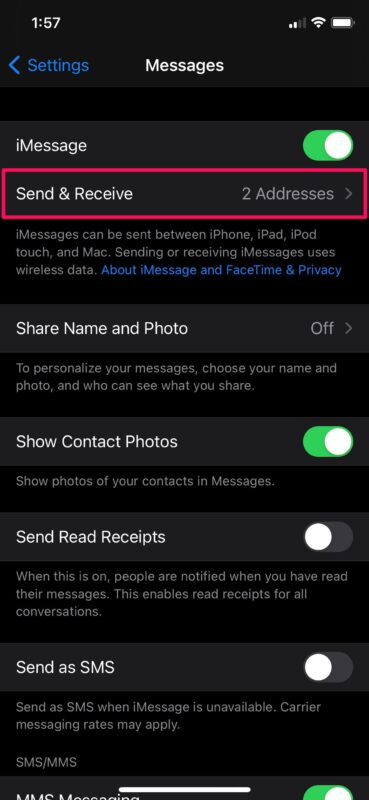
- Here, tap on “Send & Receive” as shown in the screenshot below to proceed to the next step.

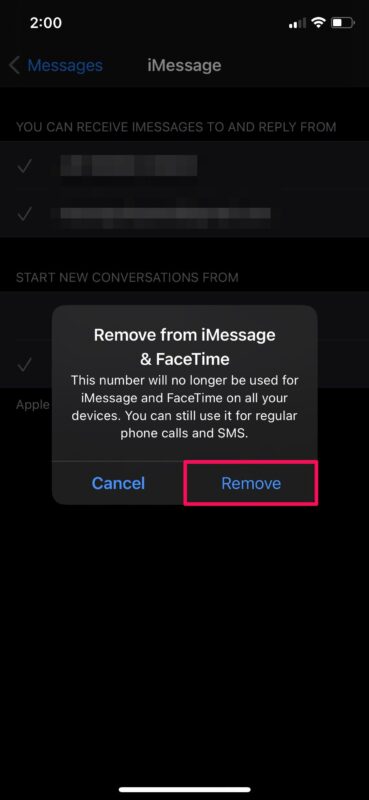
- To remove an activated phone number, tap on the phone number under “You can receive iMessages to and reply from” as shown below.

- Next, choose “Remove” to stop using the phone number for both iMessage and FaceTime.

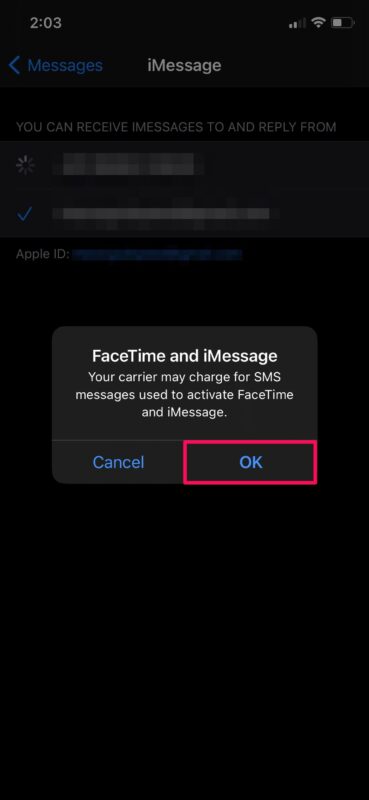
- Now, if you want to reactivate your phone number at any point, head over to the same menu and tap on the phone number to proceed.

- You’ll be informed regarding carrier activation charges. Tap on “OK” to confirm.

It could take a minute or two for the activation process to complete, so be patient.
Keep in mind that if you do this without setting up an iMessage email address, you won’t be able to use iMessage or FaceTime unless you activate your phone number again. By doing this, you can keep texting other iMessage users and make video calls over FaceTime without having to reveal your actual phone number.
Apart from being able to remove your phone number for iMessage and FaceTime, you can also use a completely different email address specifically for iMessage. That’s right, you don’t necessarily have to use the Apple ID that’s linked to your iPhone or iPad. This is a feature privacy buffs would really appreciate.
That being said, there is a downside to using a different email address with iMessage. Since you’re not using the linked Apple ID for these services, you won’t be able to sync your iMessage conversations across all your Apple devices with iCloud. However, nothing’s stopping you from switching to a different Apple ID / iCloud account for use with your iOS or iPadOS devices.
Did you remove or change the phone number that’s used by iMessage and FaceTime on your iOS/iPadOS device? What’s your reason for not using a phone number with iMessage and FaceTime, or did you update it for another reason? Share your thoughts and experiences in the comments.

