How to Format USB Drive on Mac
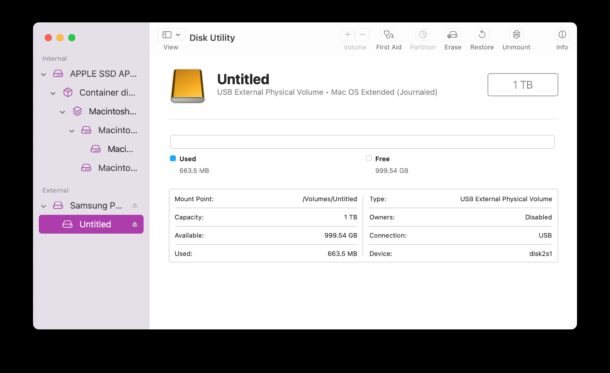
Many of us rely on external USB drives and storage devices, whether hard drives or flash drives, to transfer large files and to serve as backups for things like Time Machine. Typically when you buy a new hard drive or USB drive, even if for a Mac, it comes pre-formatted in a Windows friendly format like exFAT or FAT32, rather than Mac file system like HFS+. This isn’t a problem however, as you can easily format a USB drive to be fully Mac compatible.
The process to erase and format a a USB drive is the same regardless of whether the drive is a USB hard drive, USB flash drive, SSD, key, thumbdrive, or otherwise, and it’s also the same regardless of whether or not the drive is USB-C or USB-A.
It’s important to remember that formatting a drive will erase all data on the drive, so you will not want to do this if you have data on the drive that you wish to preserve.
How to Format an External USB Drive on Mac
Formatting will erase everything on the drive to make it natively compatible with MacOS.
- Connect the USB drive to the Mac
- Open Disk Utility on the Mac from /Applications/Utilities/ or with Spotlight
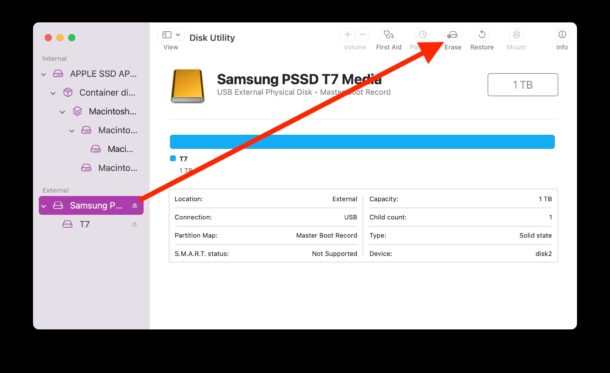
- Select the USB drive you want to format from the left sidebar
- Click the “Erase” button in the toolbar
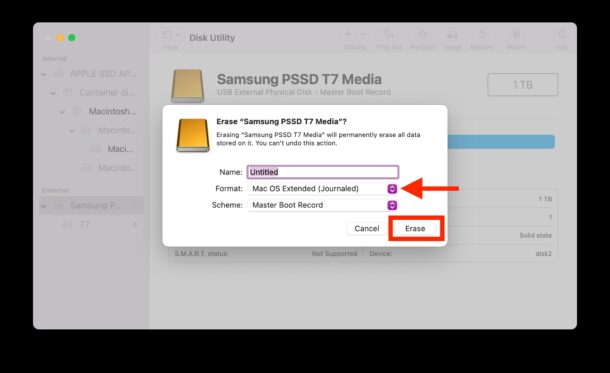
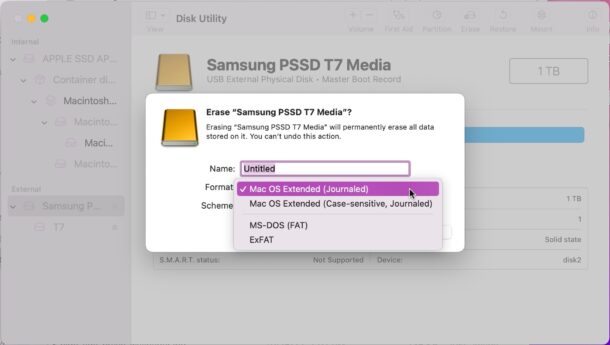
- Give the drive a name if you’d like to, like ‘backup’ or whatever, and if you want native Mac compatibility then choose “MacOS Extended (Journaled)” as the file system type, then click on “Erase” *
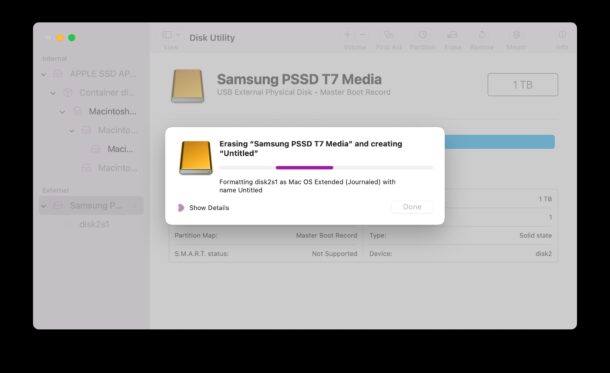
- Let Disk Utility erase the drive, depending on the type of disk this may either be very quick or take some time, but be patient until it finishes
- When finished, click “Done” and put the drive to use as intended
![]()
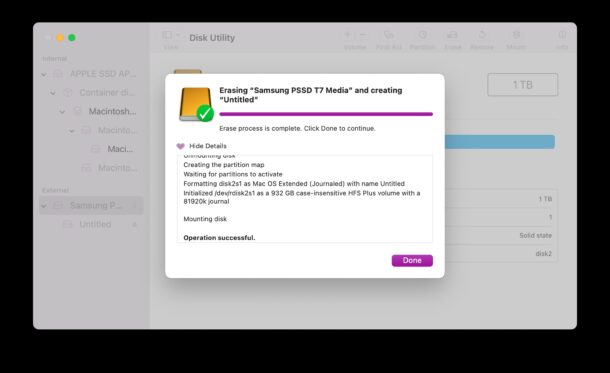
Now you’re ready to use the formatted USB drive on your Mac for whatever purpose, whether that’s to use as a Time Machine backup drive, a destination for manual file backup, extra storage space, run an operating system directly from, or whatever else you’d like to do.
* You may have noticed you can also choose other file system types when formatting a USB drive on the Mac, but for most Mac users they’ll want to stick with Mac OS Extended. You can also pick FAT and exFAT formats, however, if you want the drive to be compatible with Windows as well as MacOS.
Formatting any USB drive for the Mac is the same regardless of whether it’s a USB flash drive, USB external SSD drive, USB key, a traditional spinning USB HDD drive, or whatever other external drive or disk you have. This process is basically the same in all versions of MacOS too, so regardless of what system software the Mac is running you will find these instructions are applicable.
Did you successfully format a USB drive to work with a Mac? Did you run into any issues? Let us know your experiences, share your thoughts, or ask whatever questions you may have in the comments below.


When I received this OSXDaily email, I thought that it contained the information that I needed to finally get my iMac’s Time Machine program straightened out. But nothing seems to work.
I’ve always used G-Drives as my USB device for my Time Machine program and, if I needed to retrieve backup info from any of my apps (Safari, Mail, etc.) those drives always worked.
However, several years ago, I managed to screw up the G-Drive that I was using. I accidently clicked open the Desk Top G-Drive image and moved some of its contents to the Finder’s Trash container. After I did that, every time that the G-Drive did a backup, it also automatically dumped some of its contents to the Finder’s Trash container. When I couldn’t find a way to correct the problem, I ditched the G-Drive, and went and purchased a new G-Drive.
But the new G-Drive has never functioned as it should with Time Machine. When I click on “Enter Time Machine” the only page that shows is the Desktop. It does not show Safari, Mail, or any of the other apps on my Mac. From looking at the information in this OSXDaily email, I believe that I probably did not format the replacement G-Drive so that it would work properly with a Mac.
I’m using an iMac (Retina 4K, 21.5 inch, 2017) and am still running on macOS Monterey Version 12.6.3. When I tried following the instructions in this email for formatting my current G-Drive, I thought that making sure that this replacement G-Drive was formatted for Macs by ensuring that the replacement Format was “Mac OS Extended (Journaled),” I selected the Mac OS Extended (Journaled) option and then erased the existing data on my G-Drive, but so far, nothing has changed with the G-Drive. Opening it still only gives me the Desktop view image. I still can’t access any of my apps (Safari, etc.).
I thought that maybe I should pick up a new G-Drive and ensure that it is programmed correctly from the beginning for use with Macs, but I would like to know if there is anyway to recycle my existing G-Drive. Anyone have suggestions?
All the best,
Bob
This is quite helpful in my day job as a public librarian; my employer has one iMac and 15 PCs and sometimes we have to be aware of format incompatibilities when it comes to USB drives. This article included, your site was instrumental in helping me diagnose an issue with a patron’s drive.
I am very surprised that the screen captures are of such poor quality. They are not clear and sharp like I am able to get off of my 2 year old iMac.
Does formatting on all newer macs to “MacOS Extended (Journaled)” allow the drive to be used on old G4 macs running only OS 9.2? My network includes those old macs having old data that sometimes needs to be accessed. Sometimes it seems formatting to “MacOS Extended (Journaled)” needs to be done on a G4 to be used both on the G4 running OS 9.2 and also on the newer macs like the MacBook Pro mid-2015 running OS 10.14.6 Mojave that I’m using to type this. Formatting on the newer mac isn’t readable by the old G4.
What would be even more helpful is a guide on how to format USB drives with specific block sizes, for use with some devices that are require smaller than the standard default allocation block sizes for compatibility (such as 3D printers).
Unfortunately, GUI formatting apps like DU don’t permit the user to manually override and select a different block size, so Terminal commands have to be employed.
Formatting the drive the way that you state does not fully erase the date, you should have made this clear and mentioned about secure formatting not a simple bottom level format which can easily be recovered by third party recovery software.
I do think that you should clarify this as you are giving the wrong impression hereabout deleting data.
“””It’s important to remember that formatting a drive will erase all data on the drive, so you will not want to do this if you have data on the drive that you wish to preserve.”””
Thank you
Neil
seriously?
article like this might me wonder if are written by ChatGPT
/Users/bob/Desktop/Disconnect.png
I frequently get this disconnect notice. I thought the Sandisk might be failing so replaced it with a new one properly formatted. I thought Time Machine might be the cause, So I set it to Manual. Still disconnected randomly. Apparently the drive reconnects immediately. I never miss a backup and Time Machine never indicates a problem.