If you missed the livestream of the iPad Mini Event today, Apple has placed the full video online for anyone to watch. There is much more to the keynote than just the iPad Mini, as Apple unleashed a barrage of new products and updates, including an all new beautiful iMac, new Retina 13″ MacBook Pro, and a refresh to the Mac Mini lineup and even launched iPad 4.
The hotly anticipated iPad mini has been released. It’s a thing of beauty, available in both black and white models, and just like the iPhone 5, the rear enclosure is also offered in black anodized or standard aluminum. The features are quite nice too:
iPad Mini Specs
7.9″ display
1024×768 resolution at 162PPI
A5 dual core CPU
5MP iSight camera
Black and white models available, much like iPhone 5
0.68lbs, light as a pad of paper
7.2mm thin, as thin as as pencil
10 hour battery
Pre-orders start October 26, and will be shipping on November 2nd. The base model starts at $329 and goes up from there, here is the pricing matrix:
iPad Mini Pricing
16GB – $329
32GB – $429
64GB – $529
LTE models cost an additional $130 each.
If you’re looking for a retina display you’ll want to stick with the bigger brother of the mini, the new iPad 4, which was just updated with a super-fast A6X CPU.
An all new iPad was released today, officially labeled as the 4th generation iPad. It’s basically a beefed up iPad 3 with an all new CPU, but it’s otherwise much the same, with the same aluminum enclosure, same great 10″ retina display, and available in both black and white with the standard 16Gb, 32GB, and 64GB configurations. Both Wi-Fi and LTE models are available of course, and there is faster networking with both. The major differences from the prior generation are really the following:
A6X CPU, 2x as fast as A5X
FaceTime HD camera
Wider LTE range
Pricing continues to start at $499 for the base 16GB model, LTE adds $130 to each model as usual.
In an event that unleashed a ton of new stuff, including the iPad mini, all new iMacs, all new retina 13″ MacBook Pro, and refreshed Mac minis, the 4th gen iPad was perhaps the least expected item and only real surprise for those who closely follow rumors.
An all new Retina version of the MacBook Pro 13″ has been released. Starting at $1699, it’s available beginning today, October 23, and it’s quite a powerhouse in a surprisingly lightweight package. Here are the base model specs:
Base Specs
13.3″ Retina IPS display at 2560×1600 resolution
2.5GHz Core i5 CPU or greater
8GB RAM, upgradeable to 16GB via build-to-order
128GB or larger SSD
Intel HD 4000 GPU
7 hour battery life
Unibody aluminum enclosure
HDMI, SD Card reader, USB 3.0 ports
FaceTime HD camera
Backlit keyboard
3.5lbs
0.75″ thin, 20% thinner than prior model
Of course there will be build-to-order options, and other variations will be available in the following configurations.
Retina MacBook Pro 13″ Models & Pricing
Base: 2.5GHz Core i5, 8GB RAM, 128GB SSD – $1699
Mid: 2.5GHz Core i5, 8GB RAM, 256GB SSD
Upper: 2.9GHz Core i7, 8GB RAM, 512GB SSD
The original non-retina MacBook Pro 13″ still remains in Apple’s lineup, though it’s clear that the thinner, lighter, more powerful retina versions are the future of the MacBook Pro. If you’re in the market for a new Mac and can afford the difference in pricing, get the retina model.
An all new iMac has been released. It’s beautiful, has a ridiculously 80% thinner design, and it’s a whopper with specs. The 21″ model starts shipping in November, the 27″ arrives in December. Here are some of the details:
Do Not Disturb is one of the best features that came with modern versions of iOS, particularly for iPhone users. If you haven’t heard of it, basically it lets you put your iPhone (or iPad or iPod touch) into Do Not Disturb mode, which effectively mutes the device for all incoming calls, messages, and alerts, giving you peace and quiet while it’s on.
Here’s how to use Do Not Disturb at it’s most basic level, but also and even better, to use the excellent iOS Do Not Disturb feature with time scheduling and contact exceptions.
As some of you undoubtedly noticed, OS X Mountain Lion removed the Displays menu bar item, which let you quickly change screen resolutions from a pull down menu available system wide in OS X. If you miss that function, you’ll be pleased to discover a freely available app is on the Mac App Store to provide the same feature again. Called Display Menu, it offers the ability to switch display resolutions on any screen connected to the Mac, including the built-in display. It also improves on the old Apple provided menu item by telling you what the aspect ratio is for each resolution, and by allowing you to quickly toggle Mirror Displays on and off.
Generally speaking, you’ll want to always keep your Mac screen at the optimal native resolution, but many designers, video producers, visually impaired individuals, and even parents of young kids, often find changing screen resolution an essential task. This app makes it quick and easy again like the good old days.
Why did Apple remove this feature from OS X 10.8? Who knows, it could be related to upcoming retina displays, but maybe it’s gone for the same reason the battery time indicator was removed, or for the same reason they erroneously removed Save As to only re-include it again later. For those wondering, the Displays menu bar item actually still ships in Mountain Lion tucked within /System/Library/CoreServices/Menu Extras/ but it just doesn’t stay open, quickly crashing upon launch.
A recently discovered video of Steve Jobs at the early days of NeXT is making the rounds, it’s a great video and provides an interesting portrait of Jobs in 1987 as he was in between leading Apple. Whether you’re a fan of Jobs, interested in Apple history, or just a student of Jobs legendary thinking, the 20 minute clip embedded below is well worth watching.
The most simple screen saver in Mac OS X is just a floating grey Apple logo against a black background, but you can make that screen saver significantly better by attaching a customized message to it, which will be added along with the logo and move about the screen of the Mac.
You can add any message you want to the screen saver this way, we’ll offer a few great ideas below, like putting some identifying information, or perhaps a note, but first let’s cover how to set the custom message in the Mac screen saver.
One fun but easily overlooked feature of iOS are Emoji icons, and iOS 6 has added a ton of new incredibly detailed and often hilarious Emoji into the mix. To access the extra Emoji characters, you’ll need the Emoji keyboard enabled first if you haven’t done so yet. Once it’s on, you’ll be able to access the little emoticon graphics by tapping the globe on the virtual keys of an iPhone, iPad, or iPod touch, where it’ll be accessible as an international keyboard. Here’s the basic process if you haven’t done this yet:
Enable the Emoji keyboard by opening Settings > General > Keyboard > Add New Keyboard > Emoji
Open any app with text entry abilities, tap on the little globe icon next to the spacebar to access the Emoji keyboard
Tap the various section icons at the bottom of the Emoji screen to access different types, and flip through different screens of Emoji with a left or right swipe gesture
The little pictures can make for hilarious additions to conversations, though the newest Emoji will only be viewable by other people who have upgraded to iOS 6 as well. They can also be used to communicate entirely on their own, and of course, they’re just plain fun, so enable the Emoji keyboard and enjoy.
Emoji has long been popular in Asia and is starting to gain more popularity in the United States and Europe, probably partially because of the iPhone’s support of the feature. Outside of bringing another dimension into conversations and comments, the icons can be added into folder names to customize the appearance of them, and Mac users can also access Emoji from OS X 10.7 and later.
Dragging files into the Mail Dock icon is a quick way to send out email attachments, but if you’re faster with the keyboard, try setting up a keyboard shortcut to perform the same task instead. This makes any selected file(s) from the Finder just a speedy keystroke away from being sent off in an email: Read more »
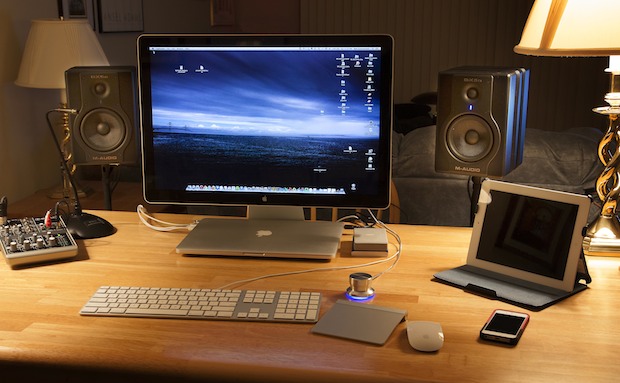
This weeks Mac setup comes to us from Chris C., an iOS and web app developer. Whether he’s writing code or designing a user interface, there’s plenty of great hardware in this beefy setup to get the job done:
Macbook Pro with 15″ Retina Display – Core i7 2.6GHz,16GB RAM, 512GB SSD, GT650M 1GB
Having three displays is pretty amazing, and there’s obviously no shortage of disk space with a whopping 5.5TB of storage available. Not bad!
Do you have an interesting Mac setup you want featured here? Send a good picture or two, a list of hardware, and include a brief description of what the workstation is used for to osxdailycom@gmail.com
A new update labeled Java for OS X 2012-006 has been released for all versions of Mac OS X. The updates name is somewhat misleading however, in that instead of updating Java it actually uninstalls the Java applet plugin from all web browsers on the Mac. This is done as a security precaution to protect against potential malware, which has consistently used Java exploits as a means of attack. With Java removed from the browser (but not the OS), it forces Mac users to download the absolute newest version of Java directly from Oracle if the plugin is needed.
Installing the update removes will cause a “Missing Plugin” alert to appear if you visit a webpage that requires Java. In turn, that will direct you to Oracle to download the newest version of Java.
If you don’t find the update available on your Mac, it means you either uninstalled Java already, or you never installed it to begin with. Ignoring or hiding the update is also possible, though the security benefits of going through with it are strong.
For those that install the update but need Java to access certain websites, download the newest version of Java and then disable it on a per-browser basis, or even system-wide when it’s not needed.
Want to share a grocery list with someone? Maybe you have an important to-do list that you need to give a co-worker, or to anyone else with an iOS device or Mac?
You can now share any such list right from the Reminders app in Mac OS X, or you can even share the lists right from iCloud.com. The shared Reminders will be viewable on the recipients Mac, but perhaps more importantly, on their iOS device, and even location-based Reminders can be shared this way.
Following up about Screen Sharing in Mac OS X, which lets you remote control a Mac from another Mac, you can also remotely access and control Macs from an iPhone, iPad, or iPod touch using VNC.
There is minimal work involved to get this working, and if you already set up Screen Sharing you’re halfway there. A variety of paid solutions offer the same abilities described here, but we’ll show you how to do this completely for free and have it working in just a minute or two.
For anyone who uses the command line regularly, a new tool called pkill makes killing processes significantly easier in modern releases of Mac OS and Mac OS X. Improving on the standard kill command, pkill easily supports wildcards, making it easy to terminate all processes belonging to a match or even a specific user.
iOS now lets you upload images directly from Safari using standard web-based upload forms. Not only can you upload directly from the Photos library and Camera Roll now, but you can also upload an image directly from the camera after taking a picture.
There’s nothing fancy that you’ll need to do, just tap any normal upload button from Safari and you’ll see the pop-up image selector shown in the screenshot, whether you’re on an iPhone, iPad, or iPod touch.
This is obviously a great feature for anyone who shares pictures around the web through any of the many web-based image services, and also a nice change for bloggers, whether they’re professionals or just your moms simple blogspot. Prior to this, there wasn’t a way to do this outside of moving the photos to a computer and then uploading them that way, or using a native app that supported uploading directly to the given service.
Podcasts are great for entertainment and learning, but let’s face it, the new iOS Podcasts app is not so great for many users. Unless you’re running the app on an iPhone 5, it’s slow and frustrating to use on just about every other device, making it a major step backwards for iOS 6 users from listening to podcasts from the Music app. But there’s some good news, you can listen to your favorite podcasts from the Music app instead through two different methods.
Listen to Podcasts from Music App with Siri
Siri comes to the rescue now that it can launch apps, and this is much easier than the above sync method. You will need to have podcasts already downloaded to use this approach, and you’ll want to try it out yourself with a few different shows before committing to this method completely:
Summon Siri and say “play podcast (podcast name)”
The podcast starts playing immediately by way of Music app, where it can be found as “Now Playing”
This works great for many shows, but it has some issues with certain podcasts names. For example, Neil DeGrasse Tysons popular “Star Talk Radio” is often interpreted by Siri as “SH*T TALK” for some reason and won’t launch unless you annunciate the entire shows name. A bit odd, but that’s the way it goes.
Siri is the easier approach, but if your iPhone doesn’t run Siri then the Playlists method below is great too.
Listen to Podcasts from Music App via Playlists
If you don’t mind syncing podcasts over from iTunes the old fashioned way, you can listen to podcasts directly from the Music app again, even in iOS 6. Here’s the complete process to do so:
Tap and hold on “Podcasts” until it jiggles, then tap (X) to delete it
Double-tap Home button to bring up the task bar, then find “Music” and tap and hold on it, tapping (X) to quit the app
Connect the iPhone, iPad, or iPod to iTunes and create a new playlist for podcasts, then sync podcasts the old fashioned way by adding them to that playlist
Relaunch Music app from iOS, find your podcasts playlist, and enjoy
The obvious problem with this approach is the lack of streaming, and the need to preplan your listening habits, not to mention the unspeakable act of stepping back into the technological stone age and actually connecting a cable between your iOS device and computer. Nonetheless, it can be a much better alternative than fumbling around in the clunky and slow Podcasts app, especially for anyone using an iPhone 3GS, iPhone 4, or iPod touch 4th gen.