Searching the file system for a specific document or file is easy and very fast. Though most users are best served using Spotlight from the menubar, there are times when either Spotlight isn’t working, you need more paramaters, you’re working in the Terminal, operating with a remote machine, or perhaps just would like to use an alternative search function.
You’re in luck, we’ll show you how to find files and folders directly from the command line using two different tricks. The first method is operating system agnostic, meaning you’ll be able to use the search function with Mac OS X, Linux, BSD, and many other unix variations, whereas the second trick for searching utilizes a Mac-only model of finding files from the command line. Let’s read on and learn how to use these great abilities.
Though we have long been able to add automatically dialed extensions to contacts on the iPhone, the newest versions of iOS handle extensions much more intelligently, allowing you to create a “Dial Extension” button to any specific contact. That extension dialer can be activated manually, making the navigation of telephony menus infinitely easier.
Mac OS X has a myriad of multi-touch gestures that have been expanded upon in modern versions of Mac OS X, and one of the better gestures is the two-fingered swipe left or right to go either back or forward in a wide variety of apps.
This gesture is borrowed from the iOS world and it’s quite useful as a back / forward quick action.
This great multi-Mac setup belongs to Terry R., a Vice President at a leading cybersecurity firm. You’ll find a wide variety of gear and software in use, with three different Macs and a handful of iOS devices, all of which provide an interesting look into how Apple hardware is used at the executive level. Hardware shown includes:
MacBook Pro 13 (2012) – 2.9GHz Intel Core i7, 16GB RAM, 750GB hard drive, OS X 10.8.2, MS Office for MAC
Apple Thunderbolt Display 27” display
Apple Magic Mouse
Apple Wireless Keyboard
Henge Dock
This first Mac is used primarily for standard day to day activities, including document development, emails, business development, proposals and program execution. Next up you’ll find a MacBook Pro:
MacBook Pro 15 (2011) – 2.2GHz Intel Core i7, 16GB RAM, 1 TB hard drive, OS X 10.8.2
MS Office for MAC, Adobe Acrobat CS6, VMWare Fusion, Windows 7, Office 2010, Project, Vision, and Mathlab
Apple Magic Mouse
Apple Wireless Keyboard
Griffin Elevator stand
The MacBook Pro is used for emails, video, photographic, and mathematical processing for engineering, system designs, and business development, proposals, business management. Finally on the Mac front, there’s a MacBook Air, which is used for a variety of day to day activities, document development, emails, business development, proposals, and naturally also serves as the primary traveling computer.
You’ll find a handful of other Apple gear throughout the setup as well, including:
iPhone 4
iPad (2?) with Apple Wireless Keyboard
Apple TV 2 connected to an Asus 23″ LCD
Apple Time Capsule 3TB (out of view) used by all MacBooks for real time backup
Here’s another angle of the desk arrangement:
How’s that for a great Mac setup?
Do you have an interesting Mac setup you want featured? Send a good picture or two, a list of hardware, with a brief description of what the workstation is used for to osxdailycom@gmail.com
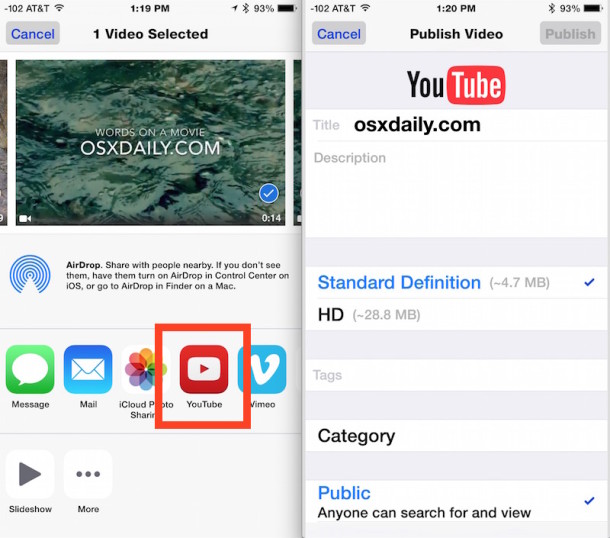
You can easily upload a video directly to YouTube right from your iPhone, iPod touch, or iPad. This feature has actually been around for a long time, but as YouTube gets more and more popular, it’ll certainly get more useful to have direct uploads like this.
The process of uploading movies from iOS directly to YouTube is very simple:
Everyone loves good looking wallpapers, and here are a few great space wallpapers being posted by request of our readers after seeing one shown in a recent tip screenshot.
The images are originally from the press page of a very interesting documentary on Chile’s Atacama Desert titled Nostalgia for the Light, they aren’t intended to be wallpapers but the images are high resolution and look fantastic as a background picture on iPads, iPhones, Macs, or whatever else you’re decorating – even the Surface!
Click the images below to grab the full size version hosted on POV’s Flickr page:
The volume level of Siri can be independently adjusted from the rest of the system volume of an iPhone or iPad, allowing you to directly control how loud Siri is without impacting other system audio. Though the feature is not immediately obvious, it is really easy to use: Read more »
For those of us who have a bunch of apps contained within iOS folders, it’s fairly easy to misplace apps that aren’t used often. To quickly find out what folder contains an app, just swipe to the right of the iOS home screen to bring up Spotlight search, then type the name of the app into Spotlight. Alongside the app name you will conveniently find the name of the folder which holds the app.
While you’re in Spotlight search results, you’ll find that tapping on the app name launches it directly from Spotlight as well, just like in OS X. Chances are if you can’t find an app because it’s buried in a folder, this will be the quickest way to get to it.
You’ll need at least iOS 6 to be able to find the folders holding apps.
Conan O’Brien has has long been a Mac fan, but that doesn’t stop the Conan Show from ripping on everyones favorite fruit company in a reliably hilarious manner. The latest offers a revised look at the iPad Mini commercial which aired during the unveiling event, and adds some new lyrics to Heart and Soul being played in Garageband… no spoilers, just watch the video embedded below for a good laugh:
If you’ve already made up your mind about buying an iPad Mini and you want one sooner than later, you’ll probably want to pre-order it tonight (October 26) at midnight* Pacific Standard Time. Grabbing a pre-order insures that you’ll get the device on it’s official release date of November 2nd and won’t have to wait in any lines or wait for production to catch up to demand, assuming the iPad Mini sells out of course.
Pre-ordering can be done two ways, either through the web at store.apple.com or with the official Apple Store iOS app. We prefer the Apple Store iOS app because historically it has performed much better under initial pre-order sales rushes, while sometimes the Apple Store website remains down, and a lot of iPhone 5 pre-orderers missed their initial delivery window as a result. The same thing happened with the iPad 3 launch earlier in the year too.
Take the time now to fill in and save your billing and shipping information, before the rushes to order flood in
Set a reminder/alarm for 11:50 PM PST, fire up the App Store app around 11:58, find your iPad Mini at midnight, and checkout ASAP
Good luck, and enjoy your iPad Mini when it arrives a week later!
* Note: Apple hasn’t (yet) confirmed the midnight pre-order start time, this is everyones best guess based on recent Apple preorders which began at midnight on the day of. It’s always possible pre-orders won’t begin until the morning of October 26 too… we’ll update when we can confirm.
Apple has started to run a new TV commercial for the new Retina 13″ MacBook Pro titled “Colors”, embedded below. The ad follows the same theme set by the original Retina 15″ MacBook Pro commercial aired earlier in the year, and says the following:
Introducing the new thirteen inch MacBook Pro, with the stunning Retina display. For the pro, in all of us.
This is the second commercial Apple has released after the iPad Mini event, the first focused on the new iPad Mini’s optional Smart Cover.
Now that the iPad Mini has been added to Apple’s tablet lineup, you’re probably wondering which model you should buy. If you’re impatient and don’t want to read the justification, we’ll go ahead and suggest you should get the base model iPad Mini 16GB and probably in white. If you want more opinion as to why that model is generally the best, read on.
Color: Black or White?
Choosing the device color is probably the toughest decision. White devices are a pleasure to read on because the onscreen text seems to flow out of the borders, but black devices tend to emphasize whats on screen better and are better for watching video. Both devices look beautiful so some of this will be a matter of opinion, but due to the more scuff-prone nature of the black anodized iPhone 5, we’re going to assume the black anodized iPad Mini will be equally sensitive, making the white models appearance more durable. If you’re neurotic about a scratch here and there, get the white model, or get something like a ZAGG Shield.
Verdict: White if you care about scratches being less visible
Storage: Capacity Matters Less Than You Think
Here’s a little secret, I’m considered a power user and I have 10GB available on my 16GB iPad. In fact, with the exception of those who store a lot of movies on their iPads, I don’t know anyone who has used up the 16GB available on a base model iPad. The reasons are fairly simple; with the cloud, streaming services, and normal usage patterns, most users don’t need or use much storage on such devices. iPad is generally used more for media consumption than media storage, and the iPad Mini won’t be any different. Besides, most people use tablets for reading, whether that’s your favorite websites (osxdaily.com right?), saved articles in Pocket or Instapaper, or just tons of iBooks and ebooks, and none of that requires much of any storage capacity.
Verdict: 16GB is plenty
LTE: Don’t Pay for LTE Twice, Use Hotspot Tethering Instead
Question time: in this day and age, when do you not have your phone with you? Just about never, right? Well, your iPhone (or Android) already has 3G or LTE service, and all cell carriers offer Wi-Fi Hotspot tethering service to allow you to connect other devices to the phone and use it as a hotspot. Yes, that means the Wi-Fi only iPad Mini can get on the internet through your iPhone. As a result, there is very little reason to pay for LTE service twice, though there are exceptions to this rule for the data hungry, grandfathered unlimited plans, and some other situations.
Verdict: Skip it, use iPhone Hotspot instead
Resale: Base Models Hold Resale Value Best
If you ever plan on reselling the iPad Mini to upgrade down the road, the base models of iPads, iPhones, and iPods consistently hold the resale value the best. What initially costs $100 more to increase storage or $130 more to get LTE connectivity does not translate into equivalent price differences on the resale market, particularly for older hardware.
Verdict: Spend less now to save more long term
Wait: Do You Even Need an iPad Mini?
Let’s step back a minute, because this whole article assumes you’re in the market for an iPad Mini. Do you actually need one? Well, that probably depends on if you already own an iPad, what you use it for, what you want to use it for, and how many other people use it.
If you have a family who all fight over a single iPad, sure you could probably use an extra iPad and the iPad mini is a great choice.
If you already have an iPad and it only gets used by yourself, you probably don’t need an iPad Mini to go along with it unless the size difference is important.
If you don’t have an iPad at all, the Mini is a very compelling offering, but doesn’t yet offer the Retina display, which means there’s a chance the full sized iPad would be better for you instead (though we still recommend the base model). The retina vs non-retina decision is best made after seeing the screens in person so you can determine if the price and size difference is worth it, but generally speaking it’s hard to go back to a non-retina device after you’ve become accustomed to the ultra high resolution displays.
If you think you need an iPad Mini only because it’s the new shiny gadget, you probably don’t need one. Yet at least.
Finally, if you just bought an iPhone 5 and that excitement is still new, wait a few weeks, enjoy your new iPhone, and circle back on the idea.
The next time you need to quickly find a nearby hotspot with wireless internet access, grab your iPhone (or iPad) and just ask Siri. Try phrasing questions like the following:
“Where are the closest Wi-Fi hotspots” – finds locations with wireless internet nearest to current location
“Where are wi-fi hotspots in City Name, State” – finds wifi in the given city, very helpful for traveling
Siri’s wifi search has a strong preference for coffee shops, which is generally fine since coffee shops tend to be fairly comfortable and accustomed to people plopping down for a while with a laptop.
For those who don’t like working in coffee shops and cafes, you can also ask Siri to find nearby public libraries. Virtually all public libraries have free wi-fi to connect to, and they also tend to be much quieter than an average cafe hotspot. Note that Siri will sometimes find university libraries as well, and those typically require a university login to use making them inaccessible to the public.
“Where is the closest library” or “where is the closest public library” – each will find nearby libraries
This is an excellent trick for anyone who telecommutes, travels, or just needs to get online while out on the road.
Don’t forget that iPhones can also create their own Wi-Fi hotspot on the fly, though most carriers charge extra for the service and it quickly eats into your standard data usage as well if you’re not careful.
You can set unique names for how your Macs computer name appears locally, from file sharing and networking, and even Bonjour services, with the help of the scutil command. This allows you to have a custom hostname for Terminal and SSH, another friendlier name for what’s visible to others on local networks, and yet another name only visible to services like AirDrop. Here’s a brief look at each and how to set them from the command line.
Interested in the iPad Mini? Don’t miss Apple’s official “Introducing iPad Mini” video embedded below, which is nearly 5 minutes long and covers all aspects of the all new smaller iPad model.
Apple also has posted a much shorter 30 second video showing off the iPad Mini with the new smaller smart cover, this may end up a TV commercial but it’s unsure for now:
If you want to watch the official unveiling, don’t forget to watch the iPad Mini Keynote event video too, which also covers the new iMacs, new retina 13″ MacBook Pro, Mac Mini refresh, and the refreshed iPad 4.
If you missed the livestream of the iPad Mini Event today, Apple has placed the full video online for anyone to watch. There is much more to the keynote than just the iPad Mini, as Apple unleashed a barrage of new products and updates, including an all new beautiful iMac, new Retina 13″ MacBook Pro, and a refresh to the Mac Mini lineup and even launched iPad 4.
The hotly anticipated iPad mini has been released. It’s a thing of beauty, available in both black and white models, and just like the iPhone 5, the rear enclosure is also offered in black anodized or standard aluminum. The features are quite nice too:
iPad Mini Specs
7.9″ display
1024×768 resolution at 162PPI
A5 dual core CPU
5MP iSight camera
Black and white models available, much like iPhone 5
0.68lbs, light as a pad of paper
7.2mm thin, as thin as as pencil
10 hour battery
Pre-orders start October 26, and will be shipping on November 2nd. The base model starts at $329 and goes up from there, here is the pricing matrix:
iPad Mini Pricing
16GB – $329
32GB – $429
64GB – $529
LTE models cost an additional $130 each.
If you’re looking for a retina display you’ll want to stick with the bigger brother of the mini, the new iPad 4, which was just updated with a super-fast A6X CPU.
An all new iPad was released today, officially labeled as the 4th generation iPad. It’s basically a beefed up iPad 3 with an all new CPU, but it’s otherwise much the same, with the same aluminum enclosure, same great 10″ retina display, and available in both black and white with the standard 16Gb, 32GB, and 64GB configurations. Both Wi-Fi and LTE models are available of course, and there is faster networking with both. The major differences from the prior generation are really the following:
A6X CPU, 2x as fast as A5X
FaceTime HD camera
Wider LTE range
Pricing continues to start at $499 for the base 16GB model, LTE adds $130 to each model as usual.
In an event that unleashed a ton of new stuff, including the iPad mini, all new iMacs, all new retina 13″ MacBook Pro, and refreshed Mac minis, the 4th gen iPad was perhaps the least expected item and only real surprise for those who closely follow rumors.