Secure Empty Trash in Mac OS X

If you need to delete sensitive information and have it completely inaccessible, you’ll want to use the “Secure Empty Trash” feature. This works by writing random patterns of data over a trashed file immediately after it has been emptied, or removed from the filesystem, such a process which otherwise takes place over time throughout normal computer usage as more files are created and deleted.
There are two easy ways to secure empty the Trash on the Mac. In order for either option to be visible to you, you must have some file or folder within the Trash can, otherwise the option will not be visible since there is nothing to trash.
1: How to Secure Empty Trash Quickly in Mac OS X with a Right-Click
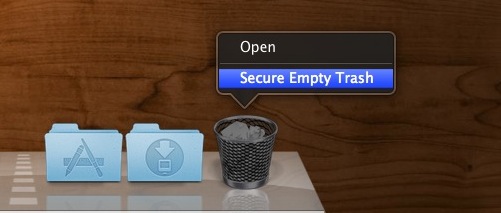
Mac OS X makes it easier than ever to access secure file removal:
- Command+Right Click the Trash can
- Select “Secure Empty Trash

You must hold the “Command” key while right-clicking the Trash icon in the Dock, or else the Secure option will not be visible.
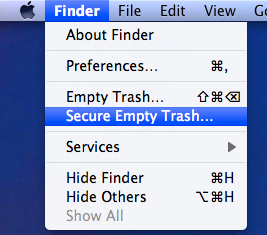
2: How to Secure Empty Trash from the Finder Menu
The “Secure Empty” option is also accessible from the Finder menu, and the resulting behavior is identical in that it overwrites the removed data:
- With anything in the Trash, pull down “Finder” menu and choose “Secure Empty Trash”

Using secure empty will take a bit longer than emptying the Trash as normal, this is because the aforementioned overwriting process is taking place. The more files you are secure deleting, the longer this process will take.
Get in the habit of using Secure Empty Trash anytime you are removing something that is truly sensitive and that you don’t want others to regain access to. Things like financial statements, credit card information, personal files and diaries, or deleting the source files and finished documents from openssl file encryption.
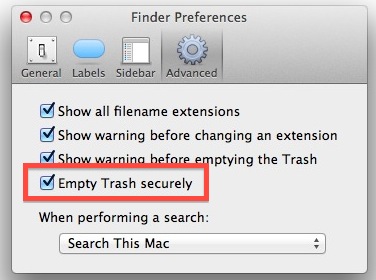
Enable Secure Empty as Default Method of Trashing
For nearly every version of Mac OS X, there is also an option to always securely empty the Trash, enabled within the Advanced Finder preferences. If you regularly work with private data this is a good feature to turn on.

While the Secure Empty Trash feature makes recovering data significantly more difficult even by professional data recovery services, if you want true data removal without any traces, performing a secure format of a hard drive is the safest bet and is always recommended when transferring ownership of a Mac or it’s hard drive.


Empty trash: SECURE EMPTY – – – WILL NOT SHOW!
Here it is 04/2017. Did Apple remove the “Secure Empty” option? I know I USED to use Secure Empty, but hardly ever. Now I had something come into my computer, but I finally removed it to trash. Now I want to “SECURE” empty it but can’t. Why not?
Use the command “srm” in terminal, works in recent versions of OSX :
https://osxdaily.com/2013/06/09/secure-remove-files-directories-from-mac-os-x-with-the-command-line/
srm –help
Usage: srm [OPTION]… [FILE]…
Overwrite and remove (unlink) the files.
Yes correct you can use srm as a secure trash replacement in OS X modern releases:
https://osxdaily.com/2015/10/12/secure-empty-trash-equivalent-mac-os-x/
I would caution against using Secure for “item is in use”. Restart in Safe Boot instead. If you force delete an item in use, it has a small chance if causing file system glitch. Same goes for enabling Finder to always secure empty trash.
“Then why does Apple allow it?”
Because it is a very small chance, and possibly for the same reason they allow (through hidden contextual menu command) to rename a user account folder. It only causes pain and anguish 1 or 2% of the time.
“Secure Empty Trash” does not work on locked files.
This is not a desirable feature especially since locked files can’t be removed (at least in finder) from trash to another folder.
[…] with the command line but who want to retain secure file removal options should consider using a simple method of secure deletion, or by using the “Always Secure Empty Trash” option that is […]
Thanks for sharing this. In addition to Secure Empty, you can also run the Erase Free Space tool in Disk Utility, slider on ‘most secure’. It takes a while, so it’s best run overnight after you’ve emptied huge blocks of files, and you want more than a once-over wipe.
[…] can have “Secure Empty Trash” be the default setting by changing the Advanced Finder preferences, found under the Finder […]
[…] Try quitting all apps to release the file lock or permissions, then attempt to Secure Empty Trash by holding down the Command key and right-clicking the Trash icon. If that doesn’t work, […]
To enable “Secure Empty” you can just right click the Trash and when the menu is displayed and you hit Command “secure” will be added.
Secure empty will empty the trash even if the “item is in use” or whatever it says. Happens to me a lot for some reason.
It should be said, this is not recommended for SSDs with Sandforce controllers or SSD`s with trim enabled.
Gah! Why not? I ran it for prob 30 mins (~15 files) before stopped it. How bad was this?! :(
Great, this is what I want, thanks