How to Make a Bootable OS X Mavericks USB Install Drive
Just like other recent major Mac updates, OS X Mavericks arrives as an app that wants to update the current OS X installation, and with a little work you can make a bootable USB installation drive. This allows you to easily perform partitioning for dual boot situations, clean installs, upgrades on multiple Macs, and more, plus it’s just really convenient to have for troubleshooting and simple future installations, without having to re-download OS X 10.9 every time you want to install it or perform an upgrade.
Update: There is an easier way to create an installer drive using the final version of OS X Mavericks from the Mac App Store. The below method still works, but most users will be better off using this simpler method. Note that some users who have encountered a -9999 error when trying to use the aforementioned easier approach may resolve that issue by using the complex method mentioned below.
But unlike before with creating prior version OS X boot install drives, the process is slightly different with Mavericks and requires an additional set of steps to make the installer actually function as a a bootable installer disk. It’s not too complicated, just a bit more time consuming.
Before beginning, make sure the Mac you want to install Mavericks on meets the system requirements for 10.9. You will need OS X Mavericks (obviously), and an 8GB (or larger) USB drive that you don’t mind formatting, we’re using a USB thumb drive for the purpose of this walkthrough but an external hard drive should work as well.
Simplified Method: Creating a OS X Mavericks Boot Install Disk
This is the new simplified method based upon the ‘createinstallmedia’ command. This works best with the final version of Mavericks available from the App Store to all users:
- Get the Mavericks Installer from the App Store (you can easily re-download it if necessary, it is always free)
- Attach the USB drive to the Mac, this drive will be formatted so be prepared for that
- Launch Terminal and run the following command to get basic instructions:
- Follow on screen instructions, or use the full walkthrough here
/Applications/Install\ OS\ X\ Mavericks.app/Contents/Resources/createinstallmedia
Alternatively, you can use the original more advanced method as outlined below. This is no longer necessary as the aforementioned steps greatly simplify the process, but we are retaining the original instructions as they still pertain to certain users and certain needs.
Dev Method: Create a Bootable OS X 10.9 Mavericks Installer
This is the original method that was required for the developer releases and earlier builds, it is more advanced and therefore not as recommended for the average user:
- Download OS X Mavericks for free from the Mac App Store, but do not install it yet
- Attach the USB drive to the Mac and launch Disk Utility
- Choose the USB drive from the left side menu, click the “Partition” tab, select “1 Partition” from the drop down menu, and then click the “Options” button to select “GUID” as the partition type, click “OK” then click “Apply”
- Launch Terminal to show hidden files and relaunch the Finder using this defaults command string:
- Go to the /Applications/ folder to locate the “Install OS X 10.9 Developer Preview.app” file
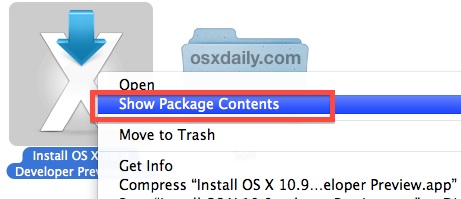
- Right-click and choose “Show Package Contents”, then open “Contents” and open “SharedSupport”
- Double-click to mount “InstallESD.dmg”
- Open the mounted ‘OS X Install ESD’ image, and right-click “Base System.dmg” choosing “Open” to mount the image (BaseSystem.dmg may be named as “Base System.dmg” on some newer installers. The OS X 10.9.1 (and presumably newer) installer may use a file named “OS X Base System”. Regardless, look for the Base System dmg file, which is invisible by default, thus why invisible files must be made visible in the earlier step)
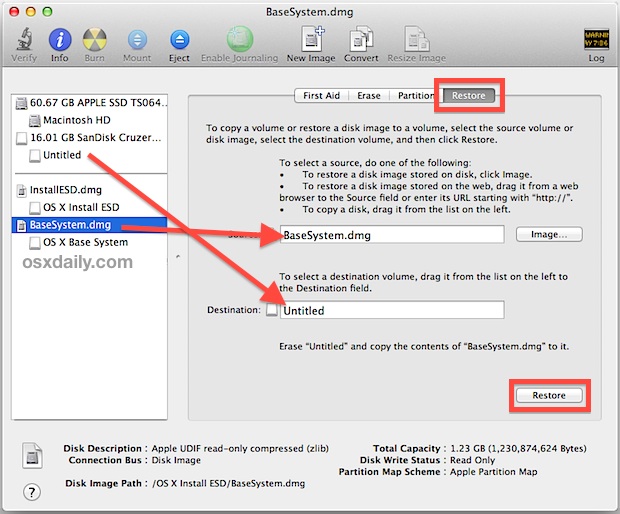
- Go back to Disk Utility, then select “BaseSystem.dmg” from the sidebar and then click the “Restore” tab
- With “Source” set to “BaseSystem.dmg”, set “Destination” to the USB drive by dragging the USB drive into the box, then click “Restore” to begin – confirm that contents of the drive will be erased
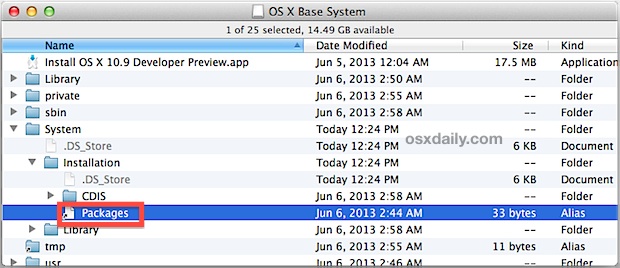
- When finished, go to Finder and navigate within the newly created USB drive to System > Installation > and delete the file (alias) located here named “Packages” – keep this window open
- Go back to the ‘OS X Install ESD’ mounted drive, and drag & drop the “Packages” folder into the /System/Installation/ directory you just deleted the Packages alias from, let this large folder copy
defaults write com.apple.Finder AppleShowAllFiles TRUE;\killall Finder;\say Files Revealed

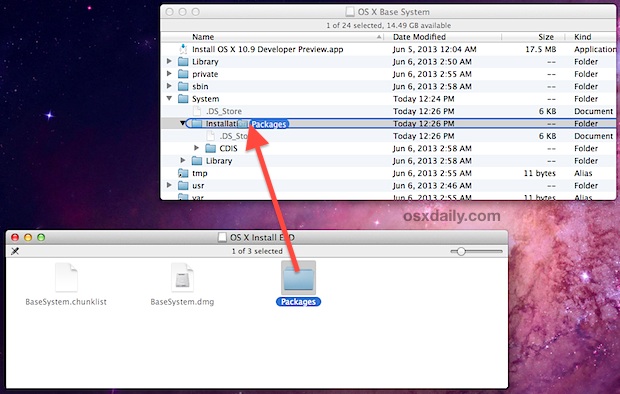
Once that Packages folder is finished copying to the drive, the USB drive is now ready to be booted from which it can install OS X Mavericks from.
Booting from OS X Mavericks Install Drive
- With the USB drive attached, reboot the Mac and hold down the Option key
- Select the orange drive, labeled “OS X Base System 1” from the boot menu
- Proceed with the installation as usual
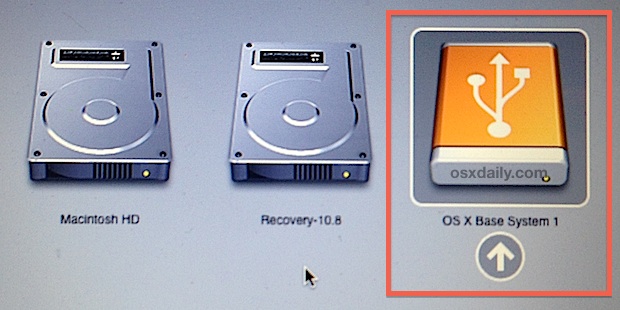
Enjoy OS X Mavericks! By the way, if there is a more direct method to create a bootable installation drive, we couldn’t figure it out. Trying to restore or use the InstallESD.dmg file does not work like it used to in the past, but it’s entirely possible there is another way. If you know how to do it, send us an email, hit up @osxdaily on Twitter, let us know on Facebook, or hollar at us on Google Plus.


Awesome tutorial. Had to modify a few steps slightly because of various reasons, but the basic content and directions were very helpful. Thanks a million for posting this.
hey, since mavericks is NO longer available in app store, so i downloaded a torrent file. the problem which i have been facing is —- after downloading file using utorrent, file file is single file(5 gb) with extension .dmg>>>> i open the file, window pop up only showing 1 folder i.e. packages which contains 15 .pkg files …. what next ??? there is no file like install mavericks.app…. i m not getting any solution …
plz help me outt !!!! do reply mate !!!
OS X Mavericks is available in the App Store to download on the Mac, go to your “Purchases” tab to find OS X Mavericks to download.
Under no circumstance would anyone ever recommend downloading system software from a torrent or random location unless you can check the md5 or sha hash to confirm it is legitimate and not tampered with.
This has worked for me opening the dmg in terminal as previously mentioned. I used the simple command:
open /Volumes/OS\ X\ Install\ ESD/BaseSystem.dmg
Cheers :)
Thanks so much. This really helped me :). Thanks again
Followed precise steps using terminal commands. Didn’t work and rendered my flash drive useless. What gives?
Hi,
I am trying to run this command but its not working
/Applications/Install OS X Mavericks.app/Contents/Resources/createinstallmedia
Please advice….
What does “not working” mean?
You can also follow these instructions, they are easier for most: https://osxdaily.com/2013/10/23/create-os-x-mavericks-install-drive/
Thanks Ph, finally I have done it
Thank you for your guide, it worked form me to install OSX Mavericks on a MacBook Air.
I lost my recovery partition. Can I get it back?
Yes, if you lost the Recovery partition somehow but you want to recreate a new OS X Recovery Partition you’ll either need to reinstall OS X or use a third party script that can build it for you.
The short method using the …createinstallmedia command does not work if you are BOOTED IN ANYTHING EARLIER THAN 10.9. That’s the reason for the 9999 errors.
That means the short method won’t help if you’re running an older OS and are trying to use a flash drive as a step towards a clean install on a new disk instead of modifying your existing system.
The long instructions aren’t so bad if you’re used to some degree of gymnastics during installs, probably mounting the hidden file is the hardest part (me I have hidden files set to show all the time), the rest is just tedium and waiting, and it worked for me the first time once I realized I had to go that way.
Btw, Disk Utility in 10.6.8 insisted on making my partition 7.93 GB out of the available 8.01 GB. It did add a hidden partition. Whatever that’s about, 7.93GB was enough to make a 10.9.2 install disk.
I also want to know how to hide my files through terminal. That seems to be the closing step that’s missing.
Sorry for this late response but for Shane and Rebecca use this widget as I said above for hidden files thing, trust me it’s easier and I have personally used it myself and can 100% guarantee it works.
Hi how do i hide my file again once I’m done with this i mean once my bootable pen drive is ready so how do i hide my files through terminal please help me with the command lines for that…. Plz Help…
Just use the same command you already used but you change the “TRUE” to a “FALSE”.
defaults write com.apple.Finder AppleShowAllFiles FALSE;\killall Finder;\say Files Hidden
Once again, APPLE take us for fools. With a DVD, it was too simple …
I followed the steps to a T and got really excited but when I try and boot from the USB drive. I get the Circle with a Slash through it. It will not boot from my USB Drive.
Did you format the USB drive as HFS+ and set it as GUID first? That’s the biggest mistake most users make when building a boot installer drive for OS X Mavericks. You can try this easier walkthrough, it’s much less technical than the aforementioned geekier approach:
https://osxdaily.com/2013/10/23/create-os-x-mavericks-install-drive/
I have done this already and it worked a charm but I would like to install Mavericks with other applications already installed, for example Logic Pro X, Office etc.
My question is, can you put package installs of these programs in the “Packages” folder and have them install with the operating system or is there a better way to do this?
Thanks
Actually one of the first instructions is wrong and the restore button will be greyed out.
Original Instruction:
With “Source” set to “BaseSystem.dmg”, set “Destination” to the USB drive by dragging the USB drive into the box, then click “Restore” to begin – confirm that contents of the drive will be erased.
Correction (and red arrow is pointing from wrong selection as well) Source should be set to “OS X Base System” (drag that instead) not “BaseSystem.dmg”:
With “Source” set to “OS X Base System”, set “Destination” to the USB drive by dragging the USB drive into the box, then click “Restore” to begin – confirm that contents of the drive will be erased.
The detailed instructions used the original OS X Mavericks installer, the 10.9.1 Installer appears to have changed the file name from “BaseSystem” to “OS X Base System”. Thanks for noticing, and sorry to hear the slight name change caused you so much confusion!
I am able to see and mount the BaseSystem.dmg, but when I go back to Disk Utility, I am not able to drag or select BaseSystem.dmg as a source in order to send it to the bootable drive.
Any ideas?
Had the same issue, but I could drag the “OS X Base System” as the source and could proceed and finish as described.
If you can’t see the invisible file “BaseSystem.dmg”, use Terminal to mount the file.
1. Open Terminal
2. cd /Volumes
3. cd OS\ X\ Install\ ESD/
4. hdiutil attach ./BaseSystem.dmg
Keep getting to the point where I am supposed to delete and replace the packages folder and cannot do it. I’ve tried everything I can think of and It will not let me delete the packages folder. Any help?
I’m having the same problem Jeff had. I can’t delete the packages folder and can’t copy the new one across. The whole disk seems to be set as read only and I dno’t know how to change it. Any help?
did you set it to GUID partition table with mac osx extended (journaled)?
Hi,
I had the same problem but managed to fix it by doing the whole process again but instead of highlighting “BaseSystem.dmg” when restoring, I highlighted the OS X Base System (sitting under BaseSystem.dmg), then dragged this into Source and continued the steps from that point and it worked.
The USB mount will change name and this is where you can delete the Packages alias from.
Hope this helps.
My experience: the simple method ( …/createinstallmedia … command line) did not work for me: “Failed to start erase of disk due to error (-9999, 0).”
The dev method above works fine.
Perhaps it’s something about my installation. I was running this in Snow Leopard.
I tried doing the same thing and got the same error, i got unconfirmed source that is doesn’t work on snow leopard but others say it should, i’m all confused, i just finished the above instructions by restoring base system and packages and i’m crossing my fingers. Best of luck to you.
Hi, I´m a big Apple fan, and a read your website page every day, it is very useful.
I read the article of making a bootable drive of OS X Mavericks, and I recently found a program called DisKMaker X, that makes a bootable USB install drive of OS X Mavericks. My question is… have you heard about it?, use it?, is it good?, reliable??
Thanks in advance
There is little reason to use third party tools when the Mavericks installer can do it for you
Use this in terminal for making the files visible/ invisible:
defaults write com.apple.finder AppleShowAllFiles TRUE
defaults write com.apple.finder AppleShowAllFiles FALSE
I meticulously followed all the steps, and got as far as opening the OSX Install ESD folder, but it didn’t show the BaseSystem.dmg file. Even tried the terminal step a second time, but no luck.
Hi, there’s a new Terminal command on OSX Mavericks, try defaults write com.apple.finder AppleShowAllFiles TRUE
This method is wrong.
Can’t have recovery partition with this one.
Use terminal instead.
won’t work ! checked my syntax over and over but the command simply does not exists !! :-(
It does work, but if you’re having problems with this version perhaps you can turn to an easier tutorial:
https://osxdaily.com/2013/10/23/create-os-x-mavericks-install-drive/
It works with the 10.9.1 but not the new 10.9.2
That version does not make the media bootable.
Apple must not be happy that this method got out.
Actually I just did this with 10.9.2 and instead of using the terminal download this widget
and click the show hidden files on the widget.
#Topic: Create a bootable OS X Mavericks USB install disk
Hi,
After 3 days of frustration just like you and many others who has been having issues of below constant errors whether you use automated tool such as DiskMaker or Terminal (refer solution below):
error types:
#The disk could not be created because of an error: An error occured: 1. Could not find disk for /Volumes/OS X Base System
#this tool must be run as root
and there are many related. I wish I have compiled a list of errors so others could benefit from this solution.
I have even ended up downloading Mavericks few times because some said it could be an issue with the downloaded maverick file or USB issue, use external hard drive and what not.
But solution is, there is a error in command. Only one site / forum i ended up finding the right command and even then it didn’t work. Problem was, the formatted USB name. You need to make sure you manually rename it in Finder by right clicking on the USB drive and click Rename. Rename it to “Untitled” and just copy paste the below command:
sudo /Applications/Install\ OS\ X\ Mavericks.app/Contents/Resources/createinstallmedia –volume /Volumes/UNTITLED 1 –applicationpath /Applications/Install\ OS\ X\ Mavericks.app –nointeraction
Now you should immediately start seeing your terminal start copying files. This process takes about 20 to 30 minutes. Until you see “Done” please be patient. For the rest of the booting stuff it’s pretty normal. Hope this helps.
Hariharan
http://www.ihariharan.com