How to Use Emergency Bypass on iPhone to Allow Contacts to Get Through Do Not Disturb Mode
Do Not Disturb mode is one of the greater features for iPhone users who like to enjoy some peace and quiet, but since it mutes all sounds, alerts, and notifications on the iPhone it’s possible to miss a truly important call or alert when the feature is enabled. This is a scenario that Emergency Bypass attempts to remedy, by allowing individual contacts to bypass Do Not Disturb mode and have sounds, alerts, and vibrations from that specified contact get through to the iPhone even if Do Not Disturb is on.
Emergency Bypass is set on a per-contact basis to allow the chosen contact to be able to get through Do Not Disturb mode. This guide will show how you can use this great feature on your iPhone so that people or contacts can always get through to your phone.
This must be toggled on for each specific contact you want to grant Emergency Bypass abilities to. The feature requires a modern version of iOS, if you’re not on or past iOS vers 10.0 or later yet you would need to update your iPhone to gain the feature.
How to Setup Emergency Bypass for iPhone Contacts
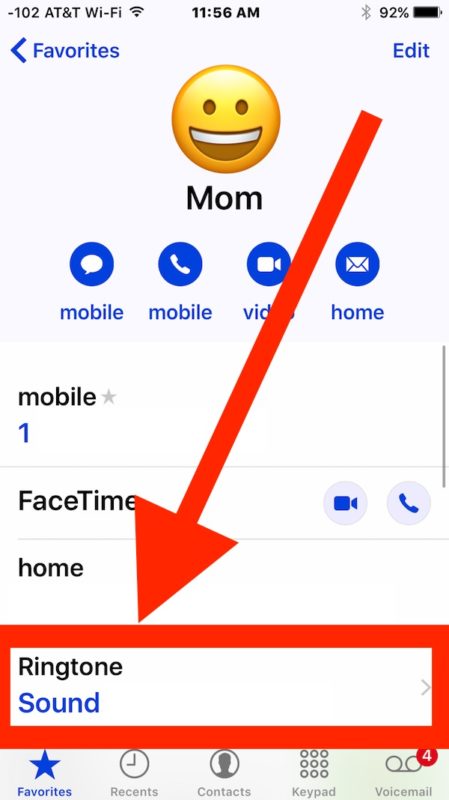
- Open the “Contacts” app or the phone app and locate a contact you want to grant Emergency Bypass access to so they can bypass Do Not Disturb Mode
- Tap on “Edit” in the corner
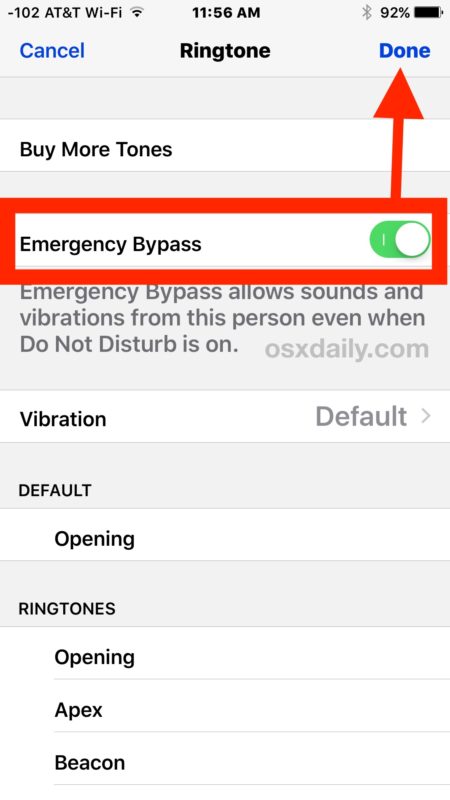
- Tap on “Ringtone” within the contact information
- At the top of the Ringtone section, toggle the switch for “Emergency Bypass”, then tap “Done”
- Repeat with other contacts as desired to grant them Emergency Bypass permission on your iPhone
As stated before, this allows specific contacts to have their attempts at reaching you get through even if Do Not Disturb mode is on. This means if that specific contact attempts to reach you, the iPhone will ring, alert, or vibrate as if the Do Not Disturb feature was not enabled at all.
Of course the obvious use cases of families and significant others may apply to this feature, but it’s also helpful for people who are on call for work too since they can exclude a particular contact from being thwarted by Do Not Disturb.
This is helpful for many obvious reasons pertaining to emergencies, not only because intentionally setting up Do Not Disturb mode is excellent but also because it’s remarkably easy to accidentally enable Do Not Disturb mode which leads to the iPhone not ringing or making sounds, a situation that can cause a lot of confusion for novice users who are not aware of the general features existence.
Emergency Bypass is also a good feature to setup and allow alongside repeated calls bypass and exception lists like Favorites, both of which are part of setting up Do Not Disturb mode on the iPhone the right way.
Speaking of emergency situations, another great iPhone feature is to configure Medical ID on your iPhone, and it’s also helpful to remember that Siri can contact 911 or emergency services for you if requested. Hopefully these emergency features will never need to be used, but it’s certainly worth knowing they exist just in case!

My cat just stands up pulls the lever down on bedroom door & let his sibling in.
Emergency bypass
You also have to do this for text alerts, as well. Hopefully this will help stop robocalls from calling, even with the apps that don’t seem to work.
I have an iPhone 8 Plus and updates 12.0.1 and I don’t
have always iPhone by my bed, only if I need to wake up
very early. My Weather App shows me all Details about
Weather, storms and even tornadoes. So I always know
what we have to expect in few days.
Thanks for sharing such a great futures.
Have a Happy Weekend!
THANK YOU!!! Thanks for taking the time to walk this guy through it!!
Shame this can’t be extended to other messaging platforms such as WhatsApp or FB Messenger… only seems to work with sms or calls
Because sometimes you cannot talk even to your favorites contacts, but need to talk just to one person dpecifically. For that kind of situation, for example, Emergency Bypass exists.
OK, found it. One has to tap on ringtone and it’s at the top of the listings of ringtones. My question is since I have designated “Favorites” in as “Allow Calls From,” why do I (or anyone) need this setting?
I do not have the ringtones field either. My contacts fields are differ than the example.
If you’re in an individual contact you have to tap on the “Edit” button to see the Ringtone section which you can then choose Emergency Bypass from, if you go from the Phone screen Favorites section you can choose Ringtone without it if there is a custom one set.
My cat enabled this on my iPhone for all of his friends numbers. Those little felines now wake me at all hours of the night.
If I have “No One” enabled under “Do Not Disturb” in Settings, does the Emergency Bypass designation for the contacts I choose override that?
Yes it does override that command, imagine Emergency bypass as a king
I have an iPhone 7 running iOS 10.2.1
When I follow your directions, I do not find the fields you describe.
I find
“Send Message”,
“Share Contact”,
“Add to Favorites”, and
“Share my Location”, or
“Block this Caller”.
That’s it.
Nothing about “Ringtone” “Sound” or “Emergency Bypass”.
What am I missing?
Does the Contact have to be a “Favorite”?
Have latest update but have same as you. No idea where this bypass is
I think you might need to go to edit mode for that contact to see the Ringtone section
Once you hit “edit” on top right, you will then see Ringtone come up.