How to Clean Install MacOS High Sierra
Some Mac users like to perform a clean install when a new operating system is released. Usually this is reserved for more advanced users, as a clean install means the hard drive is formatted and completely erased, removing the existing Mac operating system, and erasing all contents, data, files, applications – everything from the Mac is completely removed. This allows the new macOS High Sierra installation to be blank, kind of like if the computer were brand new, thus the name “clean install”. Users who opt for clean installations of macOS usually perform extensive manual file backups and then copy their important data over after the installation is complete, and then they must manually install all their applications again.
This tutorial will walk through how to perform a clean install of macOS High Sierra (10.13+).
Important note: A clean install requires the Mac hard drive to be erased, meaning all data, files, photos, movies, apps – everything will be erased from the computer. Additionally, performing a clean install can be a cumbersome and time consuming process that involves a lot of manual intervention with app installs, manual data backups, and then specific data restoration, which is why most users avoid the clean install process and simply choose to update and install macOS High Sierra as usual. A clean install is best used for specific reasons by advanced Mac users who have the capability and patience to perform these actions competently. Any failure to sufficiently backup data will lead to permanent data loss.
How to Perform a Clean Install of MacOS High Sierra
We’ll break up the clean install process into five main steps: backing up the Mac and all important data, creating a bootable installer drive for High Sierra, erasing the Mac, running through the MacOS High Sierra installer onto the freshly blank drive, and then manually restoring your data, apps, and files. This is usually a lengthy process that should not be taken lightly and without a proper time commitment.
1: Backup the Mac, Files & All
Remember that performing a clean install erases everything on the Mac. Literally every single thing will be erased; all data, all files, all applications, all photos, all movies, every single thing on the computer will be erased. Thus it is critical you backup your important data first. How you do this is entirely up to you, but it must be done.
Before performing a clean install, it is a good idea to perform two types of backups: a complete system backup using Time Machine on the Mac or something similar. Additionally, you will want to perform a manual backup of all of your important files, application installers, photos, videos, and personal information, by either coping that data to an external hard drive, or to iCloud Drive, or DropBox, or your manual file backup method of choice.
Do not skip backing up your data before going further. You will lose everything on the computer by formatting and erasing the hard drive. If you skip a backup, the data will be completely unrecoverable.
![]()
The advantage to performing a manual backup in addition to a Time Machine backup is that if you decide that a clean install is far too great a burden to manage you can just restore from the Time Machine backup. Seriously, do not skip making those backups.
2: Make a Bootable USB MacOS High Sierra Installer
You will need to create a bootable macOS High Sierra USB install drive if you haven’t done so already. This is so that you can boot from the installer drive, format the Mac, and then perform the clean install.
Follow the instructions here to make a bootable installer for macOS High Sierra. You will need a 16GB or larger USB drive, and the complete macOS High Sierra installer from the App Store.
After you have made the High Sierra bootable installer, you can proceed with the next step of formatting the hard drive.
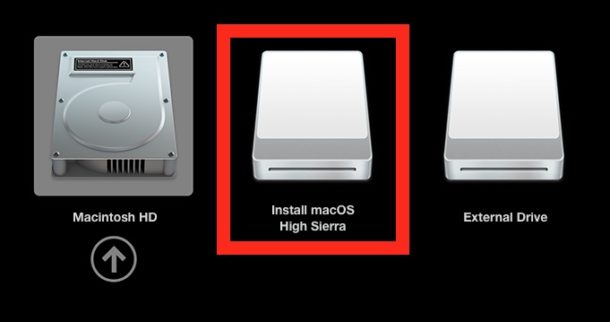
3: Format & Erase the Mac Hard Drive
With the MacOS High Sierra boot drive connected to the Mac, reboot the computer and hold down the OPTION / ALT key until you see the Startup Manager screen. At the boot drive selection, select the macOS High Sierra installer drive.
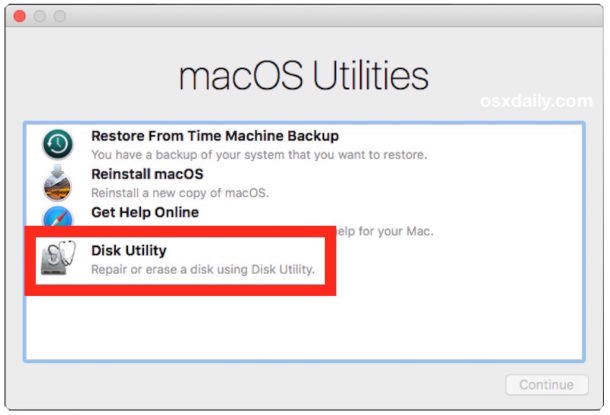
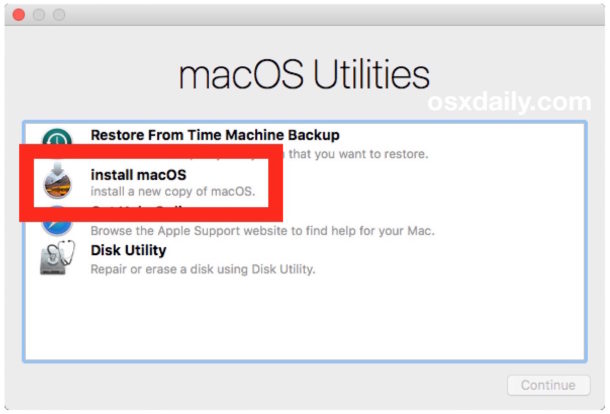
At the MacOS Utilities screen, choose “Disk Utility”.
In Disk Utility, select your hard drive (usually named Macintosh HD) that you wish to erase, then click on the “Erase” button in the menu bar. Choose “Mac OS Extended (Journaled)” as the format type and GUID Partition Map as the scheme, then click on “Erase” – THIS WILL ERASE EVERYTHING ON THE MAC, DO NOT PROCEED IF YOU HAVE NOT MADE COMPLETE BACKUPS OF YOUR DATA
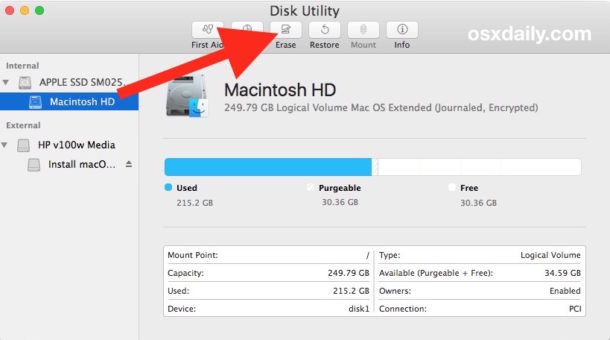
Once the drive has been formatted, quit out of Disk Utility which returns to the macOS Utilities screen.
4: Install macOS High Sierra
Back at the macOS Utilities screen, choose “Install macOS” to install a new copy of macOS High Sierra. This will be the clean macOS install onto the freshly erased hard drive.
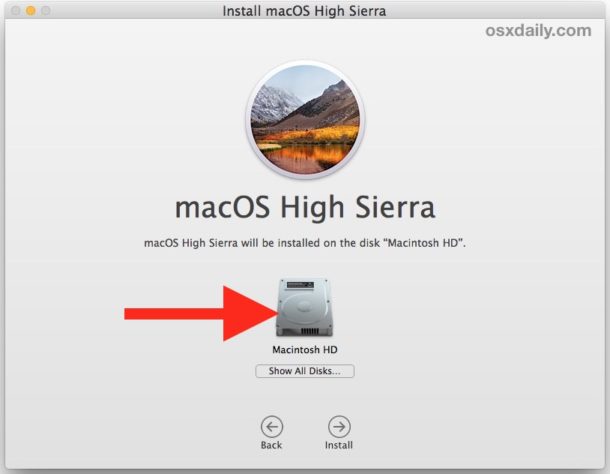
Click on “Continue” and navigate through the installer screen, selecting “Macintosh HD” (or whatever your hard drive is named) as the destination for macOS High Sierra to be installed on.
If you have an SSD equipped Mac, you’ll want to use AFPS file system which offers performance benefits, whereas other hard disk types won’t have AFPS available yet as an option until a future macOS High Sierra update.
Let the macOS High Sierra installation complete. When it is finished, the Mac will reboot and go through the standard setup procedure as if the computer was brand new. Enter your Apple ID, user account creation information, setup iCloud, and when complete with the setup you will be on a completely fresh and clean installation of macOS High Sierra.
5: Manually Restore Data & Files, Reinstall Apps
Now the fun part… you get to manually restore your important files, data, and reinstall apps that you want on the clean macOS High Sierra installation.
Most users who opt for clean installs will just copy files over directly from an external drive or cloud drive service, but you can do whatever method you want. As for reinstalling your apps, you will likely be downloading many of them from the Mac App Store, downloading them again from the developers, and perhaps restoring others from your manual file backup made in the first step. File and app restoration can take a while.
![]()
And that’s it, once you’re all setup with your apps, files, and data again, you’re on a clean installation of macOS High Sierra!
What is the point of a clean install? Why bother with a clean install of macOS High Sierra?
Some users may be wondering what the point of a clean install of macOS is. The main objective is usually to start fresh, without any accumulation of old and outdated data, any prior data, files, settings, preferences, unwanted apps, or holdovers from ancient updates or long gone software.
Sometimes a clean install can offer the best performance for a Mac, and thus some users will perform a clean install for performance reasons. Much like when you buy a brand new Mac it feels quite fast, a clean install can offer a similar feeling sometimes.
Rarely, a clean install is necessary to overcome some dramatic software update failure or colossal mishap during a system software update (like an interrupted installation or a corrupted hard drive). This is pretty unusual but it can theoretically happen with situations like a power outage during a system software update, or a user erroneously removing critical system files or components, or similar catastrophic errors involving the core macOS system software.
The main reason to not perform a clean install is the potential for a hassle. It’s obviously a lot of work to thoroughly backup all of your data manually, and then to format a computer, manually restore your files and data, then re-download and reinstall all of your apps, it can take many hours to complete this process if not nearly an entire day to get your computer back to where you want it to be once all is said and done. Thus, the clean install process is really only best for committed users with advanced skill sets that don’t mind the burden or nuisance of recreating their digital workstation flawlessly and without data loss. It is infinitely easier to use the normal macOS High Sierra download and installation process, and that approach is best for the vast majority of users.
Do you have any tips, tricks, commentary, or experiences with a clean install of macOS High Sierra? Let us know in the comments below!

On early 2011 MacbookPro with 5GB boot install flash drive inserted into USB drive, I followed the instructions up to the point where you reboot holding down the alt/option key, then chose the macOS High Sierra installer drive. Once I chose that, now sitting here for over an hour, all I see is an apple logo and a progress bar that is crawling, very slowly from left to right :-(
Very disappointing, simply does not work. Now I wonder how to turn this process off since it is stuck. everything seems to work like s**t these days, this being yet another example :-( S**t not working/and or broken is the rule rather than the exception.
This absolutely works, I have used this approach dozens of times to clean install macOS. You erase the Mac, then you install macOS onto the erased Mac.
It can take a while to install macOS, you do not want to interrupt the installation (which as you say is moving but at a slow pace), because interrupting the installation all cause a failed or broken system software install.
Have patience.
Usb installer doesn’t show up in startup manager. Using macbook pro 2017 so the USB is connected via dongle. Shows up on normal startup but not in startup manager (option/alt key during restart). Please help!
If the Mojave USB installer is not booting, it may need to be GUID.
You may need to start over, first reformatting the USB flash drive as Apple disk format with GUID as that makes it bootable. That is done through Disk Utility before creating the disk, but it is NOT always necessary, only when the USB flash drive started as a Windows compatible disk. The createinstallmedia sometimes seems to not quite pull that off… for full Mac GUID boot… if the USB flash drive was originally for Windows and not Mac format, that is probably the reason.
Good morning,
many thanks for this aricle, and to those who add and share experiences.
I’m not really in this scenario as I’m about to install a second disk in my Mac mini.
The HDD has already been upgraded to 10.13.4 High Sierra. It has been OS upgraded from the original buy. I’m short of space…
So I decided to buy a SSD disk and install it as a second disk (got the kit, cable and tools to do so… hope it will be as easy as presented in FIXIT! ;).
So, no point in doing a time machine recovery of the full system (even if it might be the easiest and “fastest” way), I’d like a clean install of High Sierra 10.13.4 on the SSD, and migrate/recover/restore the data directly from the HDD.
Ideally, parcialy restore:
– user preferences, bookmarks, stored passw and browsing histry,
– some of the programs, not all the stuffs I installed over 7 years and do no use
– reorganize the data by archiving some or copy/recover what Is usefull and necessary
Then I’d probably erase the HDD and get more space, maybe use it as a local time machine disk, instead of my NAS.
So, do you have any advice or prefered method for this situation?
Thanks in advance!
what the heck is wrong with Apple, super greed, no interest in customers ?
So I was installing H.Sierra OS 13 > a third of the way thru I think I made a typo ( can’t think of anything else) and – it froze. just completely screwed the whole operation, obviously can’t use the internet for Apples wonderful idea… to the service people for $ 75 or 100 repair > THAT SHOULD NEVER, NEVER HAPPEN> where did Apple get this idea, no available install disc or SD card ( Mac mini, no CD/ DVD) . at the least they should sell them for say $10. say the 10.7 / 10.10 versions minimum. idiots.
Hi
Im upgrading from Yosemite. I downloaded the full 5Gb plus file but then I ran the code I got this error:
Erasing Disk: 0%… 10%… 20%… 30%…100%…
Copying installer files to disk…
The copy of the installer app failed.
And now I cant access the flash drive (which is 2 day old so it is not broken..) I cant even format it.
Any ideas?
Restarting and holding alt/opt key will not work with macs with wireless keyboard like iMacs
After having tried any and all of the re-installation pre-checks and method your article suggested, without any success, after backing up and cloning my HDD, I was about to erase it all, to perform a fresh install reformatting and therefore fully erasing the original HDD.
When I open Disk Utility from the UBS start up and installer disk, I’d prepared, I noticed my HDD was large enough to be partitioned in two and that Disk Utility was able to execute the task without loss of data, although the original HDD had only one partition.
Zeroing for zeroing and ready to do so, I’d nothing to loose in trying this option.
It worked !
In the additional new partition I was able to re-install Mac OS High Sierra, once done the installer utility asked me if I wanted to migrate data and from where, by selecting the original HDD as a source, the assistant calculated size and time and successfully migrated everything. Once done I fully erased the original HDD partition and regained free space.
TimeMachine system version should match the new system in order to restore form a backup (otherwise stick with Migration Assistant that’ll create additional users). If you have multiple disks SSD/HDD or a Fusion drive, no one knows how it’ll behave.
They say at Apple Support pages to update 10.12 (Sierra) to 10.13 (High Sierra) and do a TimeMachine backup. THEN do a clean install and restore data from TimeMachine.
The best thing to bring from this article: DO ANOTHER BACKUP of your files. TimeMachine is the worst backup option if you are going to upgrade your system.
This article says nothing about the new file system (which is the main reason to upgrade). Read about going from HFS+ to APFS at Apple and other websites:
https://developer.apple.com/library/content/documentation/FileManagement/Conceptual/APFS_Guide/FAQ/FAQ.html
I have created the bootable USB drive. Now rebooted holding the ‘Alt’ key.
On boot screen – selected my Wifi connection. Clicked on Install High Sierra and I get a white screen with the Apply logo. I have been staring at this for 20 minutes and nothing has happened.
Any ideas?
That should say Apple Logo…
But how do we get the full DMG instead of the crappy 19.7MB installer thing?
Here is an article detailing how to download a full complete macOS High Sierra installer, it is linked from the USB flash drive article.
https://osxdaily.com/2017/09/27/download-complete-macos-high-sierra-installer/
horrible update… ITs like a beta…. When i open my files from external HDD’s they take a century… Steve Jobs would never allowed that..
– Backup on time machine
– Format and clean install through bootable usb
– Created a new user account like a new Mac because it did not allow me to restore everything from time machine
– Booted first time and Restored data with migration assistant
– Did not allow me to replace user accounts during the restore, instead it made me keep both of user accounts.
– Now I have two identical users on system, and it won’t let me delete one of them.
Good update, really. Thanks Apple.
Don’t bother installing it. multiple bugs with video, mail, safari and Netflix, black screen at login, server has been butchered and they have remove iOS/Webdavs support, can’t connect to remote servers in FileMaker Advanced 16. “Low” Sierra is a beta downgrade
How to delete the recovery partition from the previous system before (via terminal) to perform a TRUE clean install?
Thanks!
Boot whit a Install USB (or a Linux distro), open the terminal and type this.
USB macOS:
dd if=/dev/zero of=/dev/disk0
They are slow, very slow
USB Linux:
dd if=/dev/zero of=/dev/sda
More fast tan the macOS USB.
Two methods are the same secure.
you must delete the recovery partition from the previous system before (via terminal) to perform a TRUE clean install. the erase option in the utility disk doesn’t wipe the hidden recovery partition! and for god sake stay way from time machine.
When I wiped the drive on my 2014 5k iMac, it split the fusion drive. Now have a 1tb hard drive and a 128gb ssd.
What now?
APFS does not currently support Fusion Drives. If you want to keep your Fusion Drive you need to stick with HFS+ for now.
I tried a “clean install” using this method.
Everything worked until I tried to restore from Time Machine backup when the backup drive had a yellow warning triangle.
Seems that the backup was unavailable because it wasn’t a “case-sensitive” volume, even though it was.
After a lot of mucking about, including a recovery restore (boot+cmd+r) from the “unusable” Time Machine backup, I just ran the instal app and all was well.
Scary!