How to Create a Bootable Install Drive for macOS High Sierra
Some Mac uses like to create a bootable USB installer drive for macOS High Sierra. A bootable install volume of macOS 10.13 allows users to perform a variety of tasks including formatting and clean installs, updating multiple Macs from the same USB flash drive installer (and without re downloading), and to use as a troubleshooting boot drive should the need arise, amongst other benefits for advanced and more technical users.
This walkthrough will detail how to make a bootable USB install drive for macOS High Sierra.
Requirements to Create a macOS High Sierra Bootable USB Installer
To create a functioning macOS High Sierra installer boot drive, you will need the following:
- A blank USB flash drive (16GB or larger is recommended) you don’t mind formatting, this will become the boot installer drive for macOS High Sierra
- A Mac with access to the App Store
- The complete macOS High Sierra installer application downloaded from the Mac App Store(some users end up with an incomplete installer sized at 19MB, you can follow instructions here to get the entire 5GB macOS 10.13 installer if necessary)
Beyond that you’ll just need a bit of patience and a bit of technical know-how or comfort following technical instructions. Making a USB install drive requires the usage of precise syntax at the command line with superuser privileges, using the wrong syntax could lead to unintended data loss.
How to Make a Bootable USB Installer for macOS High Sierra
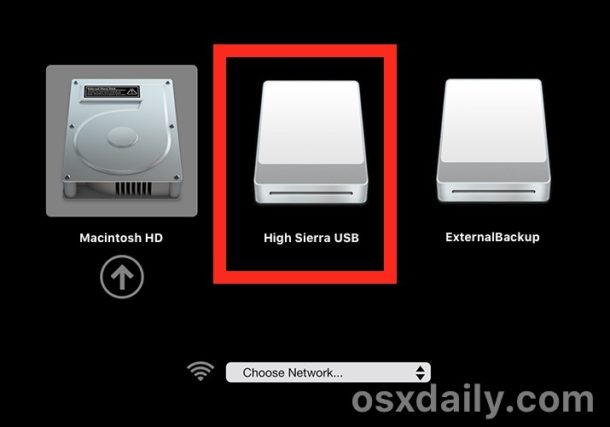
- Connect the USB flash drive to the Mac, if you need to format it go ahead and do so
- Download macOS High Sierra installer application from the App Store* and be sure the complete installer is located in the /Applications/ directory
- When the installer has completed downloading, it will automatically launch – quit out of the installer when this occurs
- Open the “Terminal” application found in /Applications/Utilities/ directory on the Mac
- Enter the following command syntax at the command line, replacing “UNTITLED” with your USB drive name if necessary:
- Confirm the syntax is exactly as written, then hit the RETURN key and enter the administrator password to start making the High Sierra installer drive *
- Let the installer complete, when finished you will be informed that the process has completed
sudo /Applications/Install\ macOS\ High\ Sierra.app/Contents/Resources/createinstallmedia --volume /Volumes/UNTITLED && say Boot Installer Complete

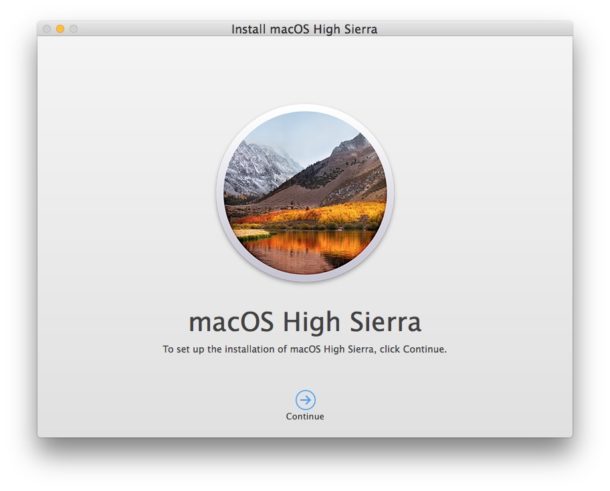
Once you have created the USB boot installer drive for macOS High Sierra, you can either launch it immediately to install macOS High Sierra on the current Mac, reboot and startup from the USB installer drive, or eject it and use it on another Mac.
* Note: if you are getting a “command not found” error and you are certain your syntax is correct, be sure to check the file size of the “Install macOS High Sierra.app” as found in the /Applications folder. If the file size of the High Sierra installer is not over 5GB then you have the incomplete installer and will need to download the complete macOS High Sierra installer application as described here in order to create a bootable installer drive.
Booting from the macOS High Sierra USB Installer Drive
With the newly created macOS High Sierra USB installer drive connected to the Mac, reboot the computer. Immediately on reboot, start holding down the “OPTION” (ALT) key to load the boot menu. Select the High Sierra installer at this screen.
Once booted from the USB drive you can proceed with installing macOS High Sierra, using the Disk Utility tools to format or erase a volume, work with Time Machine, and other similar tasks.
If you had previously created a boot installer for the High Sierra beta you may notice the syntax is different for createinstallmedia is different with the final version, part of that is to accommodate the new file name of the application installer, and the remainder removes the necessity of the –applicationpath flag and directive.
Keep in mind that macOS High Sierra can only be installed onto supported hardware, if you’re uncertain whether or not a particular computer supports the release you can check this list of macOS High Sierra compatible Macs.
Do you know of another approach to making a macOS High Sierra bootable install drive? Do you have an easier method, or do you have any particular tricks related to this process? Let us know in the comments.

Great instructions but “&& say Boot Installer Complete” is not necessary and I would have preferred not to have added that.
I have a Mac mini late 2012 edition which I have upgraded a few times with more RAM and SSDs. It worked fantastically until recently when I was trying to upgrade the macOS and in the process lost my original macOS, but I still have all my data on a backup Time Machine disc… The problem is I cannot recover my original macOS via one of the recovery options because Apple doesn’t offer that macOS any more! Can you help me create a new bootable drive so I can get any macOS operating on it again, please!??
It just works thanks.
It’s a bit of a fiddle getting everything precisely correct but once you’ve done that it’s all good.
what a pile of bs. no answer to how to make it with the older version of OS on another mac ??? all this is just blah, blah blah. The typical quality of a geek: can not make things easy
It’s working fine.
Thanks for your detailed work through. It’s working fine.
Does this work if you have a macOS patcher? Specifically Catalina
Hi guys. I used this method on my old Mac that ‘died’ last week. I run everything as described, and after the full install, it just launches back to macOS utilities. Has anyone had this before, or know a way around it? Cheers! Adam
Diskmaker X fell flat on its face when I tried to make a High Sierra install drive on my iMac running Mojave. And typing in the createinstallmedia command is like having a root canal! This short shell script is easier:
#!/bin/bash
# make macos install thumb drive on Volume (default High Sierra)
# takes about 6 minutes on a 4-core iMac
AppHome=’/Applications/Install macOS High Sierra.app’ #default High Sierra
Volume=’/Volumes/NO NAME’ #default SanDisk
echo “To accept a default in parenthesis, enter RETURN at prompt.”
echo -n “Enter pathname of install image ($AppHome):”
read line
if [ “$line” != “” ]; then AppHome=”$line”; fi
echo -n “Enter pathname of volume ($Volume):”
read line
if [ “$line” != “” ]; then Volume=”$line”; fi
sudo “$AppHome”/Contents/Resources/createinstallmedia –volume “$Volume” –applicationpath “$AppHome”
Thank you so much for posting these instructions! My roommate had his 2012 Macbook Pro Hard Drive go kaput w/o a Time Machine Backup (only had Mountain Lion on the restore options…..uggh). Via your assist, I was able to get Mac OS High Sierra on a USB drive, placed a new physical hard drive in his MacBook, and booted/installed from the USB to SSD. Your instructions are spot on. Much appreciated!!
Use these instructions instead. Direct from Apple and worked perfectly. Note the way the USB needs to be formatted.
So when I did this to create a bootable Mojave usb installer it formatted the usb flash drive as APFS!
Older macs here will not boot off it. Is their a way to force the installer to use HFS+?
Hey, mine wasn’t working. I dragged the USB drive into terminal window and found out it was actual showing up in terminal as UNTITLED 1 so i needed to add a backslash and a space and 1 for it to work.
sudo /Applications/Install\ macOS\ High\ Sierra.app/Contents/Resources/createinstallmedia –volume /Volumes/UNTITLED\ 1 && say Boot Installer Complete
It just keeps coming back with: command not found
I don’t get it. I triple checked it ten times.
I use the command below but it will just not work :-(
sudo /Applications/Install\ macOS\ High\ Sierra.app/Contents/Resources/createinstallmedia –volume /Volumes/HighSierraInstall
This probably means that your installer is not located in the Applications folder (see Daniele’s comment).
You can run “sudo find / -name Install\ macOS\ High\ Sierra.app” to find the location of your installer.
This probably means that your installer is not located in the Applications folder (see Daniele’s comment).
You can run “sudo find / -name Install\ macOS\ High\ Sierra.app” to find the location of your installer.
will pages app be part of install? Do you have to re-download from App Store? (included with the installer or not)
APFS disks may not be used as bootable install media.
Hi.
It worked for me.
I installed High Sierra over Sierra, over El Capitan, over Yosemite and over Maverick. This last one was the last clean installation.
It’s time to a new fresh and clean installation.
Thanks for your tips!
The name of the usb volume needs to match the command or else you get the not found
That is correct. The path must be exact.
I have the high sierra final version 5.17 GB in applications folder. but when I copy paste the sudo command, Terminal error that “sudo: /Applications/Install macOS High Sierra.app/Contents/Resources/createinstallmedia: command not found”
I tried right click on the installer app, and I don’t see the ‘view package contents’ option. I downloaded this version from the macos patcher app website. Any suggestions to get the boot installer setup on the USB?
The disk is created and contains the copied install image but it is not bootable, rebooting with Option key doesn’t work, any idea why?
keep getting message
This tool must be run as root.
suggestions?
Run it as root, perhaps ?
Enter sudo before the rest of the command e.g sudo
createinstallmedia {etc}
When it asks for a password, enter the password for the account you are currently using.
The USB needs to be formatted as EXFAT. Took a while to figure out what type was needed.
No, the USB drive gets formatted as HFS+, which is the Mac file system before AFPS. The drive gets formatted upon running the command to create the High Sierra installer.
See options :
Applications/Install\ macOS\ High\ Sierra.app/Contents/Resources/startosinstall –usage
/Applications/Install\ macOS\ High\ Sierra.app/Contents/Resources/createinstallmedia –usage
To prevent APFS :
sudo /Applications/Install\ macOS\ High\ Sierra.app/Contents/Resources/startosinstall –applicationpath /Applications/Install\ macOS\ High\ Sierra.app –agreetolicense –converttoapfs NO –nointeraction
How many minutes will it take to make a high sierra bootable USB drive?
It’s difficult, very difficult here.
I can not make the disk in any way, either through Terminal, DiskMaker X, Install Disk Creator or Boot Buddy.
Boot Buddy can prepare the USB, but does not boot. All other modes gives error and does not finish preparing the USB.
From the Terminal I get this message: “Failed to copy kernelcache,” prelinkedkernel “could not be copied to” .IABootFiles “
may be your size of the dmg file is not enough big
Why does the usb need to be 16 GB? The whole installer package is less than 6, so a 8 GB one should be more than enough.
It would be kind of nice if the article specified which file system to use when formatting the USB stick, since there are a number of choices.
You would want to use GUID HFS+ if you format the High Sierra installer drive yourself, but the installer will format the USB stick for you in the process.
If the High Sierra Mac is SSD equipped it will convert to AFPS.
Thanks Bigs!
createinstallmedia prompts for verification of the format action. Add –nointeraction switch to avoid the prompt.
sudo /Applications/Install\ macOS\ High\ Sierra.app/Contents/Resources/createinstallmedia –nointeraction –volume /Volumes/UNTITLED && say Boot Installer Complete
Don’t bother, 10.13 is a beta. Video driver problems with Mac minis, mail problems, OS X “Server” is a joke, it should have been called OS X Low Sierra
EASIER: http://diskmakerx.com
Does the usb stuck have to be ssd in the new format afps or can it be formatted in hfs+ sunce it isn’t an ssd ?
For those Mac which could not download complete macOS High Sierra installer application could be cause by old Mac which not supported by macOS High Sierra
8 GB is plenty. My bootable drive used 5.24 GB.
sorry i didn’t worked
I followed this instructions and it worked fine:
https://osxdaily.com/2017/06/12/make-boot-macos-high-sierra-beta-install-drive-usb/
Downloaded final version of MacOS High Sierra.
Connect the USB flash drive to the Mac, rename the drive to “HighSierra” for easy identification – remember the USB drive will be formatted and erased to become the High Sierra installer.
Open the Terminal application in Mac OS, located in /Applications/Utilities/
Enter the following command syntax exactly:
For MacOS High Sierra Final Version:
sudo /Applications/Install\ macOS\ High\ Sierra.app/Contents/Resources/createinstallmedia –volume /Volumes/HighSierra –applicationpath /Applications/Install\ macOS\ High\ Sierra.app –nointeraction &&say Boot drive created
This worked for me.
Name your usb: HighSierra
Enter the following command syntax at the command line: sudo /Applications/Install\ macOS\ High\ Sierra.app/Contents/Resources/createinstallmedia –volume /Volumes/HighSierra –applicationpath /Applications/Install\ macOS\ High\ Sierra.app –nointeraction &&say Boot drive created
Worked for me too, after having struggled a bit. A problem I could not think of was that my Sierra file was not in the applications folder after the download and this made all the process to not work. Just moved it into the applications folder and the process worked like a charm
No need to move the .app file to the applications folder.
I just ran it from where it downloaded.
sudo ./createinstallmedia …
Thank you for this, Carlos! I don’t know if I could have found this syntax anywhere else, so you really helped me a lot!
Nitpicking:
First three words:
Some Mac uses
Should be:
Some Mac users