How to Downgrade macOS High Sierra
Some MacOS High Sierra 10.13.x users may wish to downgrade back to macOS Sierra 10.12.x or even Mac OS X El Capitan. Mac users can downgrade from High Sierra to a prior Mac OS release, either by formatting the hard drive and clean installing Sierra or another prior system release, or by relying on a Time Machine backup made prior to the update to macOS High Sierra.
The downgrade method we’ll cover here uses a Time Machine backup to restore to a prior version of macOS and downgrade macOS High Sierra 10.13. If you do not have a Time Machine backup made with a previous version of Mac OS, this will not be possible to follow.
Why downgrade from macOS High Sierra?
For most users, they should not downgrade from macOS High Sierra. Downgrading system software is probably most appropriate as a last resort or a final troubleshooting method, if some particular problem with High Sierra is making the Mac unusable or incompatible with your workflow. There are mixed reports of some Mac users updating to macOS High Sierra and then experiencing a range of problems, from rapid battery life draining, inability for some apps to open, apps crashing, strange performance problems or overall performance degradation, problems with mounting and reading disks, problems with networking connectivity and wi-fi, amongst other issues that could be considered deal breakers.
Important: Keep in mind there is no official downgrade path for macOS. Downgrading macOS High Sierra is accomplished by formatting the target hard drive, thereby erasing everything on it, then restoring from a prior Time Machine backup, or by formatting and then clean installing a prior version of macOS system software onto the computer, and then manually restoring files from some other backup. For our purposes here we will be covering a downgrade by erasing, then restoring from a Time Machine backup made prior to installing High Sierra. You will want to manually copy and backup your recent work, since any files or work created between installing High Sierra and the last pre-High Sierra backup will be removed in this process.
If you do not have a Time Machine backup made prior to installing macOS High Sierra, of the Mac when on Sierra or El Capitan, then you can not proceed with this approach.
How to Downgrade macOS High Sierra to a Prior Mac OS Version
Backup your Mac before beginning this process, it requires erasing the hard drive and removing all data.
- Connect the Time Machine backup volume to the Mac if it’s not already attached
- Restart the Mac and immediately hold down Command + R keys together to boot into Recovery Mode on the Mac
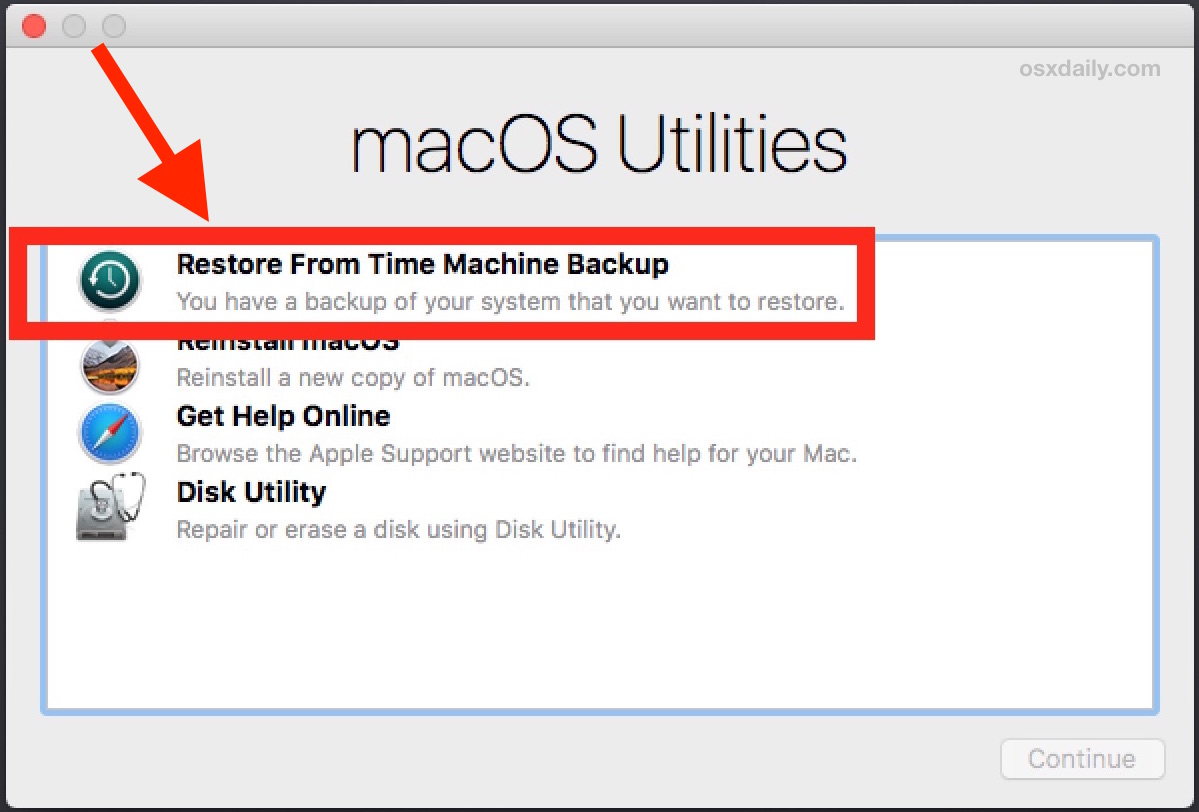
- When the “macOS Utilities” screen appears choose “Disk Utility”
- Pull down the “View” menu in Disk Utility and choose “Show All Devices”
- Select the hard drive with MacOS High Sierra installed on it, then click the “Erase” button in the tool bar
- At the erase drive screen, name the drive and select “Mac OS Extended (Journaled)” as the file system format, click “Erase” when ready – ERASING DESTROYS ALL DATA ON THE SELECTED HARD DISK, DO NOT PROCEED WITHOUT A BACKUP
- When the drive finishes formatting, exit Disk Utility to return to “macOS Utilities” screen
- At “MacOS Utilities” select the option to “Restore from Time Machine Backup”
- Select the Time Machine backup drive connected to the Mac as the backup source and choose to continue with the restore process
- At the Time Machine “Select a Backup” screen, choose the most recently available backup that has the version of MacOS you want to restore (macOS Sierra is versioned as 10.12.x, Mac OS X El Capitan is 10.11.x) and select Continue
- Choose the destination to restore the Time Machine backup to, this will be the hard drive you formatted earlier
- Now choose “Restore” to confirm you want to restore the hard drive to the Time Machine backup
The restore of macOS will begin, this can take quite some time depending on the size of the backup, the speed of the hard drive, amongst other factors. Be prepared to wait a while, and let the entire process complete uninterrupted.
When the restore from Time Machine completes, the Mac will boot back up to the state and with the system version where the restored Time Machine backup was made.
Note that if the process of formatting the hard drive mentioned above is usually only necessary for Mac users who changed their file system to thew new AFPS file system available in macOS High Sierra. If the Mac file system was not changed then a regular old restore from Time Machine is possible without bothering with the additional step to format the drive, but nonetheless the data on the driven will be removed and replaced with the data on the Time Machine backup.

OS 10.13 is a step backwards. Why?
Software:
Apple’s Mail –> Preferences –> Auto Delete (Rules) doesn’t work in OS 10.13
Apple’s Mail – “Not Junk” designation is gone.
Secure Delete is no longer part of the Mac OS operating systems as it was in OS 10.10. Now you have to buy it from a third party.
You can bet that Mac are building obsolescence into their applications and software, they have apologised for doing it on iPhones… doesn’t mean they stopped, they only apologised for doing it. Crapintosh at it again…!
This method is only useful if you backed up whilst you were still on Sierra – BEFORE you upgraded to High Sierra (as the Author did mention). But for most of us, with Big Brother Apple pushing the virtues of ‘always upgrade to the latest OS’ bull dust.. Experience now tells me to make backups BEFORE you upgrade to their latest and greatest OS, because now that I’ve upgraded to High Sierra, and found it to be too bloated for my Macbook to run, Migration Assistant or Time Machine both won’t allow me to reinstall Sierra and import my old user accounts I only managed to back up while on High Sierra. So.. pretty useless, and annoying that I’ve wasted a week now trying to work out how to go backwards from High Sierra to Sierra, and put my backed up user account from High Sierra on it. No go – will not acknowledge the newer backup. Apple – I HATE you for becoming so non-user friendly now.
Thanks. I will be doing this later today. My 15″ MBP with touchbar freezes at least every 1-2 days requiring a force restart. I’m also seeing several glitches with Citrix and displays.
Kind of reminds me of the OS9 days.
macOS 10.13.1 – I really don’t want to downgrade to macOS Sierra, but I may have to…I have seen that in my user account after about 30min at most, my system will freeze completely. I always keep the time w/ seconds showing and the seconds stop ticking away and the whole system is frozen. Then about 1-2 min later, my iMac reboots. I have seen that this never happens when logged into my other 2 user accounts on my system, so clearly something within my user account is causing his freeze.
I’ve disabled all login items, held shift down after entering my password at login but it still freezes. What are the paths to the logs I need to examine to figure out what is causing this?
Thx
Thanks a lot, it worked flawlessly. And I could put back the new documents from the most recent Time Machine backup (high sierra to sierra). So far everything is OK.
My only gripes about High Sierra is that it highjacked the only drive I can boot from with the new filesystem.
I attempted to set up a boot camp after the installation and the disk utility wouldn’t resize the partition on my boot drive. This required a clean install to a pre-install partition created. Of course then there’s the booting back to MacOS from Windows is broken.
But here’s what really irks me and I hate to catastrophize, why did Apple remove the networking assistant. I use that frequently and two months ago daily.
I know how to troubleshoot my network using command line tools, but that utility was able I show me exactly where the breakdown was occurring everytime saving me hours of troubleshooting time.
I jumped on Mac just after the UI turned flat, and everything I always drooled over from Apple seems to be going away.
My only problem with High Sierra is that it does not allow me to play videos from an external dive that are over 1GB without a tedious process of “verifying” which can take several minutes. Is there a fix for this ?
The problem with this article is that – unless I’m missing something obvious – it doesn’t work.
You can’t reformat the 10.13 drive from the Recovery partition as MacOS X Extended! It tells you the drive is in use.
Meanwhile it doesn’t want to start up from my SuperDuper backup drive, so I’m off to find the power supply for my retired MacBook Pro to try and start up in FW Target mode…
Man. I hate the Mac dance.
By the way, it’s ridiculous that the installer doesn’t ask if you want APFS.
Of course this works. This is how you downgrade High Sierra by restoring from a Time Machine backup from before updating. You can also start the process from another boot volume if you want to, whether USB flash drive or hard drive. If you want to install Sierra or El Capitan, you have to format the target drive as HFS+ it can not be installed onto APFS.
You can’t format the drive you are actively booting from, but you can format a different partition. The Recovery partition is one partition, the OS partition is another partition. So if you are booted into Recovery, you can format the OS partition but you can not format the entire hard drive because it also contains the Recovery partition that is actively booted from. To format the entire drive, you need to boot from a separate disk entirely, but that is not necessary simply to restore from Time Machine.
ALWAYS BACK UP BEFORE DOING ANY MAJOR UPDATE!!!!!
Forget Time Machine a clone is far more accurate and simple to do. SuperDuper or CarbonCopyCloner are well worth the few $$ they cost, and for the typical consumer a far better choice.
ALWAYS BACK UP BEFORE DOING ANY MAJOR UPDATE!!!!!
If you have a clone backup, you simply save any new work to a separate drive, boot to the clone and clone the backup to your system drive and you are done. This takes about 1/2 the time it takes to restore from TM and is failureproof.
However I recommend doing this. Partition your system drive for multiple OSX installations, keep one for your current OSX, and another to install High Sierra. You can then test drive, as I am now, a new OS will continuing to run under the old version. You have access to everything including applications and files, without endangering them to be corrupted or not work under the new OSX version.
Once you decide all is well and you’re ready to move forward on the new OSX, and have backed up the current version (just in case) you can use Migration Assistant to import your files and user setup to completion, then wipe the other partition and use it for storage until the next OSX update, where you can do this method over again.
This allows the user to, without endangering any of their current setup, test drive a new OSX version. It requires drive space only, and given how cheap that is, anyone really can afford this.
it is however not a replacement for backup!!!
ALWAYS BACK UP BEFORE DOING ANY MAJOR UPDATE!!!!!
Good advice and I agree with your sentiment.
I strongly recommend backing up before any system update even the minor ones. Time Machine is good for most users since it is simple, but if you can manage to work with a complete clone of a drive that can be even easier. Cloning drives is particularly great when replacing a hard disk too, both CarbonCopyCloner and SuperDuper are excellent.
The only problem I’m having with high sierra is that bootcamp has a new issue – you can’t boot directly back into macOS from windows as windows cannot see the new file system. There’s an easy workaround, and hopefully this will be fixed soon.
Rather than downgrade, FIX your High Sierra installation.
Downgrade means also you loose ALL your recent work !!
What? no links?
Using the “dosdude1.com/highsierra” patch.
I’ve been running High Sierra on my 2008 MacPro successfully since October 1st – very stable. Using the patch. No need to downgrade back to El Capitan at all…
I have noticed that Photos on my mac has gotten a little glitchy when editing. The sliders seem to be a bit buggy as if there is a lot of background activity.
Have you had anyone else have this problem….??