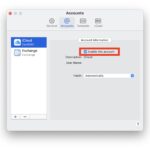
Subscribe to OSXDaily

Subscribe to RSS Subscribe to Twitter Feed Follow on Facebook Subscribe to eMail Updates

Shared on Facebook

Shop at Amazon

Ad

OSXDaily on Facebook

Search iCloud

2 Solutions for When There’s Not Enough Storage for an iCloud Backup

May 21, 2012 - 3 Comments

Not Enough Storage message from iCloud backup

Running out of iCloud backup capacity happens quick whether you have a single iPhone or a handful of iOS devices. You’ll know this has happened because you get a friendly popup informing you of “Not Enough Storage” and that the automatic backup can not occur as a result. So what to do? There’s really two choices, one is the most obvious and involves upgrading the iCloud account, and the other is free and relies on you more actively managing your backups.

#1 – Upgrade iCloud Storage

Obviously the easiest and most immediate solution is to just buy more iCloud storage, it’s cheap and a variety of plans are offered starting at $20/year for a total of 15GB storage. Going this route is simple and recommended for those who can afford it:

  • Tap on Settings, tap “iCloud” and scroll down to tap on “Storage & Backup”
  • Tap “Buy More Storage” and choose the plan that works for you

Easy enough, but what if you don’t want to add a yearly expense to your iCloud account? That brings us to option number two, which is free but will involve some more effort.

#2 – Manage & Delete Old iCloud Backups

If you want to stay free, you’ll have to manage your iCloud backups a bit more hands on to clear up some space, here’s two options on how to do that.

  1. Launch Settings, tap “iCloud”, then tap on “Storage & Backup”
  2. Tap “Manage Storage” and tap the name of the device you are going to manage storage for, now you have two real options:
    • Option 1) Turn off iCloud backups for certain apps
    • Option 2) Delete the current Backup and create a new one

Option 1 really just thins down the backup size, but it’s not always a reasonable choice. If you’re going that route the first thing you’ll probably want to do on an iPhone is move the pictures to a computer and then delete them from iCloud. You can also selectively remove other apps from the backup list, though outside of photos and movies you likely won’t save much space using this method.

Option 2 clears out the existing iCloud backup and could be a better solution, but before doing so it’d be smart to connect the iPhone, iPad, or iPod touch to a computer with iTunes and create a quick manual backup by right-clicking on the iOS device and choosing “Back Up”, this saves a backup locally to the computer just in case something goes wrong. After you’ve done that, delete the backup from iCloud Settings and then immediately start a new manual backup with iCloud by tapping “Back Up Now”, that will become the most recent backup. If you’re going this route you’re probably right on the brim of iCloud storage capacity again though, so you’ll have to do this on your own anytime you get the popup alert warning of not enough iCloud storage.

For those with multiple iOS devices, it’s probably best to just upgrade the iCloud storage. This is especially true for Mac users who intend on updating to OS X Mountain Lion, since the new version of Mac OS has even more iCloud integration and you’ll undoubtedly end up storing plenty of data in Apple’s cloud.

Access the iOS Photo Stream from the Mac OS X Finder

May 18, 2012 - 15 Comments

Access iOS Photo Stream from Mac OS X Finder

Photo Stream is an excellent iCloud feature that automatically syncs all pictures taken on an iPad, iPhone, or iPod touch to one anothers Photo libraries, and it will even sync with Mac OS X through the iPhoto app. Not everyone uses iPhoto to manage pictures though, and if you just want quick access to those pictures from the OS X Finder you can use a neat trick to access the entire iOS Photo Stream directly from the Mac desktop.

In order for this to work, you will need the following:

  • Mac OS X 10.7.2 or later on the Mac, with iCloud configured
  • iOS 5 or later on all iOS devices, with iCloud configured
  • Photo Stream must be enabled on all iOS devices involved, and must be enabled on the Mac

If you don’t have iCloud set up and Photo Stream turned on, do that before proceeding.

Accessing the iOS Photo Stream from Mac OS X Finder

  1. From anywhere on the OS X desktop, hit Command+Shift+G to bring up Go To Folder and enter the following path:
  2. ~/Library/Application Support/iLifeAssetManagement/assets/sub/
    Go to the IOS Photo Stream Folder in OS X

  3. In the upper right corner of the Finder window, search for “Image” and select “Kind: Image” from the pull down menu
  4. Save image search

  5. Now click the “Save” button to save this search, name it something like “Photo Stream” and check “Add To Sidebar” to keep the item in the sidebar

Now anytime you click “Photo Stream” in an OS X Finder window, you will get instant access to all images from the iOS Photo Stream from your iPhone, iPad, iPod touch, or all of the above.

For quick access to photos, this is easier and faster than transferring them all from iOS to the computer because it’s practically instantaneous and automatic, and it’s simpler than using the past tip for an AppleScript to save all images from Photo Stream because there is very little potential for error.

Once you have this set up you’ll likely find yourself using it very often, it’s so useful that hopefully the upcoming release of OS X Mountain Lion will include a similar featured enabled by default.

This is a variation on a great tip that was posted a while back by IconMaster to get to iOS screenshots from OS X, but by specifying any images in the search you can access all the Photo Stream images rather than only screen captures. If you do want to see only screen shots searching for file type “PNG” will achieve that.

Turn Off iCal Alerts in Mac OS X

May 5, 2012 - 1 Comment

turn off ical alerts on the mac

Anytime I schedule anything particularly important I use iCal alerts to remind me of the event. But I really only want to receive the alarm on my iPhone which is the device I have with me all the time, rather than coming home and opening my MacBook screen to an outdated alert from earlier in the day. The solution for this is to disable all iCal alerts in Mac OS X, which will not impact the alarms on other synced iOS devices:

  • From iCal, pull down the iCal menu and choose “Preferences”
  • Click the “Advanced” tab and check the box next to “Turn off all alerts”

Close out of Preferences and the next time an alarm is scheduled to go off it won’t happen on the Mac. This is also a helpful setting to adjust for auxiliary Macs that have iCloud configured where you want access to the Calendar data but don’t want to be annoyed with the popup alarm.

Stop iOS Asking to “Verify iCloud Password”

Apr 20, 2012 - 4 Comments

Verify iCloud Password message on iPhone

Many iPad, iPhone, and iPod touch users are annoyed with a constant message asking to “Verify iCloud Password: iCloud Backup requires that you verify your password.”, the popup dialog shows up randomly but most often when unlocking a device after periods of inactivity. Clicking OK and entering the password makes it go away for the time being, but it generally comes right back after another period of inactivity.

The solution is fairly simple, click “OK” when the popup shows and rather than entering the password click “Cancel” and do the following:

  • Open Settings and tap on “iCloud”
  • Tap the Account name and delete the stored password, then reenter the iCloud password and click “Done” to verify
  • Close out of Settings

This resolved the problem for me, but if you’re still geting nagged about the iCloud password you may need to just reset all iPhone settings and restore from a backup.

How to Remotely Wipe a Mac

Mar 17, 2012 - 6 Comments

How to Remotely Wipe a Mac

In an extreme situation, say a Mac is lost or stolen, you can remotely wipe the Mac of all its data and contents with the help of iCloud. Remotely wiping a Mac goes a step further though and not only removes all data from the computer, but locks it down so that it’s unusable without a set passcode, plus displays a message you provide. This is excellent anti-theft protection, and even if you never end up using it, it’s good to know how to do.

Requirements:

If you meet the requirements, here is how to use the remote wipe feature.

Remote Wipe a Mac with iCloud

  1. Go to iCloud.com and click on “Find My iPhone”, or launch the Find My iPhone app in iOS
  2. Locate the Mac on the map, and click the “i” next to the computers name
  3. At the Info screen, click on “Remote Wipe”
  4. Remote Wipe a Mac

  5. Enter a passcode twice for recovery, this will be necessary to know if the Mac is recovered so that it can be unlocked
  6. Enter a message to be shown on the Mac after it has been wiped, putting a “Property of Bill Gates, if found please contact 1-888-555-1212″ message is a good idea
  7. Set a Wiped Mac message

  8. Click on “Wipe” and confirm

The Mac will be wiped clear of personal data and become essentially useless until the passcode has been entered. This rates up there with some of the best anti-theft software available, and considering that iCloud and Find My Mac is completely free to use, there is no reason to not have this setup in case of emergency.

It should be noted this is not a reasonable approach to simply formatting a Mac hard drive, which is best done locally with the Disk Utility application.

For more remote control fun, remember that you can sleep a Mac remotely through email or SSH too. It’s less dramatic, but perhaps more practical on a day to day basis.

How to Transfer Everything from an Old iPad to New iPad

Mar 16, 2012 - 11 Comments

Transfer from Old iPad to New iPad

So you just upgraded to a new iPad, and you want to move all of your apps, pictures, settings, and data from an old iPad to the new iPad, right? Doing this is easy, you can go the post-PC route with iCloud (recommended), or the old fashioned way with iTunes, we’ll show you both.

Transfer Data from Old to New iPad with iCloud

Using iCloud is by far the easiest method, but you’ll obviously need to have iCloud set up and configured for this to work. This is the post-PC method, you won’t need to use a computer at all.

From the Old iPad

  1. Launch “Settings” and tap on iCloud, then tap on “Storage & Backup”
  2. Tap on “Back Up Now” to initiate a manual iCloud back up
  3. Let the backup finish and then leave the old iPad alone

Your work on the old iPad is finished, now pick up the brand new iPad and turn it on.

From the New iPad

  1. At the “Set Up iPad” screen, choose “Restore from iCloud Backup” and tap “Next”
  2. Restore from iCloud Backup

  3. Login to your iCloud account and choose the most recent backup from the old iPad you just made
  4. Tap on “Restore” to transfer the data from the old iPad backup to the new iPad

How long the transfer takes depends on how much stuff you keep on the iPad and how fast your internet connection is. Just let the process complete and don’t interrupt it or lose the wifi connection.

Move an Old iPad a New iPad with iTunes

You can also migrate an old iPad to a new iPad with the help of iTunes. This is the old fashioned way since it requires hooking up the iPads to a computer, but it works just fine if you don’t have iCloud or you aren’t on a fast internet connection. These instructions are the same for Mac OS X or Windows.

With the Old iPad

  1. Launch iTunes and connect the old iPad to the computer
  2. Right-click the iPad in the iTunes sidebar and choose “Back Up”
  3. Back up with iTunes

  4. Let the iPad backup finish within iTunes, keep iTunes open but disconnect the old iPad from the computer

With the New iPad

  1. Turn the new iPad on and at the “Set Up iPad” screen choose “Restore from iTunes Backup” then tap “Next”
  2. Connect the iPad to the computer and within iTunes choose the most recent backup from the restore menu
  3. Click “Continue” and let the restore via iTunes take place, do not disconnect the iPad until the transfer is completed and the iPad has rebooted

Restoring from iTunes may actually be quicker than restoring from iCloud, depending on the size of your backups and the speed of the internet connection. Even so, migrating with iCloud is the easiest and thus what is most recommended.

Note: If you already set up the new iPad, you can easily return to the original set up and configuration screen required for the transfer by tapping from Settings > General > Reset > Erase All Content and Settings, this will reset any iOS device to factory defaults. This erases everything on the iPad, so only do this if you are certain.

Download Photo Stream Photos to a Folder in Mac OS X

Feb 11, 2012 - 13 Comments

Save Photo Stream Images to a folder in Mac OS X

Photo Stream is a nice feature of iCloud that pushes all of your pictures automatically to your other iOS devices and your Mac with iPhoto or Aperture. If you haven’t used it before, this means if you take a picture on your iPhone, it will automatically show up in the Photo Stream on your iPad, and also in iPhoto on your Mac. Oddly, there isn’t an option to choose a destination other than iPhoto or Aperture in Mac OS X though, but this cool trick allows you to specify a folder and then download all the images from iCloud to your Mac, without using iPhoto or Aperture.

In order to use the following script, you will need iOS 5 and OS X 10.7.2 or later, as well as iCloud set up and configured and the Photo Stream option enabled in Mac OS X’s iCloud System Preferences.

Save Photo Stream Images to a Folder in Mac OS X

  • Open AppleScript Editor, found at /Applications/Utilities/AppleScript Editor.app
  • In a new blank AppleScript window, paste in the following code, replacing “USERNAME” with the short user name of your Mac OS X home directory:
  • tell application "Finder"
    set this_folder to "Macintosh HD:Users:USERNAME:Library:Application Support:iLifeAssetManagement:assets" as alias
    set target_folder to "Macintosh HD:Users:USERNAME:Pictures:MyStream" as alias
    try
    duplicate (every file of the entire contents of this_folder whose name contains "IMG") to the target_folder with replacing
    end try
    end tell

  • This will look something like this in the AppleScript editor:

Download Photo Stream Images to a Folder in Mac OS X with an AppleScript

  • Adjust the target_folder variables as appropriate – Change “Macintosh HD” if your hard drive is named something else, and change “MyStream” if you want the final directory to be something other than that name located in the user Pictures directory – remember with AppleScript, rather than slashes the colon is used instead to type and show file and folder paths
  • Run the script to verify that it works and then save the script with an appropriate name like “PhotoStreamDownloader”, and select “Application” as the file format for easy access and launching later

Now anytime you want to download your Photo Stream to your Mac, just launch that saved script app and you will grab your latest Photo Stream images to the configure directory in Mac OS X. For best results, place the application into your /Applications directory and add it to Launchpad for easy future use.

AppleScript Editor is fairly intuitive, and if you entered a directory or path wrong when you attempt to run the script it will let you know with an “AppleScript Error” message. If you get a “iLifeAssetManagement:assets wasn’t found” message, then you haven’t enabled Photo Stream in iCloud’s System Preference panel.

Hopefully a future update to iCloud and Photo Stream will allow us to choose an image download destination directly, but until then this great trick works just fine.

Like this? Check out some more iCloud tips.

Police Catch iPhone Thief Using iCloud, Have You Set Up Find My iPhone Yet?

Jan 30, 2012 - 8 Comments

Find My iPhone

If you haven’t set up iCloud and Find My iPhone yet, now is a good time to do so. This friendly reminder comes to us from a recent New York Times article, which details the story of a police officer using iCloud to bust an iPhone thief and return the iPhone to its rightful owner using none other than the free Find My iPhone service:

The ace up the sleeve of Officer Garland, an avid Apple consumer was something called “Find My iPhone,” a free 5.4-megabyte piece of software, or app, that he had on the iPhone in his pocket.

Punching in the victim’s Apple ID … he quickly determined by the location of a small gray phone icon on a digital map that the robber was near Eighth Avenue and 51st Street.

As Officer Garland and his partner drove there, the signal source shifted, closer to Eighth Avenue and 49th Street. There, a man later identified by the police as George Bradshaw, 40, of New Lots, Brooklyn, stepped outside a Food Emporium.

Officer Garland pushed the “Play Sound” button on his phone. Instantly, a pinging beep — not unlike the sound of a submarine’s sonar — began emitting from Mr. Bradshaw, 20 feet away.

The victim later identified the robber and got her iPhone back.

So have you configured iCloud and Find My iPhone yet on all your Apple gear? It’s easy to do, read our guide on setting up iCloud and follow the instructions below to enable the specific Find My iPhone (or Find My iPad and Find My Mac) feature. You’ll need iOS 5 or later on the iPhone, iPad, or iPod touch, or OS X 10.7.2 or later on the Mac.

Setting Up Find My iPhone (or iPad)

You will need an Apple ID, iOS 5 or later on an iPad, iPhone, or iPod touch, and iCloud setup.

  • Launch the Settings app
  • Locate and tap on “iCloud” – if you are asked for an Apple ID you haven’t setup iCloud yet
  • Near the bottom of iCloud settings, look for “Find My iPhone” and switch to “ON”, allow the app to use location services

Find My iPhone

It’s that easy to turn on, but you’re not quite finished yet because you will want to also install the Find My iPhone app for iOS. The Find My iPhone application is a free download on the iOS App Store, and lets you locate the iOS devices or Macs on a map, send messages and pings to the devices, and even remotely wipe them of their data.

Find My iPhone map and options

Setting Up Find My Mac

Assuming you already have iCloud enabled in OS X 10.7.2, setting up Find My Mac is very easy:

  • Launch System Preferences
  • Click on “iCloud”
  • Click the checkbox next to “Find My Mac” and then click “Allow”

The Mac will now be accessible via the iOS Find My iPhone app in the device list, and can also be pinpointed on a map using the iCloud.com website.

How to Authorize a Computer with iTunes

Jan 29, 2012 - 5 Comments

Authorize a Computer for iTunes

If you have a new computer, you’re going to want to authorize it with iTunes and an Apple ID. Authorizing iTunes does quite a bit, it lets you sync apps, books, music, movies, and other content from the iTunes Store, re-download past apps from the App Store, it enables Home Sharing with iTunes, and also allows for some iCloud specific features like Automatic Downloads. In other words it’s basically essential, and it’s very easy to do, make sure you have have an active Apple ID before continuing:

  1. Launch iTunes on the new computer (PC or Mac)
  2. Pull down the “Store” menu and select “Authorize This Computer”
  3. Enter your Apple ID and password at the next screen and click on “Authorize”
  4. Authorize a Computer with iTunes

You can authorize up to five personal computers of any variety of Macs or Windows PC’s. In other words, up to five computers can sync and share your data and purchases. If you go over that number, you’ll need to deauthorize one of the computers before authorizing a new one.

Sync iCloud Documents & Data Over a 3G Cellular Connection

Nov 22, 2011 - 1 Comment

Sync iCloud over 3G

iCloud and iOS includes the ability to sync some iCloud data directly over a 3G cellular connection when a wireless network isn’t available. For now, this is limited to “Documents & Data” from the iWork suite of apps, which includes Pages, Numbers, and Keynote. This is a great feature, but due to the bandwidth usage, it should be used sparingly by those who don’t have large data plans with their carrier.

  • Launch Settings and tap on “iCloud”
  • Tap on “Documents & Data” and slide “Use Cellular” to ON

Be sure to closely monitor data usage with this and other cellular features as to avoid costly overage charges, unless you have an unlimited data plan, of course.