Exclude Folders from Time Machine Backups on Mac
Do you have a huge folder or ten you don’t want to include in Time Machine backups? Maybe just a few files that aren’t necessary to keep, or that you have a different backup solution for? Maybe you just want to slim down the size of a backup, or speed things up by excluding a large item that just isn’t necessary to access in the future? For most users, you’d want to let Time Machine run it’s course and handle things on it’s own, but if necessary it’s really quite easy to manually exclude files and directories from Time Machine, thereby preventing them from being backed up by the automated service entirely.

In classic Mac fashion, this is extremely easy to do, and it’s all quite user friendly.
How to Exclude Items from a Time Machine Backup in Mac OS X
Using this trick you can exclude virtually anything from the automated time machine backups:
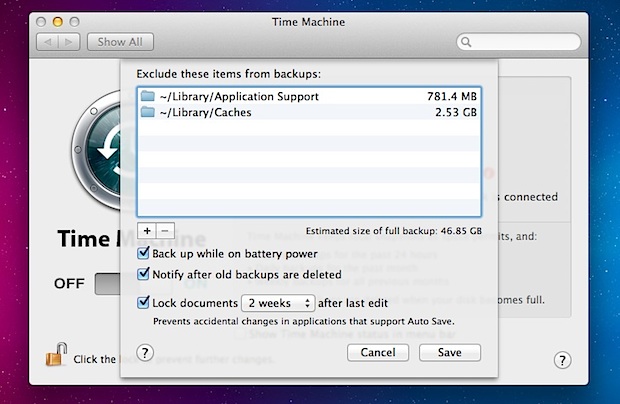
- Launch System Preferences and click on “Time Machine”
- Click on “Options”
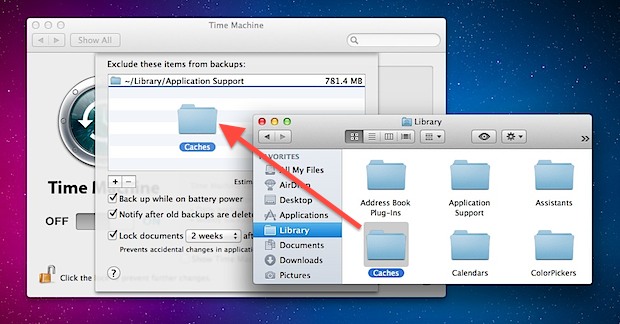
- Drag and drop folders into the ‘Exclude items from backup’ list
- Click Save and close out of System Preferences
There’s no limit on what you can exclude, so add as many items into this list as necessary.

If you’re averse to dragging and dropping or just prefer the classic “Open” dialog box for navigation, you can also click the + plus button and manually select items and folders to exclude. Repeat the process until all that you want excluded is in the list.
Changes will not impact past Time Machine backups, but future backups with Time Machine will acknowledge the exclusion list and prevent those items from being backed up, at least until they have been removed again.
Re-Including Items into the Backups
As you may have guessed, having the files or folders reincluded in the backup is just a matter of removing the items from the exclusion list. To do that, just the name of the file/folder in question, and hit the Delete key, or click the minus button in the exclusion window to remove it from the blocked list and then add it to the backups list. That process will also simultaneously start a new backup if a Time Machine drive is accessible.
It’s generally a good idea to keep a complete backup of a Mac, and if you don’t know what to exclude you probably shouldn’t exclude anything and just let Mac OS X handle the whole process on it’s own.


Have just added a new external drive which I want backed up using time machine. However, the drive is automatically listed in the “excluded from back-up” list and will not let me remove from exclusion list. It will not let me highlight the drive and shows on the list “faded”, the same way the actual Time Machine drive appears.
I have another external drive which is able to be added or removed from the list no problem.
Any ideas on how I can add the new drive for back up please?
BUT …. how to ‘invert’ the exclude,
i mean i want to select folder which i want to include in the backup system. so the folder i selected will be backup while the rest will be ignored. with the current feature (select to exclude), let say i want only to backup one folder from my disk where i have total of 1000 folders inside that disk. It means i have to click/drag 999 folders to exclude them! not to mention if the folder is in nested structure (folder inside folder). An optional ‘switch’ to set mode between ‘exclude’ and ‘include’ will be cool. Thanx
Informative!!
time machine automatically excludes ~/Library/Caches for you. there’s no reason to exclude it yourself.
You will save a bunch of space in general if you only focus on the users home folder. Since the Mac App Store keeps all of our apps anyway, this is a fine strategy for those of us with not much outside the home folder.
You can use Time Machine (the application) to look at the ~/Library/, then highlight the Caches folder for example, control-click or right-click to get the contextual menu to delete all backed up copies of this folder to free up the space wasted if you won’t be backing this folder in the future.