How to Change the Dock Indicator Lights Color in Mac OS X

The color indicators in the Mac OS X Dock provide an easy way to tell what apps are running just by glancing at the Dock. OS X basically provides you with two options for those indicators, which is to either show them or not, but because we like to customize things we’ll cover how to change the indicator light appearance so that they display as a different color completely. Optionally, this could include using a simple indicator that also removes the glowing appearance, which can leave the OS X Dock looking a bit more minimalist like this:

There are actually two ways to go about changing the Dock indicators, one uses a free tool called MacUtil, and the other will be done completely manually without the need for any third party apps or downloads. MacUtil is the easiest approach, thus making it the generally recommended approach, and we’ll cover that first. Because either method modifies system files, it’s a good idea to perform a quick manual backup to Time Machine before beginning. It’s unlikely something will go wrong, but it’s always better to be safe than sorry. As always with these system tweaks, proceed at your own risk.
Change the Color of the Dock Indicator Lights in OS X with MacUtil
We’ll cover the quick method first, using a free third party tweak utility called MacUtil. If you’d rather do it manually on your own, or use different colors than what are offered by MacUtil, jump below for the manual approach:
- Get MacUtil free from the developer
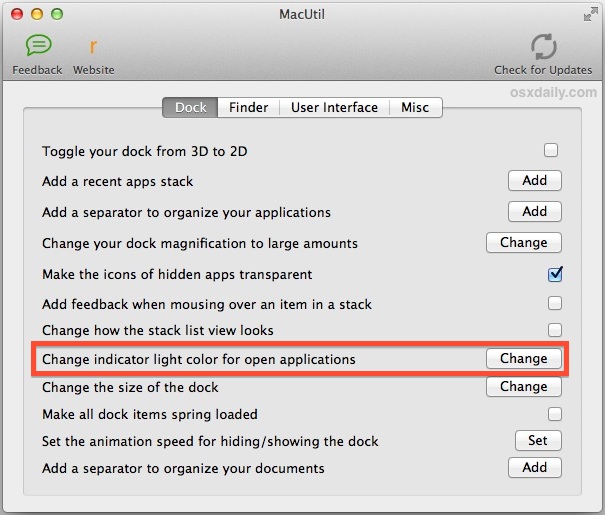
- Launch MacUtil and click the button next to “Change indicator light color for open applications”
- Enter the administrator password to authenticate the changes
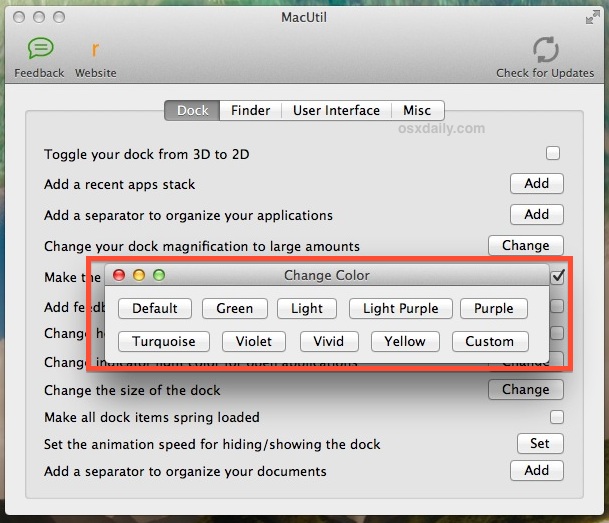
- Select the color you wish to change


You’ll now have a range of color options to choose from: Default (literally the OS X default), Green, Light, Light Purple, Purple, Turquoise, Violet, Vivid, Yellow, and “Custom” which will rely on your own image file input, and could be used to make the indicator lights any color at all.
If you’re simply aiming to make the indicator lights more obvious, “Vivid” is the obvious choice, which essentially brightens up the default option, making it a bit more obvious which apps are active and which aren’t.
Whatever color you choose, changes are made instantly and they take effect quickly, so there is little harm to trying a few and seeing which you like best.
Here is “Vivid”, which makes it much easier to see:

This is what “Yellow” Dock lights look like:

And here is what “Purple” indicator lights look like:

And here is what a “Custom” black indicator color looks like, we chose a black rectangle which looks quite nice if you like minimalism more than glowing glitz:

For those interested in the black color, it’s just a tiny 10×3 file that is black, you can download it here or save the little tiny black image below if you’re interested in using it yourself.
![]()
Do note that this sample black indicator is not retina ready, so if you have a retina Mac you will want to use a higher resolution version instead. I just made that file myself, which is very easy to do by grabbing one of the files in the manual approach mentioned below, making the desired color changes, then saving it and using it with MacUtil’s “Custom” indicator function.
This is obviously all really easy to change from the MacUtil app, but if you want to do it manually that’s what we’ll cover next.
Changing the Dock Indicator Lights Manually
For the Do-It-Yourself crowd, you can do all of this entirely on your own by modifying system files and replacing them with your own variations. Not to rain on anyones parade, but it’s sort of a tedious process, so unless you have some very specific desire to use a particular image, it’s easier to just use the MacUtil method described above. Nonetheless, we’ll show you how to change these files on your own if you’re inclined to go the manual route.
This requires changing system files yourself, it’s always a good idea to perform a quick manual backup to Time Machine or whatever you use before making changes to system folders and their contents.
- From the Finder, use Command+Shift+G and to summon Go To Folder and enter the following path:
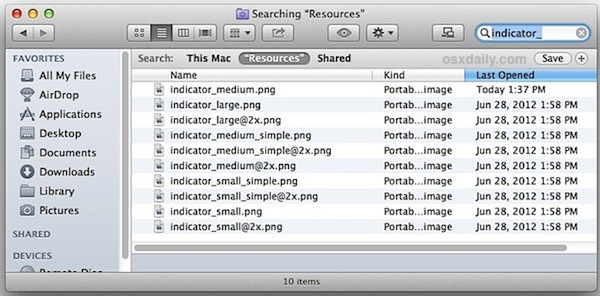
- Use the “Folder Search” feature in the upper right corner, narrow the search down to only the “Resources” folder, and and look for “indicator_”
- Select all and make a copy of these files to a folder on the desktop called “Indicator Backup” – this is so that you can easily revert back to defaults should you decide your replacement indicators are unpleasant
- Modify or replace the Resources/ directory contents to change the indicators, focus on the following files:
- Go to the Terminal and kill the Dock to refresh it for changes to take effect
- Enjoy your new Dock indicator icons
/System/Library/CoreServices/Dock.app/Contents/Resources/

indicator_large.png

indicator_large@2x.png

indicator_medium_simple.png

indicator_medium_simple@2x.png

indicator_medium.png

indicator_medium@2x.png

indicator_small_simple.png

indicator_small_simple@2x.png

indicator_small.png

indicator_small@2x.png
killall Dock
For what it’s worth, the “@2x” suffix indicates whether the image file is sized for retina displays or not, and if you don’t have a retina-equipped Mac then you don’t really need to replace those for the changes to take effect.
You can modify those files however you want, whether it’s just making simple hue and saturation changes with Preview app, or replacing them with completely different images and your own art drawn up through Pixelmator, Photoshop, or your image editing app of choice.
Happy customizing!


I can’t find these ”indicator” files in Yosemite, does anyone know if they’ve been renamed?
just got mavericks… white indicators on a light grey background – seriously?! unf this app will not change the color.
Updated website for MacUtil: https://russellsayshi.com/MacUtil/home
Thanks !
That’s extremely useful, the Mavericks color indicator is catastrophic for me, I can very barely see it.
One thing : the icon you provide is in jpg format, it would be a good idea to convert it to png, that way all your readers would not have to do it and could use it directly.
If your interest is to know which apps are running, use command-tab, which pops up a window showing their icons. Multiple command-tabs moves from one to the next. Command-Q will cause the highlighted app to quit.
> “For those interested in the black color, it’s just a tiny 10×3 file that is black, you can download it here or save the little tiny black image below if you’re interested in using it yourself.”
Huh? MacUtil does not accept JPG files, only PNG. And your icon is not on the edge of the dock, like the other colors.
Thank you! Exactly what I was looking for. Cheers!
Thanks for this. I was having trouble even seeing the lights in Mavericks. Some lights I made:
https://drive.google.com/file/d/0ByWjlLzXs5mPZDZzNXlaRF9qdzQ/edit?usp=sharing