How to “Show In Finder” the Original File in Photos App for Mac OS X
![]() The ability to quickly jump to a photo in the Finder file system of Mac OS has changed in the new Photos app. For now, the traditional “Reveal In Finder” option in Photos app for Mac OS X is missing, but that doesn’t mean you can’t show the original file in the Finder or access the photos from the Mac file system.
The ability to quickly jump to a photo in the Finder file system of Mac OS has changed in the new Photos app. For now, the traditional “Reveal In Finder” option in Photos app for Mac OS X is missing, but that doesn’t mean you can’t show the original file in the Finder or access the photos from the Mac file system.
There are actually a few ways to access the original image file in the Finder from Photos app, and one method works almost exactly to the “Show In Finder” option that used to exist in iPhoto and Aperture. Read on to learn three different ways to reveal an original image file in the Mac Finder from Photos app for Mac.
Option 1: Use the Photos “Show Referenced File in Finder” Option to Reveal the Original File in Mac OS X
The Photos “Show Referenced File In Finder” function is basically exactly the same as the “Reveal in Finder” option that existed in prior photo management apps in Mac OS. But there’s a catch: you must be manually managing your photo library, and not importing copies into Photos app library. In fact, if you’re not self-managing the library, the “Show Referenced File in Finder” option won’t even exist, it will be grayed out or just outright invisible. If you don’t import image copies into Photos app however, this feature works great and is quite simple:
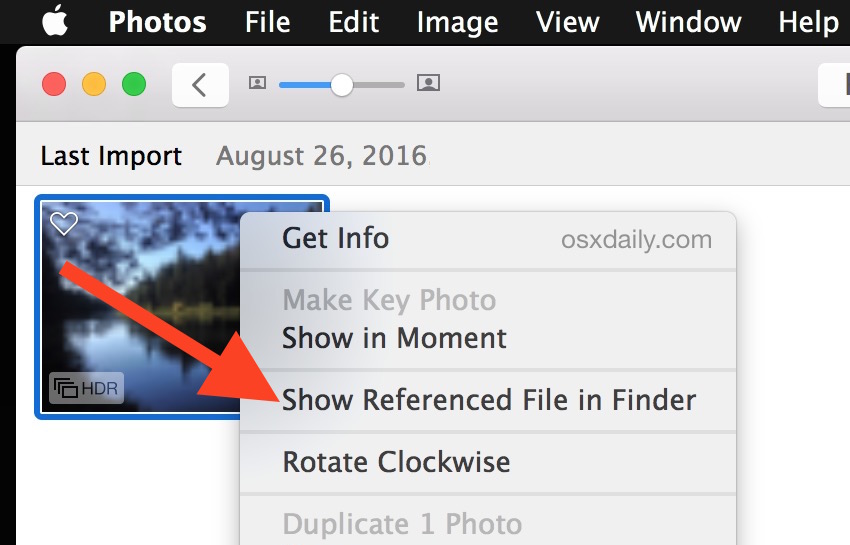
- From Photos app, right-click (two-finger click on trackpads) on any image you want to access in Finder
- Choose “Show Referenced File in Finder” from the option list to immediately jump to that image files finder location
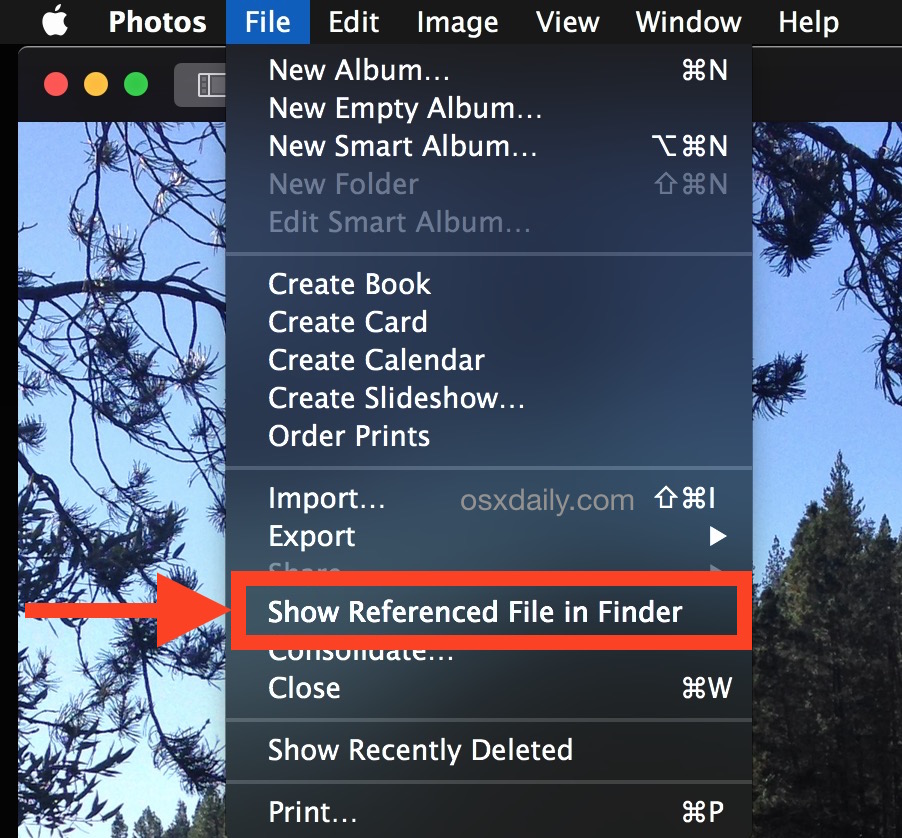
You can also access the same option from the File menu of Photos app:
- Select an image in Photos app for Mac OS X and pull down the “File” menu
- Choose “Show Referenced File in Finder” to open the original files location within the Mac file system
Whichever way you access this feature, you will end up in the Finder with the original image selected.
Option 2: Access the Original Image File with a Drag & Drop from Photos App to a Mac Folder
If you choose to maintain the default Photos function of importing and copying pictures into a distinct Photos library, the “Show Referenced File in Finder” won’t be available to you. This means you’ll need to use a workaround to access the original image, perhaps the most simple is a basic drag and drop:
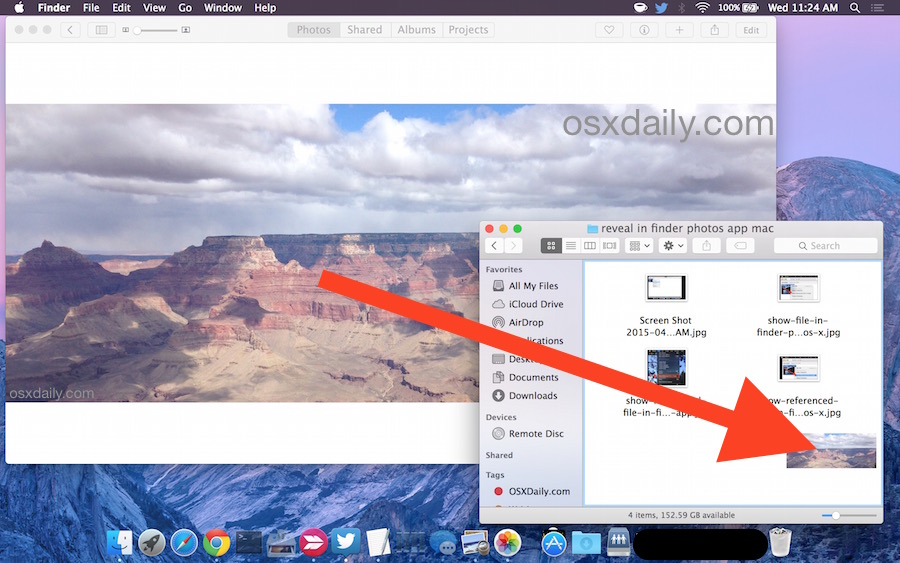
Just select the image you want to access in the Finder of Mac OS X, and drag it from the Photos app into a folder on the Mac desktop. A copy of the file – not the original – will reveal itself in the location you dropped the picture.
Option 3: Use Finder to Dig Around in Photos.photoslibrary
Not necessarily recommended but another possibility is to root around in the Photos.photoslibrary package found in ~/Pictures/ and manually attempt to locate the master image file(s). This works, but the .photoslibrary packages are clearly not intended to be user facing, and the directories are not organized in a manner that makes them easy to browse. While this is possible, we do not recommend this unless the above methods don’t work and you absolutely must access the original image file, mostly because improper handling of these master picture files can lead to problems in Photos app, or worse, the loss of an image or photo.
The video below quickly shows how you can access the Photos app master image files through Finder in Mac OS X
The Photos.photoslibrary file is located in the user Pictures folder with the following icon:
Perhaps a future update to Mac OS X Photos app will include a “Show In Finder” option natively for all photo libraries, that would certainly be a welcome feature for many Mac users. In the meantime, if you have migrated a library into Photos app from iPhoto or Aperture, you won’t have the right-click option unless you specifically chose to stop import copying files into Photos before you moved the library over. The only real workaround to that would be to make a new Photos app library and having it use references rather than copying into the app itself.
Do you know of another way to access the original picture file of an image found in Photos app? Is there a better or faster way to get quick Finder access to referenced photos? Let us know in the comments!

I just updated to Catalina. my photo app, not even listing the photos as an option in the left side menu or the top menu, it starts with memories. Nothing helped including repairing the library and trying to force synch with iCloud or even deleting the app … any help would be appreciated
We need to inundate Apple with requests to bring back that “Show in Finder” option. If they get a million requests they may realize how dumb it was to remove that option.
Late to the party, but… I have loved Apple products since my Apple IIC (I have actually never owned a PC, but this change and the fact that newer MacBook Pros will NOT be available with internal DVD/CD burners and… other changes I don’t ‘kin to)… is making me think about investigating a PC when this one gets towards the end of its life span (which may be sooner rather than later, since I’ve never had to use my extended warranty as often as I have this time… grump, grump).
None of the solutions in this article worked for me though, and I had a really horrible moment when I realized that the only files I could find in my “Masters” folder were a small fraction of my total library (I discovered this when I was monkeying around, got a prompt in Photos that asked me if I wanted to “view as archive,” and it switched me from the broader archive — which fortunately, I discovered was still there when photos not in the “Masters folder (believe it or not, only photos from 2016 and 2018 were in that folder, so I know that there’s still a hidden list of files… somewhere) — and only further monkeying around got me back to the prompt that reversed this terrifying exclusion of most of my photos.
I am a backup fanatic (I have an external hard drive that I use regularly), but I also like to archive to DVDs that I keep in chronological order (hence my complaint about the discontinuation of internal burners). Since I haven’t been able to do this for the last three years, given that Photos doesn’t easily burn photos to disk, I’ve been feeling… queasy….
The instructions in this thread on how to “export unmodified original” have been a huge help (even old, old files came with their correct origin data since “migration assistant” had failed me and I had to manually import from iPhotos on my previous device).
The short version is that, I was able to set up a folder on my desktop to hold multiple export multiple files and did so. Then I highlighted multiple files and exported them (from the unmodified originals) into this folder.
I can now burn them to DVD to have a reference file (that has the advantage on not being able to be over-written by forgetfulness on my part, should I accidentally “touch up” the file (as a lossy format, even rotating a .jpg encourages most programs to copy the file, recompressing it in the process; I used to be able to “solve” this problem by exporting the file to the desktop, importing it into Photoshop, then saving it as a .png, which is a non-lossy format).
As a side-benefit, I was also able to import RAW format files into Photo, then “export as unmodified original,” and open them in Photoshop, which is the only improvement I noticed over iPhoto, although I previously been able to use Image Capture to import them, even though iPhoto doesn’t recognize the file format.
The net result of all of these take-aways from this lovely thread is that a) I am going to do the “export as unmodified original” to files that I am going to burn to DVD and keep all of my photos in a really DVD binder, b) import each and everyone into the most recent version of iPhoto my “Apple-approved tech installed (except any RAW files, since iPhoto doesn’t like them, lol) and delete them in Photo.
Basically, I really don’t see any reason to have files hidden from users/much point for a program that hides the actual file from easy view and thereby hides so much metadata.
Except for people who live and die by using Twitter/Facebook/Flikr/Vimeo on a daily basis, (and, I suspect, with a bit of work, Instagram and all other social media…: the snap-happy people who just want easy ways to upload stuff to Twitter, YouTube, and don’t really want to “store memories for a lifetime…”) the “share” feature doesn’t make me like Photo in the slightest.
Instead, as people have said, this change really seems calculated to drive people to “the cloud,” but given that “the cloud” gets hacked on a regular basis (which is the reason that Adobe will prize Creative Suite 5 out of my cold, dead hands) let alone that is now a playground for federal prosecutors (which doesn’t bother me in itself because my initial rejection of cloud computing was that it wouldn’t give me anything close to the same expectation of privacy as local storage, on my devices can, given that I know… a few former hackers… and not because I use it for porn, let alone anything illegal, lol).
_______________
Fortunately, my Steve Jobs era Macbook is still working well… enough… (and will continue to do so for a long time because I treat it like ‘my precious’, so I’ve got decades worth of digital images that are backed up on it, many of which are digitalizations of family photos going as far back as the 1840s, so I’m a little bit serious about not wanting to lose access to original versions).
Tim Cook’s version of Job’s insistence on making “insanely great products” feels, in not just this instance, uncomfortably like Apple is making me jump through the same hoops to get anything done that always made me cuss at PCs during Steve Jobs’ tenure, which is a scary reversal.
Regardless of my future path, knowing that I can download older photos onto a “hard” version (and yes, I know that DVDs fail too and have good ideas as to why and how to prevent it) with the metadata attached encourages me, so I thank the people who found this solution.
Hi, I don’t have copy items clicked and it still doesn’t show me the reveal function. (all greyed out.) photos were imported from my phone.
Check the filename of the video by right-clicking an “Get Info”. Assuming the video is “IMG_3377.mov” Then open a terminal, type “sudo opensnoop -a | grep 3377”, type your password and expand the video on Photos. The opensnoop command basically writes all the file access on disk, so it will display something like:
54395136 2017 Oct 27 21:43:12 501 5014 36 0 /Users/bob/Documents/myPics/Photos Library_3.photoslibrary/Masters/2016/11/13/20161113-180955/IMG_3377.MOV Photos\0
You then know the location.
Opensnoop might require some enabling to work, but you can easily find this on the internet.
In Finder:
1. go to Pictures,
2. right click on Photos Library.photoslibrary
3. select “Show Package Contents”
4. drag the Masters folder across to your Finder Favorites thereby creating a permanent link to it (the Masters folder stays in Photos Library.photoslibrary).
Done. Now you can browse to it from other apps.
Also the Gimp will open the Photos Library.photoslibrary folder without doing anything …
My solution, don’t use the app. I use other method so I have full control of my file. I store all my personal media files on a dedicated storage for easy access and back up.
Photos is trash. Every Mac “upgrade” makes things worse.
You love Photos app, it is your favorite app. You love every Mac update, they make things better. Up is down. You love them, you love to update your Mac. You think Photos is the best.
I drag and dropped a file from Photos onto the desktop. The original 2.8MB file was automatically reduced to 300k on the desktop. Is this acceptable?
Agree with above that it is another user-unfriendly experience. The intent to hide ‘complexity’ is good unless it creates more complexity for originally intuitive behavior.
Yes, this is maddening. I just want to be able to locate my files, then move them where I want, including to an external hard drive. I don’t want a (possibly inferior) copy (!), that leaves the original cluttering up the machine- particularly when I want to move hundreds. And for that reason, doing the above individually (!) is ridiculous.
It was so easy on my previous PCs – all files visible to do as I will. It’s simply not on to produce machines that hide files that the user has created, and resist the user’s desire, indeed need, for control…!!!
Another user-unfriendly experience. F Apple. Bummed that I invested in a new macbook. It shall be the last.
Thats just downright shameful. As one who has defended Macintosh and Apple since 1990, I have no defense for this controlling, manipulative alteration in the way that Apple now forces the user to interact with their images. I’ll look for open source, third party work arounds before I’ll let any corporation manipulate me inorder to line their greedy little pockets.
Ctrl – Right click the photos library folder (found in pictures) Click on ‘show package contents’
Pictures can be found in the Masters folder, grouped under years.
Convoluted but it gets you there.
This is what I want. Thank you.
Just make a folder in Finder that always points to the photos app’s “masters” directory:
1) Open terminal
2) cd ~/Pictures
3) ln -s Photos\ Library.photoslibrary/Masters PhotosLibrary
Now any finder window that opens your “Pictures” location will have a folder named “PhotosLibrary” that you can open and navigate/copy/manipulate all of the photos and videos stored in the photos app library.
Cheers!
Kubitz, thanks for that!
Thanks for the idea! Dealing with managing a bunch of photos on USB-attached drives and this will help.
Can i get a little clearer step by step? I’m new to Mac and discovered this immediately. So frustrating!
I was able to open terminal, command to pictures, but then what? sorry for my lack of knowledge, but I really want to use this option!
I ended up using the Terminal for this one.
I used “get info” in Photos to get the file name.
Then in the terminal, for my example used:
find /users -name “IMG_3788.JPG”
The result I got was
/users/andrei/Pictures/Photos Library.photoslibrary/Masters/2016/04/17/20160417-213824/IMG_3788.JPG
then just use the “cd” command (change directory) with that path:
cd /users/andrei/Pictures/Photos\ Library.photoslibrary/Masters/2016/04/17/20160417-213824/IMG_3788.JPG
(make sure to add a “\” before any blank space within the path, or it won’t work)
and once the in there, use
open .
(this opens a finder window, in the current folder, where the terminal is pointing)
The core problem with this ap is that it restricts and impedes the user’s interactions and management of their own data.
For those of us who manage images from multiple sources, the fact that anything taken directly from an iPhone – an increasingly common source of images – is effectively hidden from the user is a genuine problem. It is unacceptably difficult to get the core files into a digital filing system, integrated with images from proper cameras (which are easily imported without this ridiculous ap).
This is without doubt the single most frustrating, time-wasting blind alley Apple have yet produced – quite an achievement when you look at some of the other “great” ideas they’ve had.
It reflects a deeply patronising view of the consumer, in this case manifested very clearly: we don’t need to bother ourselves with details like file locations – we should just keep quiet, look at the pretty pictures, and leave the data management to Apple because they know best.
Well, guess what? I don’t think Apple does know best. Making good computers and good devices is one thing; understanding EVERY consumer is another and the restrictions imposed by this latest app, the absence of clear ways to remove it from the workflow and, particularly, the continued complaints from frustrated users indicate that this app is no good.
It’s about time they junked it or fixed it. Either way, just show me the files in finder. Straight away.
PS: The OS X Daily article does NOT address how to effectively manage large numbers of images in one go. If you only want to mess about with one or two, fine… No good when looking at several hundred images.
Simon, the article is titled “How to “Show In Finder” the Original File in Photos App for Mac OS X”, and it describes that exactly. The article is NOT titled “how to effectively manage large numbers of images in one go per what Simon wants”.
Simon, you will also find this article has no recipes about a good guacamole either! No guac recipe?!
This is the most frustrating aspect of a Mac. Why in the hell don’t they let you have direct access to the freaking photo files in finder?????? Keeping them confined within the Photos app is a royal pain in the arse and makes importing photos and trying to work with them later such a time consuming process, it’s almost not worth it. Come on Apple, get your doo together, PLEASE!
Will, this walkthrough details exactly how to have direct access to the photo files in Finder.
https://osxdaily.com/2015/04/22/show-original-file-from-photos-app-mac-finder-osx/
Thank-you!! After reading for 10 minutes your suggestion is the one that worked.
Used to love macs, but PC is more user friendly now to make movies (and burn them to disc if I choose). Can’t spend a month to learn new systems each time I want to make a video. problem solved.
Janet, it took me about 2 minutes to read this article and show the original file of a picture in the Finder of my Mac. If you take a month to read articles, I would suggest reading it sooner so you can find your pictures on the Mac sooner. This has nothing to do with making movies, so maybe that’s why you’re so confused. Movies are not pictures, movies are not Photos app. Stay on topic Janet, and you can find your original picture files too.
Nope. It wasnt that easy and its still a hassle. Look at the comments on here. Apple used to be the plug-in and play system. Crazy how Windows is picking up where Apple dropped off.
“it took me about 2 minutes to read this article”
I think you’re missing the point. Janet’s complaint is the very reason this article exists and why virtually every comment here was posted. People want to work with their images, they don’t want to be constrained by the constantly changing features of a specific app. I’ll also point out that many of the solutions shown in the original article, no longer exist as options in the Photos app.
The solutions here still work fine in Photos app, Photos app has never changed. You can still access the original file using the tips here.
If you don’t like the way Photos manages your pictures, don’t use Photos app. Easy solution and no complaining necessary.
hi all.
I found another way of doing this to be quite easy and you will find the original photo in this way.
Simply open up the ‘get info’ window. Copy the picture name, e.g. IMG_457 and search for this name in spotlight. Click ‘Show in finder” and there you have it :)
Thank you Simon. This works well for me in iPhoto.
hi,
to find the original master photos in both iPhoto and photos apps, simply open finder, select “pictures”, in folder right click either iPhotos or photos and select “show package contents”
within this file is your master file, simple!
One more tip…after you navigate to the Masters, under File in the finder, choose add to Sidebar. Now it’s always available.
As soon as I find a way of retrieving my photo files I will be ditching ALL Apple photo programs. I am so over it. I have nearly 20k photos and this is just not working for me any longer. The only thing that these updates are doing is driving me to consider buying a PC.
Tim Cook just trying to emulate all the bad qualities of Steve Jobs, like elitism and micromanagement of the user, with none of the good qualities, like innovation, efficiency and intuitive interface.
Yes, you’re not allowed to know where your damn files are. How Microsoft!
This is how to find your originals.
1. navigate to ~/Pictures/Photos Library
2. right click on the “Photos Library” file and choose “Show Package Contents”
3. inside that folder is a folder called “Masters”
All of your photos are located there.
Would love to meet the idiot who decided “Show in Finder” wasn’t a necessary feature. Absurd decision
This will not work if the photo comes from phone via iCloud.
Best option is to export to desktop or other folder and work with that file.
when i first got this program going i somehow snyched it with dropbox and found my individual files in there.
This app SUCKS non of these options work. Its all in one huge database that I’d just as well delete but then I’m deleting all my photos.
I want my photos so i can easily edit and forward them PRIVATELY if I choose. I’m deleting this and figuring out another way to get my iphone photos on my computer.
Because there is no “Show in finder” option, “Photos” is simply DISGUSTING. “Show Referenced File in Finder” is not available to me and I CAN´T drag the files from photos to another location. It just don´t work. I hate Photos as much as I hate Itunes. Sorry, but it´s DISGUSTING. DISGUSTING.
This is such an unbelievably stupid and disgusting thing.. it’s like the photos app is made by idiots!
All i wanted to do is copy a video i had made on my old iphone which is now just a camera to my macbooks desktop to upload to facebook… but would it drag and drop to the desktop or downloads folder? NO!!
OK so use the Show in Finder option… it was not there! and then there was a grayed one in the menus! WTF
Copying the file name into spotlight did NOT find the file..
In the end i opened the photos package, couldnt find the file until i looked at this article and they said i should look in the MASTERS folder and they are there!
BUT WHAT A COMPLETELY SCREWED UP PROCESS TO DO THE MOST SIMPLE THING!!!
Wtf is the logic behind this??
By the way – the upload file to facebook option did’nt work when i tried it as well!
Such squat… my Mac never used to make moving content about so hard..
Thanks for posting. I found all of these very helpful. Hopefully they bring it back… if not you helped me find the pictures. Thank you.
There’s an easy and comfortable way of getting to the files using the export action. This will allow you to export multiple files and also determine the file format, metadata and naming.
Two ways of doing this:
1. Choose the photos you want, click ‘Command’+’Shift’+’e’.
2. Choose the photos, Go to File menu -> Export.
If you go with the menu path, you can also export with the original format.
Hope this helps.
The get info, copy filename, then search was not working for me searching using finder but did in spotlight. (Top right magnifying glass) I must admit I have never used spotlight ever until now!
I am trying for 3 hours now finding the original files of my pictures in the new Photos app… that should not be! Back to stone age! Shame on Mac!
Holy Sh*t
it took me 15 minutes just to find a photo on my computer to upload it to a website… no thanks to the “intuitive” cloud sharing BS. Thank you for the article.
I used Spotlight to find a picture. Then I went across the bottom to find Masters in list. I then dragged it to the Favourites list in a Finder window.
I’ve been using Photos for a few weeks, but today was the first time i need to give Google the path to a photo that I wanted to upload, and I had no idea how to do that.
I ended up making a copy as per this article’s instructions, but I’m surprised that no one thought users needed an easy way to access photos outside of the photo app.
I tried dragging the photo to the “drag photo here to upload” screen, but that did not work. Then I tried opening the upload dialog (which uses finder ) and dragging the photo there – no dice.
The drag to desktop work around is pretty simple…and messy..and should be unnecessary. I see there are other ways to do this that I’m not going to try. I would be intuitive and build into the app.
Right click on “Photos Library” (you can find it in the “Pictures” folder) – click “Show Package Contents” – go to “Masters” folder and there you go. I’m not using iCloud Photo Library though only My Photo Stream.
THIS answer is the WINNER! Thank you a million times.
+1 WINNER
And which tool took out right click, copy?
BOOM! Thanks a million!
First one that works for me! Thank you!
We shouldn’t have to do this though.. Think of the workflow required for an aged person who wants to take a picture on their iphone and put the original quality photo onto ebay? It’s harder that ever.
why the f#ck does apple keep changing this that have been “user staples” for decades!!! Please resurrect Steve, as 15 year apple user, I’ve never been so disappointed with the functionality and performance of all of apples hardware and software. NOTHING WORKS ANYMORE!!! Lame.
F Apple, this photo app is a dook load. no drag and drop and no “show in finder!” (greyed out).
Why oh why do they screw up everything besides their hardware?
I hate apple softwares.
I was hoping someone could help me… I’m trying to burn an album from the ‘photo’ app but every time i drag it to a desktop folder to burn them, they get out of order. i have them in date/time order ( e.g.- 0-6months old of my daughter). but as they are from different iPads,iPhones, they have different file names/numbers.
I need them to stay in the time/date order for me to burn them and print them in oder.
Can anyone help?
I don’t do much with photos anywhere but my father is agitated by this update. He used to insert photos into emails etc by opening them from finder, which he can’t do now. Also the “show in finder” option is greyed out and he can’t drag-drop them. He also hates that he can’t geotag stuff now. Any ideas for a quick fix email insert? I’ve scoured the web to no avail.
What about downloading your photo’s and video’s through Itunes and then choose the folder you like in Finder and all photo’s and video’s will be copied there.
Then they should download the original isn’t it?
I found a workaround to access your photos library by file and not by image.
1) Go to any social media site where you can upload a photo to your profile (in my case I went to meetup.com — this is how I originally fell upon this little trick).
2) Choose to “upload a photo” and when the browser window comes up, if you’re lucky as me, you’ll automatically be taken to your Photos app library by file name (in this case it was a lot of numbered folders, sorted by year). If it doesn’t automatically take you there, you should still be able to access it from Pictures/Photos Library/Masters when you browse.
3) Locate the “Masters” folder in the Photos app folders (you may have to go back a few folders depending on where the pop up window automatically brings you to).
4) Here’s where the trick comes in — Yosemite allows you to search by tag color when in Finder. So simply tag the folder any color you want.
5) Then cancel out of your social media site and go to Finder.
6) Search by the tag color you gave the folder, go to the folder and voila! There are all your iPhone photos with image names.
Hope this helps some folks out!
Thanks, Jillian. This worked perfectly!
This is absolutely insane. Leave it to Mac to f*K it up again. For Every 1 cool think Apple does they do 5 un-cool things. It’s only a matter of time……
Well, THAT “Show Referenced File” option is ALSO greyed out on my Pictures. WTF people?
I can’t seem to drag and drop either. So back to exporting. GREAT MOVE, APPLE.
Anyone know of an app to buy? I have 50,000 pic and just want to be able to use them.
Option 2 is incorrect. When you drag and drop it creates a duplicate file, but it is compressed. Even if you shot in jpg, the ‘dropped’ file is half the size of the original. The one that works for me is File>Export>Export Unmodified Original
For people shooting in RAW format is the worst! Is it just me or there’s no way of accessing the RAW file? Drag and dropping the file makes it a JPG. The only workaround I could find was checking the file’s name, opening the library in finder and searching with the filename. Tedious stuff… then you have to re-import the edited ones. Annoying.
I completely agree! I don’t want the jpeg that is created by this method, just give the “show in finder” method back…
Choosing the Export…Export Unmodified Original exports an original photo in RAW format. At least that’s how it works for me.
The problem if you drag & drop an image from Photos to the Finder / desktop: the GPS data is missing if an image had one.
There is another way to get the original: the 64 bit version of nessViewer (http://www.nessviewer.com/en/html/download_64bit.html).
1.) Create a new media show in the toolbar.
2.) Select “Import” in the File menu.
3.) After some seconds, you see “Photos” selected in the popup. Select one or multiple entries in the table list and confirm.
4.) It will import all media of the selected list entry (or entries).
5.) Now you can drag & drop one of the (original) files in the drawer to wherever you want.
The import offers also Aperture, iMovie, iPhoto, and Photo Booth media.
Please not: nessViewer is a commercial application, costs 19.90 Euro and I am the distributer.
Apple intentionally did this to make more money for Apple. They want you to pay for there services, such as iCloud.
Everything Apple does is designed to make money for Apple, for example, they removed CD drives from their computers early on, so you would by an external CD drive, or better yet, stop buying music CDs, instead purchase songs from iTunes.
Which is why the MacBook Pro still has a CD drive, right?
Actually, no. I was actually seriously considering finally signing up for iCloud, for the convenience of automatic photo backup in the Cloud and automatic library update of anything taken with my iPhone, but to me (and others) it’s an absolute deal breaker that I cannot easily jump to the Master file in Finder when I have Photos import the photos. I will now use a reference library instead, with me continuing to manage my photos in my own folder structure which I have on my external and double backed up Drobo drive. So, no paid iCloud for me until this is fixed.
I think you need to take a chill pill Peter. iPhoto is being dropped from a support stand point but you certainly don’t cross me as a fellow that needs help from Apple.
Also, no one is forcing you to use Photos. Simply continue to use iPhoto as you have been or look for another option. Image capture will allow you to sync or download your images from any device straight to the location of your choosing. Good Luck!
Not to be able to round trip with Photoshop is a dealbreaker for many,mparticularly since Photos will be the default way to get stuff off your devices.
I’m guessing photos in the iCloud Photo Library won’t round trip either.
Yet Apple sells these beautiful retina display machines which would be aimed in part at pros using Adobe products.
Right, or Lightroom, or whatever other app. It’s absolutely maddening…
Image > Edit With will let you roundtrip with whatever
There is an option to export the original item which doesn’t show it in the Finder, but allows you to edit it in an external editor such as Photoshop.
What I am finding I miss the most is the ability to drag a photo from Photos onto the Photoshop icon in my Dock, and have Photoshop then open this image file and if I choose, save it back once I’m done with it. I did this a lot with iPhoto, and now I have to import the altered image back in and it doesn’t replace the original. I realize that with iCloud I might only have a preview image in Photos, but I’m not currently sharing my library through iCloud, so I’d like that feature back.
I don’t mind having to export it, but couldn’t an Open With… be added to the menu for opening in any alternative editor?
I’d also like to see the gray background return, at least as an option. Ansel Adams had gallery walls painted a middle tone before he would exhibit his black and white photos on them. He believed it made the darks appear darker and the “whites” whiter when the background was a mid-tone. I agree that it does make a significant difference on how I judge tonal values in a photo if the background is white or black. The darker color scheme in Photoshop was a relief for me for this very reason.
Another way to reveal the original if you’re importing your photos automatically is to click get info, copy the file name, then search for it in spotlight. I did that and two photos with the same name came up, but it was easy to figure out which was the one I wanted. And the path to the file was ~/Pictures/Photos Library/Masters/… So it’s the same place “Reveal in Finder” would’ve taken me or “Show Referenced File in Finder” had that option been available. Granted, my library isn’t huge on my new MacBook Pro and it runs a lot faster than my old 2009 MBP with a huge iPhotos library, so there may be issues to consider if you’re on an older machine, but this option worked really quickly for me.
This actually did the trick ! Well done !
Wow, thank you. At least this works.
But, why can’t we show the photo in finder?
why doesn’t Photos know where it is? Of course it does, so why does it not let us know?
Why does it not work if the photo is imported?
How do you get a picture into Photos if you don’t import it?
Even photos taken with an iPhone that shows up in “Photos” of Photos (damn, that’s so stupid) does not qualify for “show in finder”. So, How do I create a picture in Photos that will show in finder?
Using info from the above I found that if I did seach for “masters”, then chose show in finder, up comes folders I can open and so access in finder
Works exactly as described. This is a nice workaround for those who must access the original file, thanks for the tip Jason!
This is a nice work-around until Apple gets around to making it simple again!
Thank you so much, Jason! I have spent hours trying to reveal the files in Finder and this trick works.
Hi Jason,
That didn’t quite work for me because my search in finder didn’t find the picture.
I also tried to us the “Go” then “Go to folder…” in the Finder menus, but my system says “~/Pictures/Photos Library/Masters/” does not exist.
What I did to get to my photos was:
1. Open finder and click on “Go” in the menu, then “Go to folder…” then type in: ~/Pictures
2. In the ~/Pictures directory, right mouse on the file/folder called Photos Library.photoslibrary.
3. Click on: Show Package Contents
4. Click on: Masters
Then the pictures are under a directory structure based on the year, then month, then day of the month.
For example: The pictures I wanted were under Masters/2015/08/09.
Good luck. Hope this helps.
This worked for me to locate the files in Finder, thanks. I’m still stymied by trying to upload images to a website that offers a “choose images” button, though — the file pathway I can see in Finder isn’t available in the dialogue box.
Hi Margaret,
When you have the image visible in Finder inside the Masters folder in the Photos library, and you want to select that from that dialogue box that comes up when you select the “Choose images” option from the web site, then what you can do is drag the photo from Finder into that dialogue box. The result of that is that now this dialogue box will be pointing to that exact same file. It’s one of those annoying quirks, but this really works. Have done it many times myself (in other contexts).
Erik
Thanks Erik!
This was the solution for me!
Charlie
CJ, I spent hours working with Apple unsuccessfully trying to do just what you explained so clearly and simply! The four or five people I talked with either didn’t know this process or were not telling it! Thank you for posting this!!!
You’re my hero right now.
Holy moly that worked.
My problem: No more space on my MacBook Air. So I needed to free up space by moving photos to the cloud. But heaven forbid I want to use a non-iCloud…
Thanks, this worked for me.
I don’t get it? It doesn’t seem to work for me.
I click get info, copy the file name, then search for it in spotlight, and it pulls up only one photo in the Photo App under Moments. I still don’t know where the file is in finder, or if this is original file.
THIS IS IT! I hardly ever use spotlight but now there is a reason for me to learn it.
Show in Finder takes a little while on my machine but it works the same as the iPhoto option.
Although some users may not need this option, it is essential for uploading photos to some sites as they cannot use drag and drop yet.
When the file folder for the uploads opens, you CAN drag and drop the filenames but not the photos to the folder requesting file names for upload.
I use this option frequently so thanks for the workaround.
Brilliant… good work around – finally found where “Photos” stashed all my old iPhone images – all under the day that I imported them, rather than under the year/month/date folder structure. Should have known.
Anyway – Thank you Jason
That’s great, Jason, if you know the name of the file. I have many that are just a number.
Why is everyone acting like Apple is forcing you to use this app? If you don’t like, maybe you shouldn’t use it.
I for one think it’s pretty awesome and a long time coming. I’m a little disappointed in the edit capability, thus far. Like iWork I have no doubt Apple will quickly release updates. For now I’ll stick with Pixelmator for my editing.
By dropping support for iPhoto they’re forcing either Photos or Apeture.
In point of fact, Apple is forcing many people. Did you know that since 10.10.3 was officially released on the Mac App Store, people ceased to be able to install the iPhoto 9.6.1 update? iPhoto still shows up in the Purchased list, but the Update button does not work. Perhaps this is an App Store error, perhaps not.
Without the 9.6.1 update, iPhoto will not open in 10.10.3. So unless you had the foresight to update iPhoto to 9.6.1 prior to Apple releasing 10.10.3, Apple is absolutely forcing you to switch to Photos once you do update to 10.10.3.
They essentially *did* force me to use it — I had iPhoto set up to do everything I wanted, the way I needed it done, and when I migrated to a new MacBook Pro the Photos app swallowed everything whole and that was that. I actually loathe the thing, but right now it’s holding nearly 6K images hostage so I have no choice but to deal with it.
LOL im just so freaking confused, on my iphone i know everything i need to know, and i just don’t know how to import my iphone photos (orig) to a separate hard drive from my mac !!! i feel like an idiot, just got a mac 3 months ago and with a pc i could always select where to have things filed, and easily organize my stuff by year ….. now its just a mess, and i just wanna print some photos at the store!! is that too much to ask for? thought a mac would be easy….like the phone :D
I used to use Picasa. With the latest OS, I cannot import my photos from iphone unless I use Photos. So, no .. I don’t have a choice.
Sure you can. Use Image Capture instead.
There are so many bugs… I can’t keep up sending Feedbacks to Apple.
BATCH Rename hopefully is coming in the next update. But why Apple rushed with this release ??? It’s not even ‘alfa’.
None of these options work for me, I do not understand why and also do not understand as many others why Apple just does not include the simple “Show in Finder” option.
I agree with “Raymondo,” that Photos.app seems like an alpha release…not even a damn beta, and now Apple claims it is out of beta!!! Give me a break Apple, you have really messed up on this release of Photos. I hope the .1 update fixes A LOT!!!
Re 3rd option : “Just select the image you want to access in the Finder of OSX …” But where are the images?
And please bring back the Dark/Grey Background, for Pictures !!
(yes, I made a feature request at http://www.Apple.com/feedback. It’s the ONLY way, Apple hears all of these comments)
White just does NOT allow the pictures to pop out.
More and more, Photos seems like an alpha release to me. Especially for an app that’s taken the place of two beloved photo apps, Photos seems half-baked. Why, Apple, why?
I agree with both sentiments: Bring back “Show in Finder” and the ability to edit the photos in an alternate application.
More like an Omega release, circling back tot he other end of the alphabet. I spent $99 for Aperture last year in the hope of finding something that operated rationally. Now what?
Option 2: “reveals a copy – not the original” what’s that got todo with “show the original in Finder” ? I must be missing something.
Did you read the article? It says it makes a copy of the original.
It does make a copy of the original when you drag and drop, but it doesn’t make an exact copy. The files sizes of the original and copy are different with the copy being less. I’m guessing that Photos is actually exporting the file and selecting a level of quality automatically. You can select the image, go to File – Export and choose Export Unmodified Original to make an exact copy of the file. I’ve been doing this to make a separate backup of my photos.
Did YOU read the article, Jim?
LC is correct! The title of the article is “How to ‘Show In Finder’ the Original File in Photos App for Mac OS X”.
The point of the article is to show us 3 Ways to access the “original file” in Finder not make a copy for us. Option 2 does nothing to help us find the location of the original file in finder.
In fact, the first step in option 2 is to “Just select the image you want to access in the Finder”! That’s exactly what we would like to do only we would like to know how to find the original file in finder.
So it appears there is really ONE effective way to find the original photo files in finder, and that would be to NEVER use import in the PHOTO app, so that the “show referenced file in finder” option is available and will reveal to us the location of the original file.
I didn’t expect this from Apple. I am searching my own photo in my own laptop. Why this is so hard to implement and keep the customer happy.
This doesn’t work for me. I don’t import copies into the Photo library—my iPhoto does. But I still can’t get that Finder option.
Plus I hate that I can’t directly edit photos with Photoshop anymore. I’m going to use iPhoto as long as I can.
I would much prefer to always have a right-click “Show In Finder” option available. Why is that so hard? Why did they remove that feature?
Instead in Photos right now we right-click now and get a bunch of crud like Facebook and LinkedIn? Well, there’s something I’ll never do. I want to access files, not post them to a bunch of goobers on the internet!
Same here, but those sharing idiots drive the sales nowadays.
^lol … exactly what I was thinking … everything is all so “effing sharing” … such a simple feature. dumb dumb dumb.
Same here, simply putting your photos on a stick is harder than 10 years ago. This is a great step back…
Couldn’t agree more. This is one of the main reasons I’m never buying Mac products again (and there are many)
Seriously. I’m beginning to hate my Mac. Every update it becomes more and more watered down. The new features are useless I’d rather go back to the old os and Aperture.
Lost hours trying to back my photos.. huh..
I just select the photos/videos I want a do a file > export unmodified. I still would like to know the path of the original. I can work with method I suggest above for now.
dont y’all get it?
Apple makes $$ selling storage on icloud. by removing
logical user control over their largest data (photo/video) hordes of people give up because its become too complex to access your own stuff- they’ve sandbagged us away from our own data with fuzzy icons, syncing, photostreaming and other velvetized gloves
but the fuzzy gloves say “stop, you;re not wanted in this area. just pay us $5 more per month, get more gigs on icloud, we;ll take care of everything for you. Use autopay please on the $5”