How to Rip a CD with iTunes & Import MP3s on Mac & Windows

Do you have some audio CDs laying around that you’d like to digitize and convert to mp3? Ripping a CD and turning the audio into MP3 or M4A tracks is remarkably simple with iTunes or Music app, and the process is he same on both a Mac and Windows PC.
This is a great approach if you want to digitize a CD music collection to bring onto a computer for archival purposes, listening through iTunes, or even for later copying to an iPhone or iPad.
Now I know what you’re thinking, not many modern Macs and PCs have CD or DVD drives anymore, right? But that shouldn’t stop you from ripping a CD if your really want to, because you can use any external CD / DVD drive, a SuperDrive (you can also use an Apple SuperDrive with Windows), or even use Remote Disc to share a CD/DVD drive from another Mac.
To use this tutorial to convert a regular audio CD into MP3s, you will need the following:
- iTunes / Music app on a Mac or Windows PC
- CD drive (or you can get an external CD / DVD drive)
- A standard audio CD, like a music album
Assuming you meet those simple requirements, you’re ready to convert the audio CD into MP3 files on the computer. Let’s get started.
How to Rip a CD with iTunes
The process of ripping a CD and turning the audio into MP3 files is the same whether iTunes is on a Mac or Windows, here’s how it works:
- Open iTunes / Music on the computer you want to import the songs to
- Insert the CD you want to rip and turn into MP3s
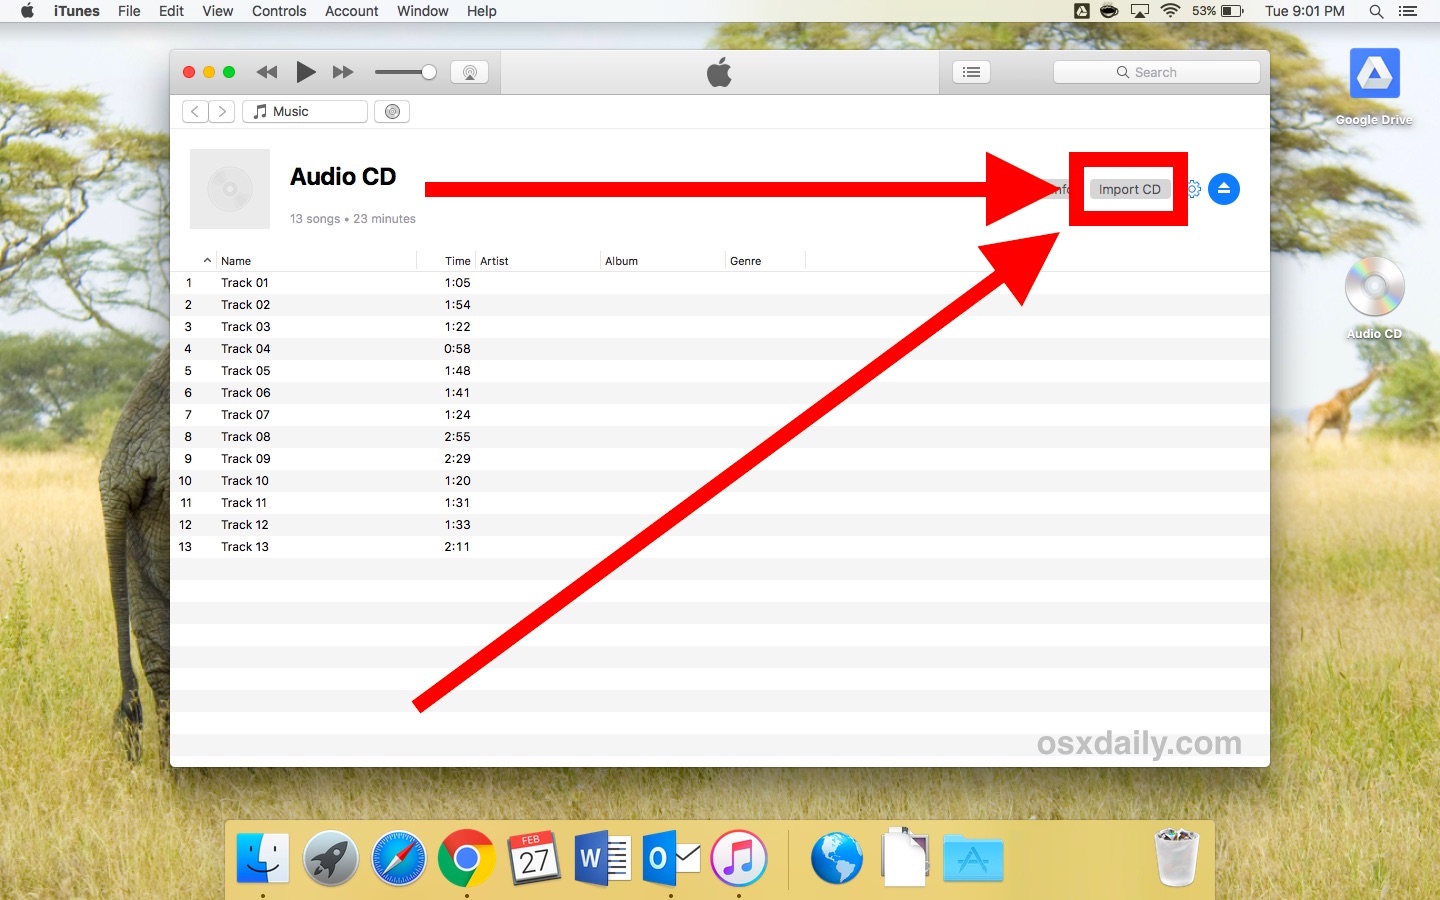
- When iTunes recognizes the disc and shows the “Audio CD” screen, click on the “Import CD” button
- A progress bar will appear in the top of the iTunes screen, just wait for this to finish after iTunes is finished importing the CD
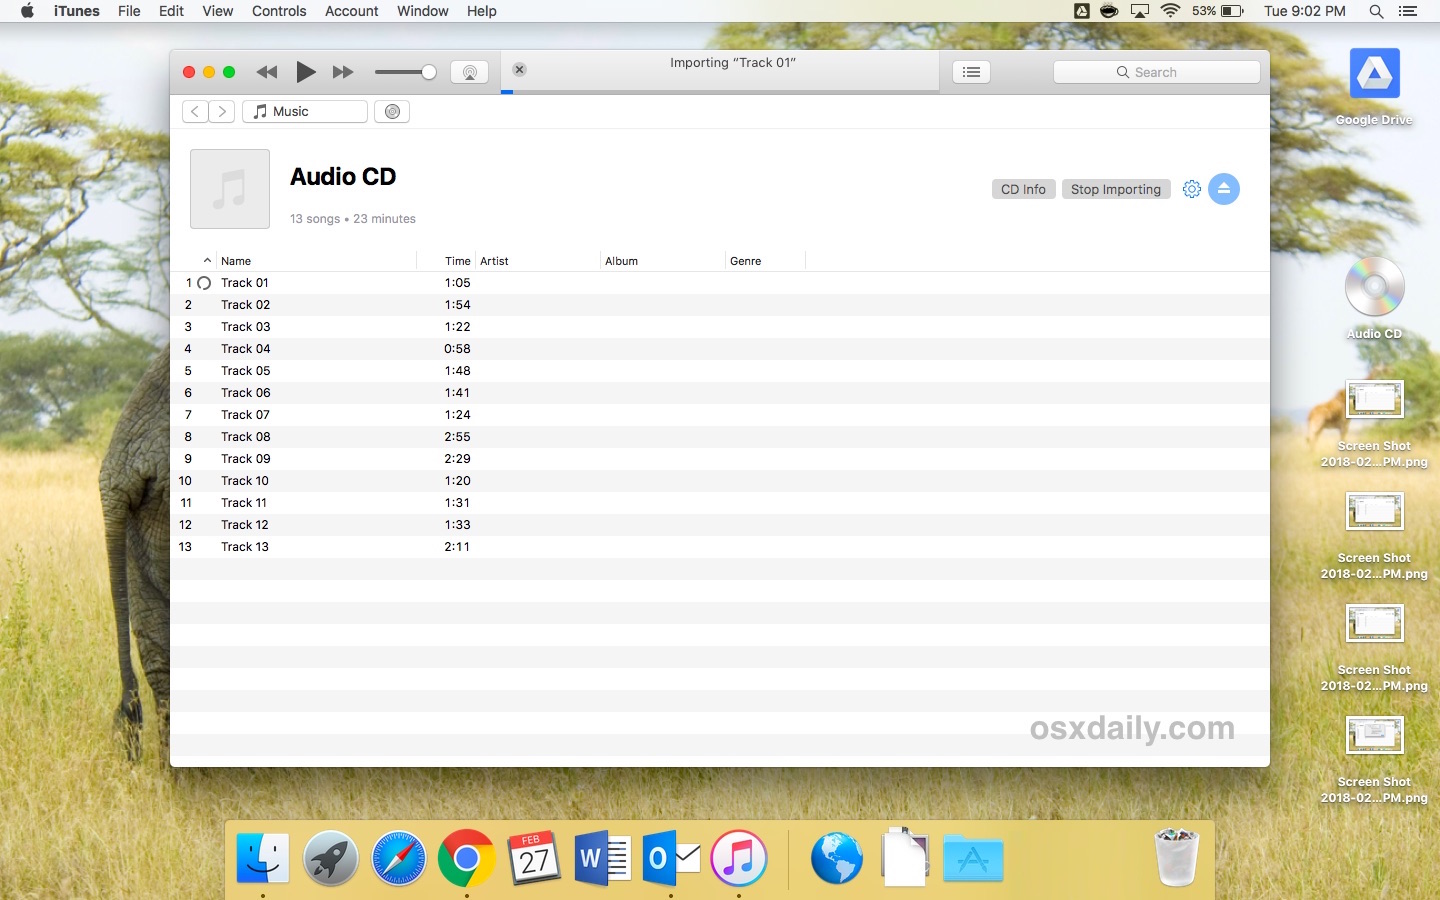
When completed, the progress bar will vanish from iTunes and the audio tracks will have a little green checkmark next to them in iTunes.

You’re done, you now have MP3s of your songs from the CD! Now you can eject the CD from iTunes and you’ll find the mp3 tracks in your regular iTunes music library. If you’re ripping a large collection of CDs repeatedly, once you’re done you might want to get album art for iTunes too so that the iTunes library looks like it’s supposed to.
As a quick side note, iTunes will default to import an audio CD using an MP3 encoder with high quality settings at 160 kbps. Those iTunes import settings can be changed if necessary, to either raise or lower the quality and bitrate, or to change the import format from MP3 to M4A if desired.
Once the songs are stored in your iTunes library, you can do whatever you want with them. Listen and enjoy, copy them to your iPhone or iPad, make them into ringtones for an iPhone (just remember that copying iTunes to an iPhone has changed in new iTunes versions and it’s a little different), whatever you want.
Enjoy your freshly ripped music! And if you have any questions or comments about using iTunes to rip CDs into mp3 format, let us know in the comments below.

Absolute rubbish. How is this not a big deal when you are ripping hundreds of CD’s. It would take forever. What a ridiculous thing to say.
good tutorial, I wanna ask another issue I encountered, hope you can help me. I got the cda file from my friend and I wanna rip it to MP3, actually, iTunes cannot recognize my cda file and I couldn’t import to iTunes, anyone has an idea? I have tried some ripper tool like handbrake and wonderfox dvd ripper pro, neither of them can do, so what should I do next?
lol at all the “MP3 suxxxxxx” comments. 99% of people don’t care, guys. they want their music on their phone/computer/wevs and they just. don’t. care. what format it’s in.
that said, i do wonder why the author(s?) specifically chose a middling bitrate MP3 when iTunes defaults to high bitrate AAC.
This makes me sad because it is true . But sadder still for the people who don’t know what they are missing.
“…iTunes will default to import an audio CD using an MP3 encoder with high quality settings at 160 kbps…”
Wrong. 160 kbps is NOT high quality. Get your facts straight before publishing.
For optimum sound quality when ripping from CD, you want to choose the highest bitrate available for the file format you are ripping to. For AAC / MP3, 256 is barely sufficient, 320 is considerably better.
For ALAC: don’t use iTunes, use a FLAC encoder such as XLD that supports ALAC output. There is no difference from FLAC and ALAC, other than that ALAC is Apple’s version of FLAC, and in typical Apple fashion, Apple does not support FLAC.
High Resolution FLAC/ALAC files encoded at 96/24 are not supported on iPhone, iPad, iPod, iPipe, etc.
That’s unfair Bob – iTunes calls 160kbps ‘High Quality’. Blame Apple not the author please. Get your facts straight before commenting :)
I have several books on CD; is there a way to drop them onto my MBP (from my iMac)? Would iTunes put them in the correct order? I’ve ‘sorta’ tried this before and it rapidly became a ball of snakes. iTunes put chapter files into different folders and different folders into even MORE different folders.
Thanks,
J
I’ve ripped more than 1200 CD’s, 17000+ songs. 95 % of people can’t tell the difference between 320 kbs MP3 or the actual CD. Hard drives are cheap, so you can rip lossless but if you have a huge collection is can take up a lot of space. Always have two drives, one for data the other for back up.
If you can’t hear the difference between an MP3 and CD audio you should have your hearing tested, as clearly you have a hearing loss.
On my experience 70% of the time iTunes fails to find the cover art when rip a CD. Also by default is the ACC format. Forget MP3 for quality. Of course even AAC cannot beat the quality of any CD-audio.
One thing that I was able to do on previous versions of iTunes was to select which tracks to rip, now you have to rip the entire CD. Unless someone knows the trick, please reply.
Thanks.
To rip individual tracks from a CD click the checkmarks next to the track names. Clicking on them alternates between checked and not checked. Only checked files will be ripped.
On my experience 70% of the time iTunes fails to find the cover art when rip a CD. Also by default is the ACC format. Forget MP3 for quality. Of course even AAC cannot beat the quality of any CD-audio.
One thing that I was able to do on previous versions of iTunes was to select which tracks to rip, now you have to rip the entire CD. Unless someone knows the trick, please reply.
Thanks.
MP3’s are a very, very poor substitute for the quality audio on a CD. If you want to save some space, rip to AAC@192, this is the most acceptable file that is still CD quality and will save you some space, however drive space is so cheap, there’s no reason not to rip CD quality .wav files.
AAC@256 to m4a
“Do you have some audio CDs laying around that you’d like to digitize …”
Excuse me, an admitted luddite, but aren’t audio CD’s (or all CDs) digitised already?
Correct, CD is a 16 bit 44.1k stereo .wav file.
Thanks but I’d like to know how to merge two lots of music on my iPod. I have music loaded on to it from an old iMac and I have more music I’d like to add from my Macbook Pro. So far I’ve failed to find a method so can you please help?
You first need to add the files not in your iTunes music library to the library, then you can add them to your iPod.
I had ripped my CDs (about 1000 pieces) to an external disc connected to my iTunes. It all worked fine for a while. Then, all of a sudden, iTunes refused to read the external disc and in a way I ‘lost’y music library (even though it was safely stored in the external disc). Why iTunes stops reading and recognising entire music libraries? Is there a problem? How do I reinstate iTunes and my (not lost) music library?
The problem is it was not backed up. Only an idiot doesn’t back up data.
iTunes cannot see your external drive. Is the drive connected correctly? Can you simply drag a file from your Mac to the drive? If neither iTunes nor your Mac can see it, and it is connected correctly, then the drive is corrupted or is trashed. Can Disk Utility repair the drive? Can a third party software repair the drive? If not, where is your backup, because the drive is trashed? You do have backups, don’t you? Would be a huge lesson if you don’t.
If you rip to Apple Lossless format (which I recommend), it will keep all the information and quality of the audio track CD. The files are a bit larger, but it is worth it. If your phone or iPod does not have enough room, there is still an option to compress the audio on the fly, but at least you will have a full-quality copy on your computer (which you may want to play through a good stereo system or headphones, for example).
There is a lot of good detailed information about this elsewhere on the internet, and how to use XLD (a free alternative for ripping, which also allows you to do error checking against a database of known rips, allows you to rip to non-apple formats like FLAC, convert from Apple Lossless to other lossless or lossy formats, and so forth). computeraudiophile.com is one such source, although there is a lot of noise and voodoo to sift through.
MP3, come on, it’s 2018. Hard Drives are cheap, MP3 is poor sound quality. Don’t teach people to rip MP3’s anymore. Get back to quality files, sound, etc.
Hear, hear.
I rip to AIFF .
160 is not high quality !!!
Agreed. Even with the settings maxed out the results with itunes ripping isn’t very good. I use XLD – it provides very high quality files, in all the formats – I use mp3 sometimes but mostly flac, so have it set to rip to both.
http://tmkk.undo.jp/xld/index_e.html
This is an excellent tool, thanks!
How does one use XLD to rip an audio CD?
I cannot find step-by-step instructions.
ha, i was going to post about XLD, too. it’s such an amazing tool. for my iTunes library, i rip to max quality, true VBR AAC. they’re somewhat larger than the files iTunes produces with the “iTunes Plus” preset, but they sound amazing and are about 1/3 the size of Apple Lossless files.
Al, check this guide from Auralic. it seems to be from an older version of XLD, but as far as i can tell, not a lot has changed:
https://support.auralic.com/hc/en-us/articles/206082768-Ripping-CD-by-XLD
The last time I ripped a CD from iTunes, it created all of the tracks with generic names like track01, track02, etc. Have they changed this feature to now put the actual song title of the track on the CD?
Some CD may contain meta data but many do not.
Unless Apple sent the data to a server to identify each song, like Siri does, then there is no way to know what the CD is.
Just label the songs yourself that you import from a disc, it is not a big deal. You can edit the iTunes meta data of any song this way. Album, song, artist, etc.
If your mac is connected to the internet itunes can search one of the various online databases for album/song information once you’ve inserted a cd. Virtually all commercial releases are available this way. If you’re not connected, you won’t get song/album titles.
In the iTunes Preferences, on the General tab, there’s a checkbox to allow getting CD information from the Internet. It usually defaults to Gracenote.
As for importing, you can select up to 320 kbps or as low as 64 kbps using the Custom setting under Import Settings, and you can select from AAC, AIFF, Apple Lossless, MP3 and WAV formats for saving.
When you load a CD that just shows generic info, all of those fields are editable and although it’s kind of a pain it’s worth filling them out so you don’t end up with multiple albums of track01, track02, etc. After you fill out the info, you should upload the info to Gracenote so that the next guy will have the info. (There’s an option for that on the CD screen.)
I usually start out by selecting all the tracks and doing a Get Info (Cmd-I). I then enter the album title, artist, album artist (I file by lastname, first name or band name, (The)), Genre and Year. I also add the disk number and #of disks if it’s a multi-disk set. Don’t bother adding artwork at this stage – it doesn’t take.
After the general album info I go back and enter track names – you can do this on the main CD screen or doing a Get Info for track01 and then going track by track.
If you’re backing up an audiobook that comes on multiple CDs I’ve found that many of them are not consistent in their numbering/naming of tracks from CD to CD, which can cause problems during playback. So I try to make the track numbering consistent so that they’ll play in order.
After the CD is ripped, I add the artwork using internet sources like AllMusic, and I get rid of the total number of tracks (no “1 of 13, 2 of 13…” for me). This can be done by selecting all the album tracks and doing a Get Info then editing the info. You also have the option to mark an album as a Compilation.
For audiobooks, I rip all the disks using the Spoken Audio option in Import Settings, which reduces track size significantly. After ripping, you should select all the tracks and do a Get Info. On the Options tab you’ll find a dropdown that includes Audiobook. When you select this and hit OK the selected tracks will disappear from your Song list and the audiobook will appear in your Audiobook library.
I burn talking books to transfer to my ipod nano.
If the book/music cd is not recognised by apple store you can label each cd by clicking on first track then press CMD+A. This brings up a box where you can edit the whole CD or each track. Very tedious but I have found no other way to do this so I tend to just label CD (ok for Books)