How to Convert Pages to Word Doc Online with iCloud

Do you own both a Windows PC and macOS device like the MacBook Pro or iMac? If so, you might run into file compatibility issues while you switch between your computers or software. More specifically, if you utilize software like Pages which is a part of the iWork productivity suite, you might not be able to open those documents on your Windows machine using Microsoft Word.
Pages is Apple’s equivalent of Microsoft Word that’s used by countless people for their word processing needs. However, Microsoft Word is unable to open a .Pages file and iWork isn’t exactly available for Windows devices because of how closed Apple’s ecosystem is. So, if you create documents on your iPhone, iPad or MacBook using Pages for work-related purposes, you’ll have to convert these documents to a Windows supported file format like .docx before you’re able to view and edit them.
Do you have multiple Pages documents stored on your Windows computer that you can’t access using Microsoft Word? Well, you’ve come the right place. In this article, we’ll be discussing exactly how you can convert a Pages file to a Word document using iCloud.
How to Convert Pages to Word Doc Online with iCloud
With the help of iCloud, you can easily convert your Pages file to a Word document on any computer. The best part about this method is the fact that you don’t need to install any additional software, as all you need is a web browser to access iCloud’s web client. So, without further ado, let’s take a look at the necessary steps.
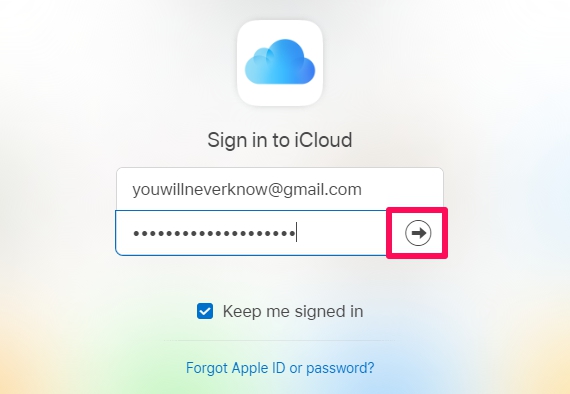
- Open any web browser that’s installed on your PC and head over to iCloud.com. Type in your Apple ID details and click on the arrow to log into your iCloud account.

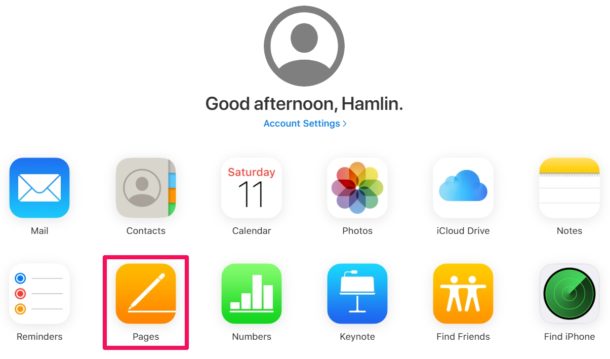
- You’ll be taken to the iCloud homepage. Click on the “Pages” app that’s located right below Contacts.

- Here, you’ll see all the documents you created using Pages. However, if you want to convert a document that’s stored on your computer, you’ll have to upload it to iCloud first. Click the “Upload” icon located at the top of the page.

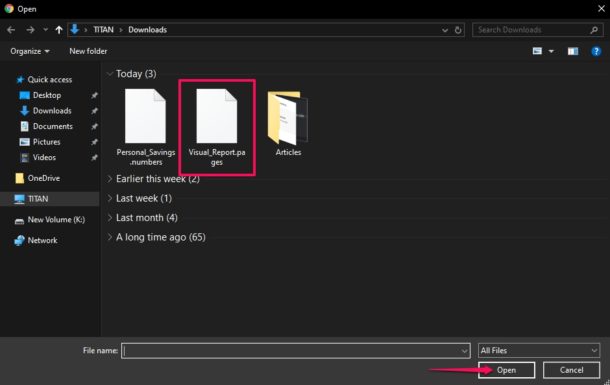
- This action will open a window for you to browse through folders. Select the .pages file that you want to access and click “Open” as shown in the screenshot below.

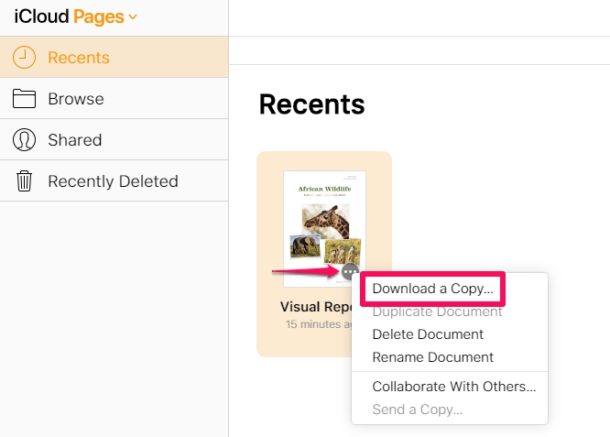
- It’ll take a few seconds for the file to upload. Once it’s done, click on the “triple dot” icon and click “Download a Copy”. This action will open a pop-up on the screen.

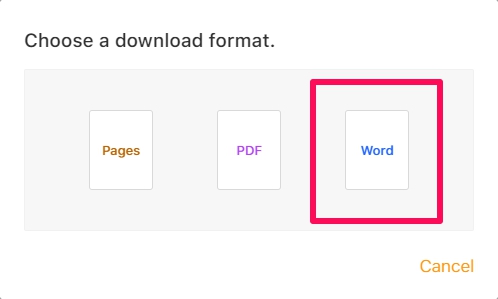
- Here, you’ll be able to choose the file format for the download. Simply click “Word” to download the document in a .docx file that can be later viewed and edited on Microsoft Word. It’ll take a few seconds for iCloud to process the conversion and start the download.

- As you can see below, the downloaded document is in .docx format. You can find it in the downloads section of your browser. Click “Show in Folder” to view the file in Windows Explorer or open it using Microsoft Word.

That’s pretty much all there is to it.
You can continue working on your Pages documents right on your Windows machine using Microsoft Word, now that it’s in a supported format. Once you’ve completed working on it, you can upload it back to iCloud and open it normally using Pages on your Mac, iPhone or iPad.
Considering how Pages opens Word documents just like any other file, we’re not quite sure why the vice versa isn’t possible on Microsoft Word. At this point, we can only hope that changes and Windows adds support at some point down the line.
In addition to the conversion capabilities that iCloud’s web client has to offer, it can also be used to edit iWork documents on any device, as long as it has a desktop-class web browser.
Next time, before you transfer iWork files to your Windows machine, make sure you have a copy of the document in a Windows supported file format to avoid a similar situation. For example, you can export your Pages document as a .docx file right on your MacBook or iPad, before you even save the document.
We hope you’ve successfully converted your Pages files to Word documents for accessing them on Microsoft Word. What do you think about this handy tool on iCloud.com? Is it a feature that you’ll be using on a regular basis to avoid running into file compatibility issues? Do let us know your thoughts and opinions in the comments section down below.

