How to Disable Automatic Updates on HomePod Mini
Do you want to stop your HomePod Mini or Homepod from installing updates automatically? Perhaps you prefer to manually update HomePod, or you’re the kind of person who likes to make sure there aren’t any user reports of issues before updating your devices? Fortunately, Apple gives users the option to disable automatic updates for the HomePod mini and Homepod, if desired.
Typically, your HomePod is set to download and install software updates from Apple’s servers automatically. This is the default update setting. While this may be super convenient for most users, there are people out there who prefer to take things into their own hands when it comes to installing updates on their devices. We’ll take a look at how you can disable automatic updates on your HomePod.
How to Disable Automatic Updates on HomePod
The steps we’re about to discuss are applicable to both the regular HomePod and HomePod mini models. We’ll just be making use of the Home app to stop automatic updates.
- First of all, launch the built-in Home app on your iPhone or iPad.

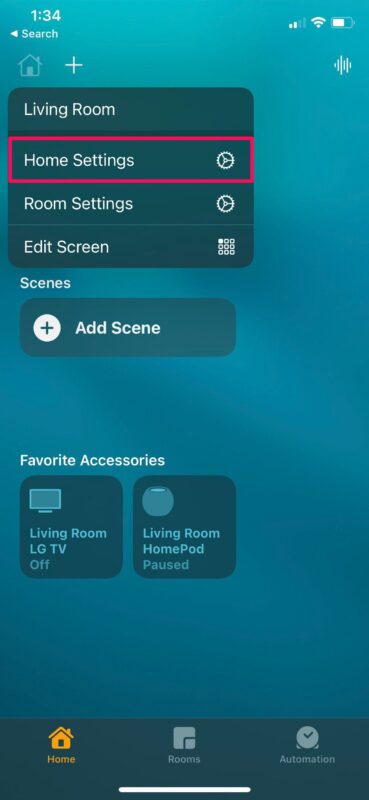
- Make sure you’re in the Home section of the app and tap on the Home icon which is located at the top-left corner of your screen.
- Next, tap on “Home Settings” from the context menu, as shown in the screenshot below.
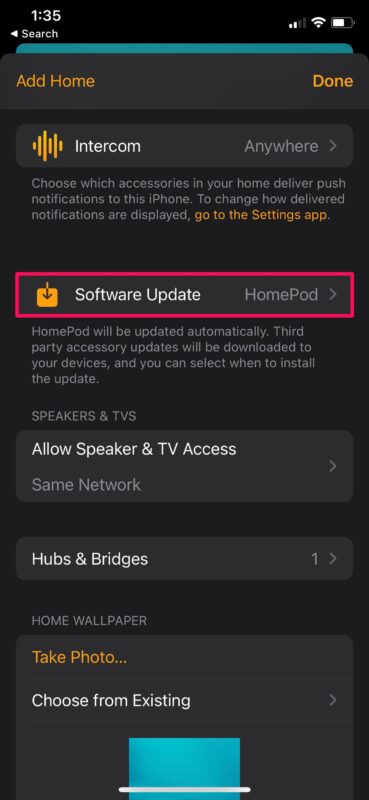
- In this menu, scroll down below the Intercom feature to view the “Software Update” setting for your HomePod. Just tap on it to change your settings.
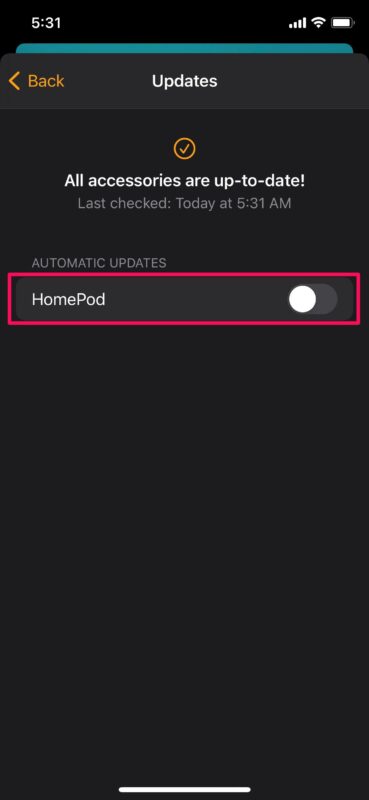
- Here, you’ll find a toggle next to the HomePod option. Use this toggle to disable automatic updates.

That’s pretty much all you need to do. Your HomePod or HomePod mini will no longer update automatically.
From now on, whenever there’s new software for your HomePod, you’ll get a notification. You can download and install the update file manually by heading over to the same menu from your Home app. Manually installing the updates give users better control over the firmware that their HomePods are running.
Since you’ve been using automatic updates all this time, you may have not seen your HomePod actually go through the update process since it happens in the background. Note that when you manually install a new update, you will see a white spinning light on the capacitive top-surface of your HomePod. During the entirety of the update, you will not be able to get Siri to respond to your queries and you’ll need to wait for the process to finish.
If you use a HomePod Mini, you can always restore the software to the factory version by connecting your device to a Mac or Windows PC. Unfortunately, owners of the regular HomePod can’t utilize this method since it doesn’t come with a USB-C cable.
We hope you were able to disable automatic updates on your new HomePod for better control over the software that you want to install. Have you disabled automatic updates on your iPhone and iPad as well? Let us know your valuable thoughts and opinions on automatic updates in the comments section down below.
