How to Run Windows 11 on M1/M2/M3 Mac, for Free
If you want to run Windows 11 on your M1, M2, or M3 Mac, you can now do that, and perhaps best of all, you can run Windows 11 in a virtual machine on the M-series Mac entirely for free.
We’ll be covering how to install, setup, and run Windows 11 ARM on any Apple Silicon Mac, whether it has an M1, M2, M3, M3 Pro, M2 Pro, M1 Pro, M1 Max, M1 Ultra, or any other M chip does not matter, it will work just fine thanks to the UTM app.
Note this particular walkthrough is geared specifically for Apple Silicon Macs. Intel Macs offer many other ways to run Windows 11 in virtual machines like within VirtualBox, VMware, Parallels, etc,
How to Run Windows 11 ARM on Any M1/M2/M3 Mac
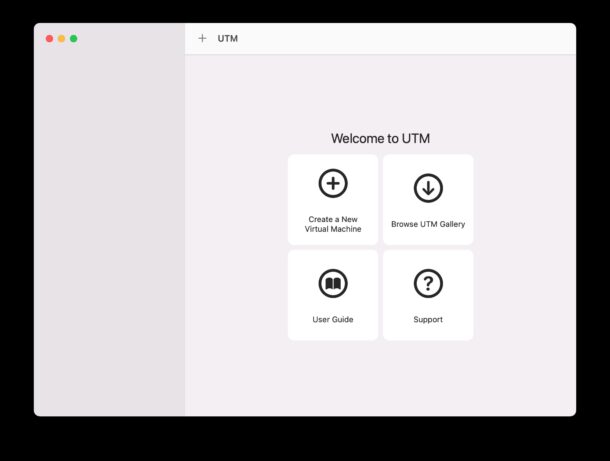
- Download the UTM app for free, it’s a virtualizer and emulator application, and drag to the Applications folder to install it on the Mac
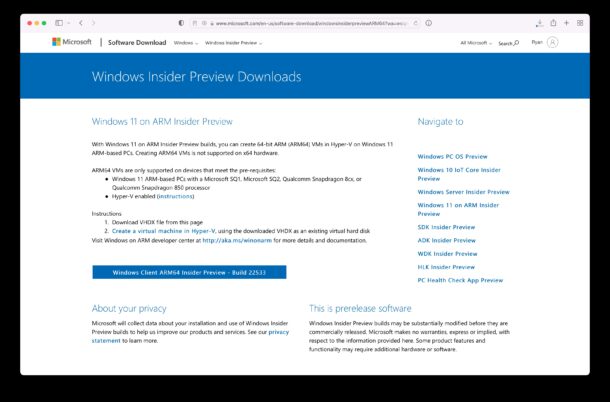
- Download the Windows 11 VM for ARM free from Microsoft here (you will need a Windows Insider login for this, which is free to sign up for if you don’t have one already)
- Open UTM on the Mac, then click the + plus button to create a new virtual machine
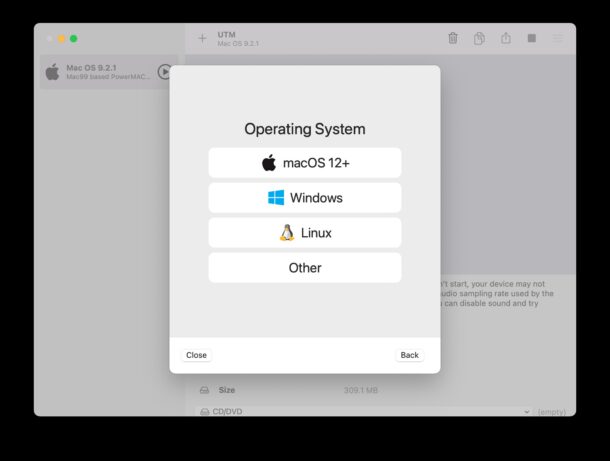
- Choose “Virtualize” from the ‘I Want to” screen, then select Windows
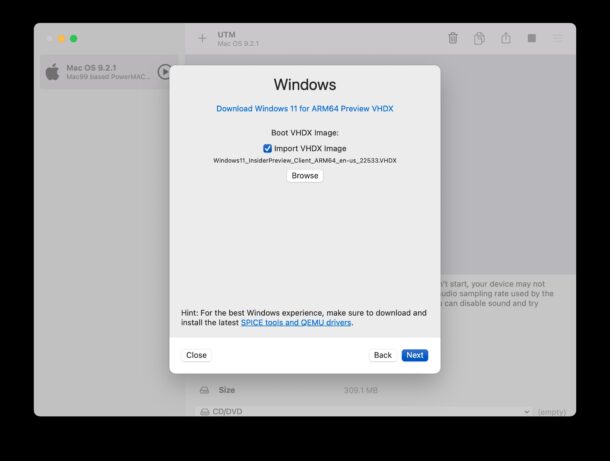
- Click the “Browse” button and select the Windows 11 VHDX ARM image you downloaded, with “Import Image” selected, then click Next
- Choose the amount of RAM and CPU cores you want to designate to Windows 11 (recommend to give 8GB RAM or more for better performance), then click Next again
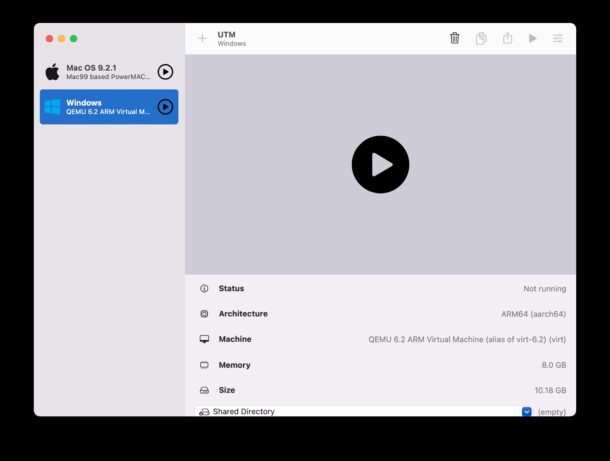
- At the Summary screen, choose “Save”
- Now click the big Play button to boot the Windows 11 VM and begin setup
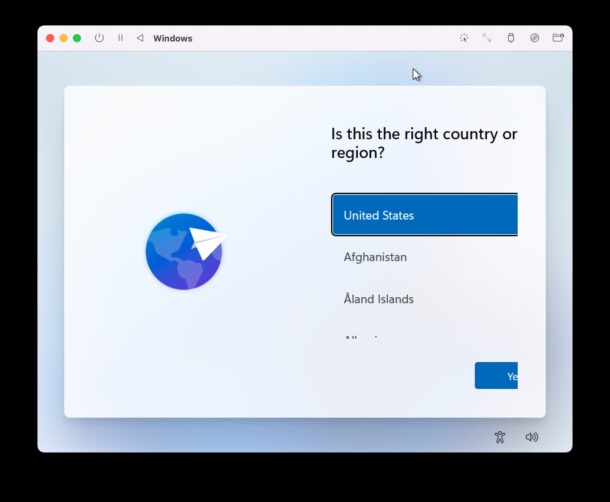
- Walk through the Windows 11 setup process as usual, choosing your region, account name, etc – Note that networking and internet will not work yet, that takes an additional setup process which we’ll cover in a moment – thus choose that you have no network connectivity for now and let Windows 11 set itself up
- Wait a few minutes and Windows 11 will launch running in the VM on the M1 Mac
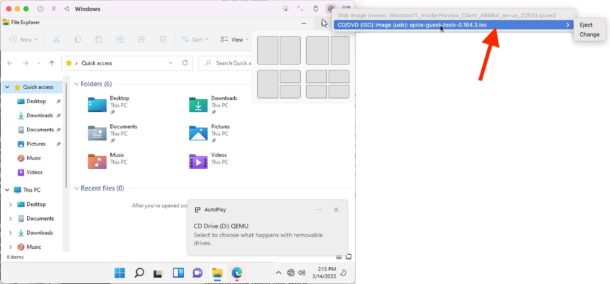
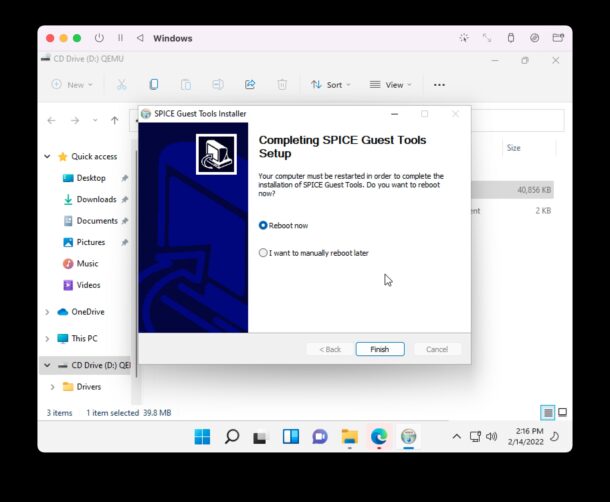
- To get internet access working in the Windows 11 VM, download the SPICE Guest Tools ISO here from the UTM website
- In the active Windows 11 VM, click the disc icon in the toolbar and choose CD/DVD Iso > Change > and select the spice-guest-tools-xxx.iso file you just downloaded
- Open the mounted D:\ drive in Windows Explorer, then run the SPICE Guest Tools installer in Windows, then restart the VM when installation is finished
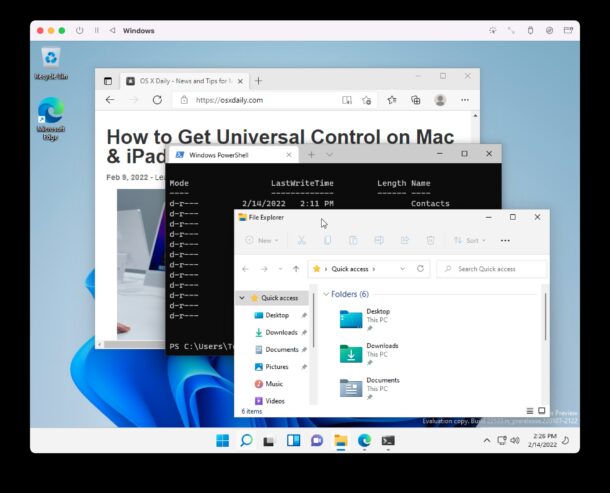
- The VM will reboot and Windows 11 will now be connected to the internet, confirm this by opening up the Edge browser and visiting a fantastic website like osxdaily.com
And there you have it, you’re running Windows 11 ARM on a Mac with an Apple Silicon processor.
Remember, you must install the SPICE guest tools to have internet access available in the Windows 11 virtual machine, and without it you will not be able to get the virtual machine online.

Windows 11 ARM runs pretty well on a Mac, though performance with UTM may not be quite as good as some of the other virtualization tools you’ve become accustomed to elsewhere. But as a free solution that is simple to setup, this is more than workable and usable.
If you enjoyed this article and the idea of running different operating systems atop your existing MacOS operating system, you’ll probably appreciate other virtual machine topics and operating systems that we’ve covered before.
Have you setup Windows 11 for ARM on your Apple Silicon Mac with UTM? What do you think? Do you use another approach?

THANK YOU! I need a Windows system to use my Samsung Laser printer that has no drivers (it’s like 10 years old or more) and this worked. I used Virtualbox but it was not working anymore after switching to a M1 Processor.
After shift+f10 you need option+tab to find the window.
On the Set up ages the pages just barely shows the yes buttons left side. But then when you get to the network page, only a “next’ button is visible. It says I need internet connectivity… which I have since I downloaded all the parts to get to this point. FAIL
————————————————————————–
Let’s connect you to a network
You’ll need an internet connection to continue setting up your connected, you’ll get the latest features and security updates.
Having trouble getting connected?
For troubleshooting tips, use another device and visit aka.ms/networksetup
Next
Try this
https://osxdaily.com/2023/01/08/how-to-install-windows-11-without-an-internet-connection/
Does anyone know how to increase the storage capacity?
I’ve bypassed the internet/network issue, but am trying to run a silly nerdy computer game but need more storage space than the default 68.72 gb. Any thoughts?
Works on my m1 air, 16gb ram. Had to do the OOBE\BYPASSNRO workaround to get past the network screen.
That said, it seems kind of janky. Videos are a touch out of sync. I can’t figure out how to reverse the two-finger scroll direction – doesn’t show a trackpad. Can’t get it to go full screen.
Definitely a preview.
Thanks for the instructions and tips, though. Interesting exercise.
Well after multiple attempts at using the workarounds you fine folks have posted I was getting nowhere. Then it dawned on me to turn off my VPN. That seemed to do the trick!
Hello,
I tried to install WIN 11 ARM via UTM 3.2.2 but setup stops at the beginning due to a lack of drivers for a media device?
Can anybody help me with this?
Attempted to install the install of:
Windows11_InsiderPreview_Client_ARM64_en-us_22598.VHDX.
Upon booting the VHDX arrived at “Start Boot Option” screen. How do I get beyond the “Start Boot Option.”?
Hi, it happened to me too, I had to do the No network thing and after that I was stuck, restarted the virtual machine and it picked up on the ISO disk
Attempted to install the install of:
Windows11_InsiderPreview_Client_ARM64_en-us_22598.VHDX.
On an M1 Pro Max, MacOS 12.3.1, with UTM version 3.1.5.
Upon booting the VHDX arrived at “Start Boot Option” screen. How do I get beyond the “Start Boot Option.”?
Thanks for posting!
Great guide, it was very easy to setup following the steps here.
Anyone have issues with getting this to Activate? Mine won’t activate and tells you to go to the Store to buy a license, then the store doesn’t exist and it tells you to get the store app.
Basically I have the same problem. How can we activate Win11 ARM? Anyone?
what are implications of not registering this windows 11 copy? will it expire anytime soon? what’s the cheapest way to register it? tks, /guy
I followed the instructions to the dot but could not get internet working. Finally installed by bypassing the internet requirement. However, after booting to windows and installing the spice tools, the internet is still not there. It shows as connected to network but still no internet. Any ideas /
Come hai continuato l’istallazione al punto della connessione ad internet? a me non riesce sono bloccato li non mi fa cliccare sul continua
I found this quite easy to set up and it works pretty well. I’m only running it for a bit of fun, I don’t use it for serious work but most things seem to work and running the vm doesn’t set the fans running and hammer the battery life like it does on an Intel Mac. The main, albeit fairly minor, annoyance is the keyboard layout isn’t correct. Does anyone have any idea how to correctly configure it to the Apple keyboard?
Thermonuclear war huh.. Lol
Having MacOS, why would anyone want to run an inferior OS like Windoze?
For Windows only application features
https://www.quicken.com/product-selector
Here is a video if you need help to bypass the internet screen
https://youtu.be/0p7n69SOrys
Thank you!
Alright guys, I found a work around for all of you getting stuck on the “Lets get you connected” screen where the next button is greyed out.
1. When you are on this screen, press shift + F10 to bring up command prompt.
2. In command prompt type taskmgr and press enter.
3. Right click on file explorer in task manager and click open file location. This will open file explorer.
4. In UTM click disk image in the top right corner and select the spice tools. After you do this, a new usb drive should appear in files explorer. Click into files explorer in the new spice drive and start the setup. It will ask to reboot. Go ahead and reboot.
5. Setup will start again, this time the screen should display correctly and you should automatically check for updates.
6. If UTM hangs on boot, quit the UTM VM and reboot the vm.
7. Continue on an create your local account and Boom!
Hope this helps you guys. Took forever to find a way to install the tool without internet.!
Thanks,
Andy Kilgore
salve ma se faccio Shift+F10 mi seleziona il livello del suono su Mac ……..altro metodo?
Grazie
You may have to do
FN + Shift + F10.
Your instructions worked. Click on Windows Explorer to launch File Explorer. After rebooting there is a message in the lower right in small type stating “System requirements not met.” So far everything is working, mainly. It hung trying to run chrome installer. Mouse moves, clicks don’t work. Quit UTM and ran it again and chrome installed ok.
Most Alarming: Mac and windows trackpad two-finger scroll in opposite directions.
Gone through this twice now…
The first time Windows 11 let me choose that I don’t have internet connection and skip that, then I installed the spice tools and it worked.
The next time I went through (different Mac) and I couldn’t skip that internet connection screen during config, so I used The Andy Kilgore Method™ of Explorer > installed spice tools > internet works.
Maybe a different Windows 11 build is included in the VHDX file that was updated so recently that I got two different files? That is my best guess as to why some people are getting stuck on the internet connection screen and others can breeze right through it, myself included.
This may help you… you can change the scroll direction. By Default Mac is setup to scroll inversely.
OR you can
1. Go to settings app in windows 11
2. Bluetooth and devices
3. Scroll and Zoom
4. Scrolling Direction
Down Motion Scrolls Up: Swiping two fingers upward on the touchpad will make the window contents scroll down. This is similar to the Mac’s “natural” scroll direction.
Down Motion Scrolls Down: Swiping two fingers downward on the touchpad will make the window contents scroll down. This is closer to the typical behavior of a mouse scroll wheel.
Thank you!
Found a workout to get this to work! So dumb. Making a video in few min to help everyone out.
If you read this article you don’t deserve a Mac I hope your mac will brick the day apple care expires
I have the same issue as others – the window for initial configuration seems too small (on my M1 Macbook Pro 13″), and once I get to the screen for getting the network set up, I can’t proceed past the grayed-out network button. Is there another unreachable button that is off-screen? The images in this article look just like mine though – with the “YES” button partially cut off for the keyboard selection screen…
Would really like to give this a try – but I am stuck. Maybe the latest preview build has changed since the article was published?
Even though Microsoft has a Windows version that supports ARM. It only supports certain ARM chips. Those that are officially installed in ARM Windows laptops. Neither Microsoft or Apple have said they support Windows in any level on Apple silicon. The only official option I have seen is Parallels does support the ARM based Windows on Apple silicon Mac’s.
I got it working but now I am getting a Windows blue screen saying “Recovery – Your PC Device needs to be repaired”
winload.efi
Error Code: 0xc000000f
I knew I was going to get a Windows experience! LOL!!
In all seriousness, I know that Windows ARM is in beta basically right so this is not a stable version like what you get on a new Windows PC. But coming from the Blue Screen of Death era of Windows 95, I had a good chuckle too see that again!
Ok enough fun, back to macOS for me :)
I’m trying your instructions for running Windows ARM on my M1 Pro MacBook Pro using UTM.
You state in step 10 to wait a few minutes and Windows will launch. However, I get stopped at a dialog “Let’s connect you to a network”. The ‘next’ button is grayed out and the installation does not continue.
What am I missing?
OK I ran into this network issue too, I raced through and was only half paying attention during setup. I started over and got it working. Here’s what I figured out on the second go around.
The trick is *DO NOT attempt to setup a network within the initial Windows 11 setup*. You have to choose that you don’t have a network connection during Windows setup, which lets you defer the network configuration.
Then, after once Windows 11 is up and running, install the SPICE drivers image, that lets the Windows VM get online.
I think I rebooted three or four times during the whole thing, typical Windows. Once it’s running it works, but performance is not as good as I had hoped it to be.
I do not see the option to choose that I do not have a network connection. Can you please explain how to do this? I am not sure if it’s a display issue because the resolution is not ideal and it is not showing a button or what, but I see nowhere that there is an option to move forward without a connection.
well I cannot seem to be able to bypass this screen because there are not buttons offered to bypass the network setup – is there a resolution option to show more of the screen to see the other options?
I don’t see where I can choose that I don’t have a network connection during the setup.
where is that option?
At the “Let’s connect you to a network” screen, use shift+function+f10 on your Mac keyboard to bring up the Windows Command Prompt.
Type OOBE\BYPASSNRO
Windows will reboot and start the process again. When you get back to the network screen, you’ll now have an option for “I don’t have internet”. Choose that and then “Continue with limited setup” on the next screen.
Yes! That worked. Now to see if I can actually do anything with it. Thank you.
Thanks a lot Mike. I’ve been stuck with the step from few hours and your reply helped.
I tried this with the current Windows 11 for ARM download (Windows11_InsiderPreview_Client_ARM64_en-us_22598.VHDX). Unfortunately, Windows will not install if you don’t have a network connection, so you get stuck at step 9 and can’t proceed further. :-(
The screen you get blocked on says:
Let’s connect you to a network
You’ll need an internet connection to continue setting up your device. Once connected, you’ll get the latest features and security updates.
—–
Having trouble getting connected?
For troubleshooting tips, use another device and visit aka.ms/networksetup
I’d love to take advantage of this, but Step 9 doesn’t offer me the option to continue without network connectivity.
According to UTM users on the Discord server, typing oobe\bypassnro into the command prompt (fn-shift-F10) reboots the VM and enables a “Skip” button on this step of the setup.
Thank you, I had read that in someone else’s reply, even though the timestamp says that your reply was twelve hours earlier. Oh well.
Now is there a way to install Windows programs? My first attempt failed.
Doesn’t work. I followed the steps exactly. After I select the country and keyboard, it says it can’t continue without an internet connection and will not go past that screen. I can’t get to a running system to install the SPICE network drivers.
1. Mount the spice network driver download as virtual D-drive.
2. At the network step during installation, press Shift+Fn+F10, to open a DOS prompt.
3. At the DOS prompt go to the D-drive.
4. Run the executable, after installing Windows reboots again.
5. After reboot Windows install starts again, but now it finds the network and installation continues. At least on my Mac mini M1.
6. Be disappointed that Visual Studio is indeed not working , as others already told.
Does anyone know if there’s a simulator that will allow 10.4 (Tiger) to run on Mojave or Monterey? Then I could go back to using FrameMaker.
I get to the network settings and I don’t have an option to skip and thus it just sits there. How do I skip this step so I can get to the desktop to install the Spice Guest Tools?
You can do shift + F10, type taskmgr and open file location to windows explorer and install spice tools through there!
The UTM app does not appear to be free, at least for me in New Zealand. Any ideas?
UTM is definitely free, it’s open source. Here’s a direct download link:
https://mac.getutm.app
and
https://github.com/utmapp/UTM/releases/latest/download/UTM.dmg
Don’t need to use the “App Store” link on the UTM website, they charge money for it on the App Store for some reason…