How to Install Windows 11 on Mac with UTM

You can install and run Windows 11 on a Mac, without having to overwrite the MacOS operating system, by installing Windows 11 into a virtual machine. Virtual machines are self-contained installations of operating systems that can be used for a variety of purposes, from testing to demonstrations, to running software that runs on Windows but not on Mac.
We’re going to walk through the necessary steps to install Windows 11 on a Mac into a virtual machine using the UTM app. The end result will be that you can run Windows 11 on your Mac at any time just by opening the UTM app and starting the virtual machine. This may sound complex, but we’ll walk through every step.
How to Install Windows 11 into a Virtual Machine on Mac
Installing Windows 11 onto a Mac with a UTM VM is relatively easy, here are the precise steps:
- Download UTM free for Mac here
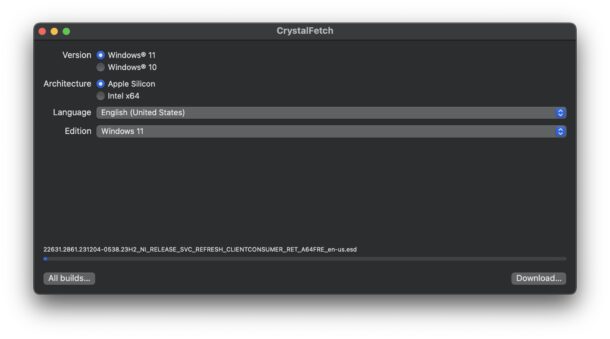
- Get CrystalFetch free from the App Store
- Open CrystalFetch on the Mac
- In CrystalFetch, select “Windows 11” and select Apple Silicon (or Intel)
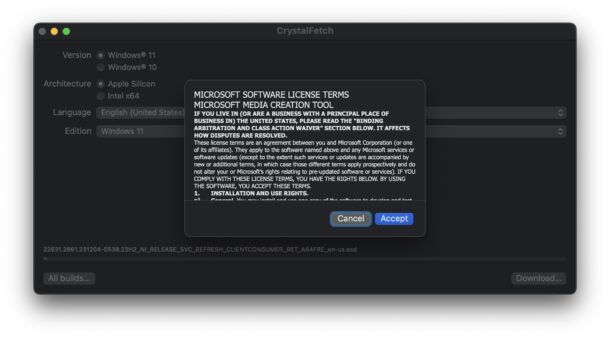
- Click Download and click agree to the terms regarding Windows 11
- The Windows 11 ISO will download and build, let that process finish
- Now launch UTM on the Mac
- Choose to “Create a new virtual machine” (or click the + plus button)
- Select “Virtualize”
- Select “Windows”
- Look for “Boot ISO Image” and choose “Browse”
- Select the Windows 11 ISO you built in the earlier steps and choose open
- Select to Continue
- Configure the Virtual Machine with at least 4GB RAM and 2 cores, but more RAM/CPU Cores is better for performance
- Allocate at least 64GB of disk space for the Windows 11 VM
- Select to Continue
- Name the VM something obvious like Windows 11 and choose to “Save”
- Now boot the VM by clicking the large Play button
- Let Windows 11 ISO boot
- Go through the Windows 11 installer
- Select “I don’t have a product key” when the activation screen comes up, you do not need to activate Windows 11 to install it or use it in the VM
- Choose the version of Windows 11 you want to install
- Continue through the installer
- Let Windows 11 install
- Soon Windows 11 will start booting and you will be at the Windows 11 setup guide
- Let Windows 11 check for updates, because it’s Microsoft and they like to check for updates all the time
- Windows 11 will give you little affirmations telling you that good things are coming, by installing Windows 11
- Be prepared to wait a few minutes to complete setup
- Finally, you’ll be at the Windows 11 desktop and ready to use Windows 11 on the Mac with UTM
- You can see that Windows 11 is in a virtual machine and is virtualized
- Using Windows settings should be familiar to Mac users, which looks visually almost exactly like the very uninspired and frustrating macOS Sonoma System Settings


There you go, you’re running Windows 11 on the Mac!
Anytime you want to boot Windows 11, you simply open UTM and start the Windows 11 virtual machine.
The Windows 11 VM is self-contained, though you can use a shared folder if you wish to share files between Windows and MacOS.
There are other ways to run Windows 11 on Mac also with UTM, as well as with Parallels, VirtualBox, VMWare, and other solutions. If the Mac is an Intel Mac, it can even run Windows 11 directly on the hardware in a dual boot situation, however at the moment anyway it is not possible on an Apple Silicon Mac to dual boot MacOS with Windows 11, thus Apple Silicon Macs will need to use a virtual machine instead.


If the message “Press any key to start with CD/DVD…” is displayed, do not hesitate to press any key immediately
What are the no-activation-key limitations? Any functionality limits? Any time limits? Any other limits?
type “exit” after the shell>prompt
I’ve just tried to perform the windows virtual installation as documented. When I get to step 19, I end up with a shell> prompt. Any suggestions?
press a key when “press any key to to start from cd/dvd” is shown
type “exit”
Could not get it to install, gets stuck in Shell.
If “Press any key to start from CD/DVD…” is displayed, do not hesitate to press any key immediately [space bar, or enter key}
“the very uninspired and frustrating macOS Sonoma System Settings” So funny but exactly my opinion.
For as much as Windows 11 has been hacked who would want to. Is a disaster.