How to Create a Disk Image of an Entire Mac Hard Drive

You can create an image of a Mac hard drive with the help of a free third party utility called Carbon Copy Cloner. The resulting disk image will be saved as the familiar .dmg format, which has a number of potential uses ranging from creating a drive clone for backup purposes, restoring the image elsewhere as a bootable backup, or even for deploying the same Mac OS X installation on multiple machines. Another great usage for making a disk image of an entire hard drive is for upgrading a hard drive, or replacing a hard drive, since you can clone the current drive to the new one.
Carbon Copy Cloner makes this entire process simple, whatever the reason you need to clone a drive, for both creating and restoring a disk image of an entire Mac hard disk. This tutorial will detail how you can create a disk image of an entire hard drive on a Mac, and then how to restore that cloned disk image to a drive on the Mac as well.
Make a Disc Image of an Entire Hard Drive in Mac OS X
The process below will describe how to create an exact image replica of a selected Mac hard drive. If the hard drive being imaged is very large the resulting disk image is also going to be large, be sure to have adequate space to support the image or consider saving it to another location.
- Get Carbon Copy Cloner free from Bombich and copy it to the /Applications/ folder
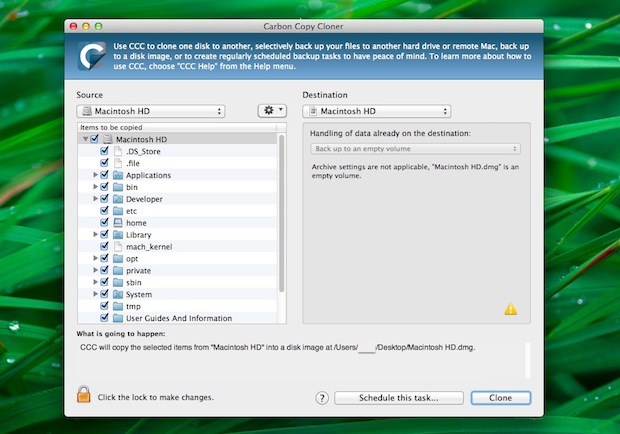
- Launch Carbon Copy Cloner and pull down the “Source” menu, selecting “Macintosh HD” or whatever the Mac hard disk is named
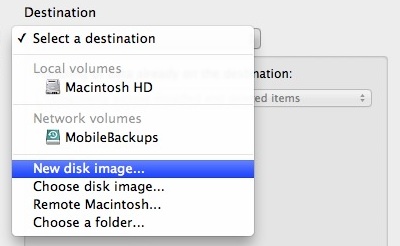
- Pull down the “Destination” menu and choose “New Disk Image”
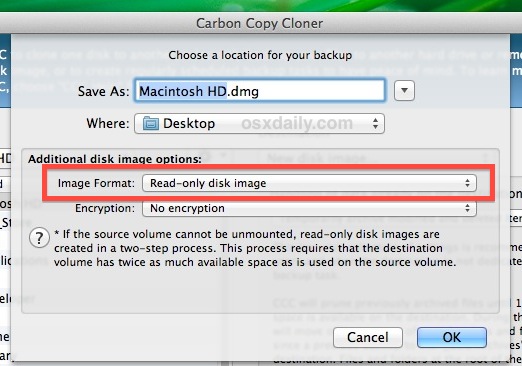
- Give the disk image a name and select a destination, if you don’t have the local storage capacity for such a large disk image be sure to choose an external or network drive as the image destination
- Pull down the “Image Format” menu and choose “Read-only disk image”, this saves the image as the familiar DMG format
- Click “OK”
- Back at the main CCC menu, choose “Clone” to create the exact replica of the drive as a disk image file


The process of creating the disk image can take a very long time depending several factors, including the speed of the Mac, the size of the disk being imaged, and the destination of the image itself. Don’t be surprised if it takes quite a while to create the backup file.
When finished you’ll have an exact replica of the Macs hard drive in the form of a .dmg image file. If you intend on using the image on a Windows PC, you may want to convert it to an .iso first.
You’ll notice we didn’t choose to create an encrypted image, that is an option you can use if it fits your use case, though creating encrypted drive images takes even longer and they also have the potential of issues when restoring down the road.
Restoring an Entire Hard Drive Disk Image on a Mac with CCC
Now that you’ve got your cloned hard drive disk image made with CCC, you can restore that full disk image to another drive using the app:
- Launch the Carbon Copy Cloner app on the Mac
- Choose “Restore from disk image” and locate the backup disk image you previously created
- Select a volume from the Destination menu, this is what you want to restore the disk image to (i.e. another hard drive) – note that you can’t restore an entire Macintosh HD to a currently booted/running OS so if you’re replacing a hard drive you’d want to clone it while connected to the Mac, then swap out the drives
- Set any configuration options if desired, like “Preserve newer files, don’t delete anything”, or perform a complete restore of the drive from the image if desired
- When satisfied with the clone restoring settings, click the “Clone” button to begin the process
Restoring an entire disk image and cloning it to another hard drive is time consuming, and it may take many hours to complete the process depending on the speed of the hard disk(s) and the Mac itself. If you’re restoring a many hundred GB or TB drive, it will take quite some time, so have patience and let the process complete.
Personally I use full disk images with Carbon Copy Cloner most often when upgrading a hard drive. For example, if I was replacing a hard drive in a Mac with a new upgraded one (say moving from an HDD to SSD) then I clone the original drive (HDD) and restore that clone to the new drive (SSD), and when it’s finished I then physically replace the original HDD drive with the new SSD. When properly completed, the new drive will be configured just like the old drive except of course it’s new hardware. This makes hard drive replacements about as easy as it can get, though it’s important to note that Time Machine can also serve similar functions for cloning and restoring drives too. For example you can setup Time Machine to backup a Mac, then once that backup is complete, you can then restore the Time Machine backup to the Mac on either another hard drive or even the same volume. CCC is a bit more advanced than Time Machine, so just use what works for you and your particular environment.
Got any tips, experiences, comments, or experiences with cloning an entire Mac hard drive with Carbon Copy Cloner? How about with restoring? Have any other tips or suggestions for cloning hard drives on the Mac? Share your thoughts in the comments below!


you forgot to explain the RESTORE step. How to do that?
Hahahahaha…
No seriously, you’re right though. That was important information to include: https://bombich.com/kb/ccc3/restoring-disk-image
To do the restore you need a working Mac that can run this program and the disk you want to restore onto needs to be connected to that mac. I don’t know if you could restore over the running system disk. My intuition would be no, that will not work… so try and get that machine booting off of another disk first, before you try and restore your image onto that system disk that you ultimately wanted it to be on.
Thank you for your help. Very useful.
Does the Mac Disk utility generate a hash value?
Image of entire Mac can be created by Disk utility, which is an inbuilt feature of Mac OS X. Follow these steps:-
1. Go to Applications > Utilities
2. From the File menu, select New > Disk Image from Folder.
3. Select the Drive , click the New Image button
4. Choose the destination where you want to store your image
5. Once the disc image is created, it will appear in the left pane in the Disk Utility application.
Can it be run when system is up, or does it require u to boot off something?
if i create a disk image, *.dmg file, and format my hard drive. Can i drag applications off the disk image onto my new formatted HDD and the applications will install/run like normal?
http://support.apple.com/kb/ht1553
Check out this link.
Disk Utility does the same thing.
Disk Utility won’t clone active startup disk.
True, but you can run disk utility before the OS has loaded, and then it will.