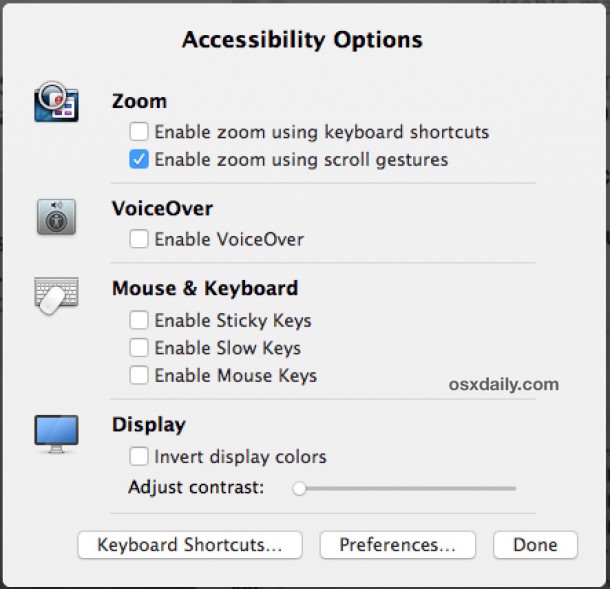
Mac OS X makes it easier and faster than ever to access and tweak Accessibility Options from anywhere on the Mac, thanks to a new keyboard shortcut.
The Accessibility panel allows Mac users to quickly toggle zoom, VoiceOver, sticky keys, slow keys, mouse keys, screen contrasts, screen invert, and more, depending on what version of Mac OS you are using.
Safari on iPhone and iPod touch can be set to open new links in the background, a behavior that closely represents opening links in new tabs on the desktop or iPad. This lets you continue to browse the current web page while opening the link in question, rather than switching from the current web page to the newly opened link.
Removing all photos from the Camera Roll on an iPhone can be notoriously slow, particularly for Mac users with large picture libraries. Deleting all images from an iOS device with Image Capture can literally take hours, and deleting more than one photo directly on an iPhone itself is time consuming and a very hands-on process as you have to tap each picture you want to ditch.
Using the OS X app Preview you can speed up the removal process quite a bit with the help of a fairly silly adjustment.
Bored with your Mac screen savers? Don’t forget to check out the four beautiful new screensaver additions to OS X Mountain Lion, or the 14 new ways to display them. If you haven’t seen them yet:
Open System Preferences from the Apple menu and click on the “Desktop & Screen Saver” panel
Find them under the Screen Saver tab and click on the “Source” menu to reveal the choices
The new screen savers are basically picture slideshows of some amazing photography in four themes: National Geographic, Aerial, Cosmos, and Nature Patterns. Combine those with the fourteen new slideshow types: Floating, Flip-up, Reflections, Origami, Shifting Tiles, Sliding Panels, Photo Mobile, Holiday Mobile, Photo Wall, Snapshots, Vintage Prints, Scrapbook, Ken Burns, and Classic, and you have 56 new screensaver possibilities.
Preview the screen savers full screen by selecting one then clicking in the thumbnail pane.
Ken Burns is the most subtle and probably the best if you want to enjoy the pictures, but the other choices like Shifting Tiles are fun too, particularly with iPhoto libraries and personal pictures.
Also worth mentioning, you can still make your own by selecting any specified folder as the screensavers image source, but in Mountain Lion you can no longer select a stream from Flickr or RSS like you could in prior versions of Mac OS X – bummer.
The new OS X Reminders app is iCloud enabled, and much like the Notes app, it lets you pin a list to the desktop. These two features combine to bring a synced and automatically updating To-Do list right to the Mac desktop, meaning if you change or complete a task while on the go from an iPhone or iPad, it will reflect instantaneously on the Mac and vice versa.
This great feature is very easy to use, but you’ll need OS X Mountain Lion and iOS 5 or later, and obviously you will have needed to set up iCloud in iOS and Mac OS X for this to work properly.
Pinning the Task List to the OS X Desktop
This simple action splits the chosen to-do list from the Reminders app:
Launch Reminders in OS X and double-click on the to-do list you want to pin on the desktop
The task list will update without splitting it from the primary app, but the pinned Reminders lists take up much less space and are cleaner looking, making them more suitable for leaving around on the desktop.
Place the floating Reminders list anywhere on the desktop and now grab an iOS device to make remote changes to the list.
Update the Desktop To-Do List from an iPhone or iPad
Grab any iOS device with iCloud enabled and do the following:
Open Reminders and make a change to the same task list that is floating on the OS X desktop
As long as the Mac (or iPad/iPhone/iPod) is online, the lists will automatically update to reflect changes made from any other machine using the same iCloud account.
Need to remove the audio track of a movie? iMovie on the Mac can make quick work of that, so as long as you have iMovie in Mac OS X you’ll be on your way to turning a movie with sound into a silent movie. This is helpful for when you need to add a new audio track, record a new audio track, or just remove an existing background audio track for whatever reason on any video file.
Want to see more emails on the iPhone or iPad screen at the same time, without having to scroll around? You can accomplish this in a few ways. It turns out side effect of changing the Mail preview size can lead to many more emails being shown on screen without having to scroll. This is particularly helpful on the smaller screens of the iPhone and iPod touch and if you need to sort a lot of messages quickly, but it can be helpful for iPad users too.
Do you type your email often, but would prefer to not have to type out the entire thing on your Mac?
Then you’ll find this trick to be particularly useful. Text Expansion is a wonderfully helpful feature that lets you type a short character sequence that instantly gets expanded out to something else. This has a wide variety of uses, but one of the most helpful is with character sequences that are slower to type, like email addresses. Using a shortcut allows you to type less but have it be instantly replaced by the complete email address.
We recently showed you a way to create an email address shortcut in iOS using Text Expansion on an iPhone, iPad, and iPod touch, and if you’re on a Mac you can do the same thing with Mac OS X.
If you’re annoyed the iPhone autocorrect dictionary still doesn’t know a word you use constantly, or you are constantly suggested the wrong word (what the duck?), you can easily teach iOS autocorrect new words by repeating them a few times in an app like Notes. The process is fairly simple, and it works universally for all iOS devices, and though you can do this process in just about any Apple app, it’s perhaps easiest in the aforementioned Notes application.
Hot Corners are a great feature of Mac OS X that let you instantly enable things like the screen saver, sleep, the lock screen, LaunchPad, Dashboard, Mission Control, and new with Mountain Lion, Notification Center. The advantage to using Hot Corners are their speediness, since you only have to swipe the mouse cursor into a corner of the screen to enable the designated action, which can be quicker than hitting a hot key or clicking an icon.
Opening Notifications on Mac with Hot Corners
If you’ve never used Hot Corners before they are very easy to set up:
Open System Preferences from the Apple menu and click “Mission Control”
Click the “Hot Corners” button in the lower portion of the preference panel
Choose a hot corner (upper right seems most appropriate) and open the pull-down menu to select “Notification Center”
Close out of System Preferences and slide the mouse cursor into the upper right corner to immediately open Notification Center
You still have to click out of Notification Center to hide it again, but nonetheless this is probably the fastest way to quickly see all of your alerts and notifications if you’re the type of user who prefers the trackpad and mouse.
The short video below demonstrates how to set this up:
Did you record a great video on your iPhone or iPad and now you want the full quality version on a computer? If you’ve ever used the iOS built-in sharing tools to send a movie from an iPhone or iPad, you’ll undoubtedly have noticed the quality gets reduced from the high quality HD 4k, 720p, or 1080p video to a lower resolution. That is done for bandwidth conservation reasons and because many email clients won’t accept large files, even if both the iPhone and computer are on wi-fi. Sending through iMessage is slightly better, but it still won’t provide the original resolution movie, and that only works for Mac users.
If you’re looking to transfer full HD video recorded from an iPhone, iPad, or iPod touch to a computer, you’ll want to connect the iOS device to a Mac or PC and copy over the movies manually much like how you transfer photos to the computer.
This tutorial will walk through how to transfer high resolution HD video from an iPhone or iPad, to a Mac or Windows PC.
Any song playing from the iOS Music app can be fast-forwarded, rewound, or scrubbed easily, and in the case of rewinding or fast forwarding, you can do both right from the lock screen of an iPhone, iPad, or iPod touch too.
Fast-Forward in a Song
From the Music app or the lock screen Music player:
Tap and hold on the Forward button, the longer you hold the quicker you fast forward
This is useful if you want to skip through a lengthy intro of a song or a boring part of a podcast and didn’t trim the mp3 beforehand.
Rewind a Song
From Music app or the iOS lock screen Music player:
Tap and hold on Back button, holding longer increases the speed of rewinding
Was your significant other talking through the most interesting part of a podcast or the best part of a song? No biggie, just rewind and hear it again.
Scrub Music & Jump to Points in a Song
From the Music app only:
Tap the album art to show the song timeline
Tap within the timeline or drag the slider to scrub audio and jump to points in the song
The timeline is what I find to be most useful since you can jump to any point in a song, or use it to fast forward and rewind. The downside is the timeline won’t appear on the lock screen music player.
There are occasional issues with scrubbing and moving about in songs streamed over iTunes Home Sharing, though having a strong network connection tends to mitigate that.
Previous versions of Mac OS X allowed you to see a “Now Playing” notification pop up over the iTunes Dock icon, the alert showed the song and artist name anytime a track switched and is a really popular tweak. It turns out that hidden feature is missing from OS X Mountain Lion, but with the help of a third party tool we can add a similar feature that pushes an alert of the current song and artist to Notification Center in OS X instead.
How to Get a “Now Playing” iTunes Alert in Notification Center
You will need OS X 10.8 (or later) for this to work:
Place “Now Playing” in your /Applications/ folder and then control+click the app and select “Open” to get around the GateKeeper app warning and launch the application
Quit out of iTunes and relaunch it, then play a song to see the Notification Center alert
The developer recommends rebooting the Mac to get the feature to work but we found it unnecessary, with just a relaunch of iTunes being sufficient in our testing.
Every time you switch songs the notification will appear over the desktop then get sent to the general Notification Center panel, though it’s smart enough to not have your entire playlist pile on top of each other in OS X’s Notification Center.
For those interested in how this works, it’s done through a modification to the awesome terminal-notifier tool that we wrote about recently.
We reached out to the developer to try and find a better hosting service than MediaFire since we know it’s blocked on some networks, we’ll update the link when possible.
The new Notes app in Mac OS lets you tear off notes and to float over the Mac OS X desktop.
You can think of this as the Stickies app on steroids, and not only does it look better, but you can share directly from the Note.
Best of all, if you have iCloud set up with Mac OS X and iOS the pinned note will automatically update when it’s edited from an iPhone or iPad via the iOS Notes app.
Encrypting folders and requiring passwords for access is an excellent way to store and protect private data on a Mac. Now, there is a new means of password protecting folders and sensitive files introduced in Mac OS X that lets you create a new encrypted disk image directly from a specified folder.
Though you can still create a blank disk image and fill it as you see fit by using the older trick, this new option in Disk Utility is easier to use and extremely quick, making it the preferred method to add a very strong layer of encryption to a folder, securing itself along with all of its contents.
Did you know you can quit multiple running apps at the same time on an iPhone, iPad, or iPod touch? Thanks to multitouch support, you can actually quit as many apps as you can get your fingers on (literally). Here’s what to do on any iOS device running versions 6 or prior:
We already knew that NASA used a lot of Macs during the Mars Curiosity landing event, but hardcore Mac geeks will be interested to know the Rover itself is running on both hardware and software that Apple used not only in consumer Macs of yesteryear, but that Apple still uses today!
When you think of IBM, you probably don’t think of Macs, right? Well you probably thought wrong, because it turns out some IBM employees love their Macs! To prove that, here’s the awesome all-Mac desk setup of a manager at none other than Big Blue herself. Hardware shown in the picture includes:
MacBook Pro 15″ (2011) – 16GB RAM, 500GB SSD, OS X Lion 10.7.4
Dual Apple Thunderbolt 27″ Displays
Apple Extended Keyboard & Apple Magic Mouse
Plantronics Calisto Pro wireless phone and Bluetooth headset
Other Apple gear not shown includes an iPhone 4S and iPad 2 64GB AT&T model.
Want your Mac setup to be featured? Send in a good picture or two, a list of hardware, and a short description of what you use your Apple gear for to osxdailycom@gmail.com


 If you’re annoyed the iPhone autocorrect dictionary still doesn’t know a word you use constantly, or you are constantly suggested the wrong word (what the duck?), you can easily teach iOS autocorrect new words by repeating them a few times in an app like Notes. The process is fairly simple, and it works universally for all iOS devices, and though you can do this process in just about any Apple app, it’s perhaps easiest in the aforementioned Notes application.


