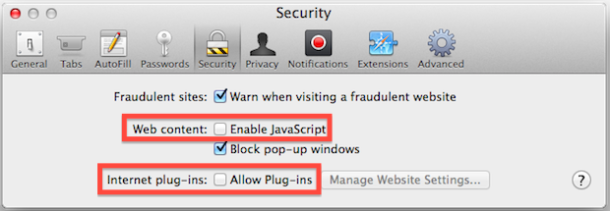
Javascript is prominent throughout the web, allowing many of the various sites and features we all know and love when browsing the web to function as intended. With that said, sometimes users need to enable or disable Javascript.
Need to re-enable or disable Javascript in Safari, Chrome, or Firefox? Fortunately, most modern web browsers make it very easy to toggle on or off, and while it’s almost always recommended to keep javascript enabled, there are cases where developers and other users need to turn it off.
Apple has released firmware updates for 2010 model year MacBook Air, iMac, and MacBook Pro. The EFI update brings OS X Lion Internet Recovery, which is accessible by booting into Recovery mode and allows a user to reinstall OS X Lion, to each Mac from 2010.
The EFI Firmware updates are available to download from Software Update, or directly from Apple:
Updating the firmware requires a reboot as usual and the Mac should be connected to a power source before proceeding. The MacBook Air update also includes a minor bug fix to resolve an issue where the machine could inadvertently restart if the power button is pressed when waking from sleep.
Apple describes Internet Recovery as follows:
If your Mac problem is a little less common — your hard drive has failed or you’ve installed a hard drive without OS X, for example — Internet Recovery takes over automatically. It downloads and starts Lion Recovery directly from Apple servers over a broadband Internet connection. And your Mac has access to the same Lion Recovery features online
For Macs that can’t use Internet Recovery, the Lion Recovery Disk tool helps to make a bootable USB device that can offer the same features, although if you want to have the most versatile troubleshooting toolkit, having a fully bootable OS X Lion install drive is ideal.
Mac OS X 10.7.3 added several new high-dpi interface elements, giving another hint that Apple may be working towards releasing Macs with ‘retina’ displays.
DaringFireball points out that it’s possible these elements were updated to make Universal Access and cursor artwork more attractive, but also mentions that some Mac Mini users inadvertently booted into high-dpi display modes when connected to a TV via HDMI:
The simplest explanation is that Apple only just now got around to increasing the resolution of these elements for the benefit of users who use the cursor-zooming Universal Access feature. But, combined with the fact that some people with Mac Minis connected to TVs via HDMI are reporting that after upgrading to 10.7.3, their system rebooted in HiDPI mode, I can’t help but wonder whether we may be on the cusp of Apple releasing HiDPI Mac displays and/or HiDPI MacBooks. I.e.: retina display Macs.
The most noticeable element changes are visible when increasing cursor size, where before a pixelated cursor would appear and now the cursors are smoothed and significantly higher resolution. These higher res images could be appropriate for use on a Mac with a High-DPI display.
Other UI artwork was also updated, as MacRumors pointed out with this comparison image of showing the subtle difference between Mac OS X 10.7.2 and 10.7.3:
Mac OS X Lion has provided a variety of clues that retina Macs may be coming sometime in the near future. From the unusually high res wallpapers, HiDPI display modes, HiDPI options, to the giant icon artwork, there is a fair amount of evidence to suggest that Apple is in some stage of developing Macs with ultra high display resolutions.
There have also been rumors to support this idea. Late last year, Digitimes reported that Apple would release a MacBook Pro equipped with a high resolution retina display in the second quarter of 2012. There is also the expectation that iPad 3 will feature a ‘retina’ display, leading many to assume that a Mac would launch around the same time frame to support development of high resolution apps and artwork for the device.
By combining the Hide All windows shortcut with the minimize keyboard shortcut in Mac OS X, you can use a third ‘Minimize and Hide All’ shortcut that both hides and minimizes all windows open on a Mac.
This hide and minimize all trick is accomplished by hitting the Command+Option+H+M keys together.
The iPhone is connected to a computer with it’s USB cable, you launch iTunes and… the iPhone isn’t shown in iTunes. What gives? Fixing this problem is probably a lot easier than you think, and after fielding a call about this I found the simplest explanation was the solution as to why someones iPhone wasn’t appearing in iTunes. Read more »
We recently showed you how to delete Safari, Mail, and other default apps installed with Mac OS X, and procedurally iTunes is not much different. Unlike uninstalling applications from third parties, if you attempt to drag the iTunes app into the Trash can, you’ll see a dialog box warning that ‘“iTunes.app” can’t be modified or deleted because it’s required by Mac OS X.’
Nonetheless iTunes can be deleted from the Mac, but without a very good reason it should not be done. iTunes is integral to supporting other Apple features and hardware, ranging from the App Store to the iTunes Store, and without iTunes installed you won’t be able to sync apps, music, books, movies, and anything else with an iPad, iPod, iPhone, or Apple TV. Assuming you understand that and you still want to remove iTunes from your Mac, this tutorial will show you how to delete iTunes from the computer.
It’s easy to be distracted by other open applications and windows while using a computer, and sometimes even the best of us need a bit of help to focus. Lion’s full screen mode can be helpful, but when that’s not enough or when you need access to other windows and apps, then Isolator is your friend.
Isolator is a free application that provides an easy way to focus on a single application at a time by applying various filters to everything in the background, these are fully customizable and even if you aren’t interested in the focus and productivity side of things, can make for a nice way to customize the appearance of Mac OS X.
You can choose to tint the background, blur it, use a bloom effect, turn it into crystals, or make the background black and white while everything else is colorful. Both the tint opacity and filter strength are adjustable by a slider, leading to plenty of customization options. Screenshots and a video of some of these effects and filters are shown below. Read more »
The OS X 10.7.3 update brought with it a variety of subtle changes, including a minor adjustment to how the Launchpad background image style is switched. In previous Mac OS X versions, Command+B would switch between the background effect styles, but this is now achieved with Control+Option+Command+B.
Try it yourself by opening Launchpad and then hitting the Control+Option+Command+B keys to alternate between backgrounds with blur, unblurred, black and white, and blurred black and white. You can see samples of these background style effects below.
SHA hashing is frequently used with distribution control systems to determine revisions and to check data integrity by detecting file corruption or tampering. For common usage, a SHA checksum provides a string that can be used to verify a file been transferred as intended. If SHA checksums match, the files integrity has been maintained.
This tutorial will show you how to check the sha1 checksum of a file on the Mac, but it works the same in Linux too.
If you have tried to delete Safari, Mail, FaceTime, Chess, Photo Booth, Stickies, QuickTime, or any of the other default Mac OS X apps before, you’ll know the Finder prevents you from doing so. Try to move one of these apps to the trash to uninstall it and you’ll get a message saying: ‘”Safari.app” can’t be modified or deleted because it’s required by Mac OS X.’
For those of us up north battling the cold winter, this Mac setup at sunset is sure to inspire some envy. Reader Pavel G is spending his winter in balmy Goa, India, and set up a desk on the rooftop of a house near the beach. Here’s the hardware he’s using to be productive while beachside in the sunny tropics:
Apple looks to have quietly updated the troubled Mac OS X 10.7.3 Updater, first noticed by several of our readers and confirmed by OSXDaily. No official change was announced and there is no revised version number provided by Apple’s Support page, but presumably the new build addresses any potential installation problems or CUI errors that occurred for some users with the original release of OS X 10.7.3 earlier this week.
The original OS X 10.7.3 Combo Updater .dmg has the SHA1 checksum of: 07dfce300f6801eb63d9ac13e0bec84e1862a16c
The revised OS X 10.7.3 Combo Updater .dmg has a SHA1 checksum of: b8322dbd1f7b55bf35aac4122ad2204c51307793
Apple has updated the SHA1 on the combo updaters support page to reflect the change, and they are also now redirecting download links from the original OS X 10.7.3 Client Updater to the revised OS X 10.7.3 Combo Updater.
The file size of the new update is also slightly larger, as shown by apprentice who compared the two in our comments (old version first, revised version second):
SHA1= 07dfce300f6801eb63d9ac13e0bec84e1862a16c
Version: 10.7.3
Post Date: February 01, 2012
Download ID: DL1484
License: Update
File Size: 1.2 GB
SHA1= b8322dbd1f7b55bf35aac4122ad2204c51307793
Version: 10.7.3
Post Date: February 01, 2012
Download ID: DL1484
License: Update
File Size: 1.26 GB
OS X 10.7.3 Build 11D50b vs 11D50
There are also mixed reports that installing from the new Combo Updater changes the OS X 10.7.3 build number fro 11D50 to 11D50b on some Macs. This does not appear to be the case on all Macs though, and some retain the 11D50 build even when the new update has been used, suggesting the original installation issues and CUI errors may have only impacted certain Mac models to begin with.
If you updated to 10.7.3 without any problems, you likely do not need to download the new version. If you held off on the OS X 10.7.3 Update due to the reported problems, you are probably safe to update now, although you should perform a Time Machine backup before proceeding just in case.
Apple has released an updated version of Security Update 2012-001 to v1.1, which resolves the Rosetta issues in the first release that caused many PPC based applications to either crash or not run at all. If you have been experiencing problems with apps like Microsoft Office, Photoshop, Quicken, crashing after installing the security update, downloading version 1.1 will fix those problems.
Security Update 2012-001 v1.1 is now available for Mac OS X v10.6.8 systems to address a compatibility issue. Version 1.1 of this update removes the ImageIO security fixes released in Security Update 2012-001.
The revised update is recommended for all Mac OS X 10.6.8 Snow Leopard users, even if you haven’t encountered problems with PowerPC application compatibility.
You can download the new version of Security Update 2012-001 from Software Update, or directly from Apple as a standalone installer.
All Macs with OS X Mavericks, Yosemite, Lion, Mountain Lion, have a bootable Recovery partition that can be accessed in case of system problems, allowing you to troubleshoot, restore from Time Machine backups, and even reinstall Mac OS X. There are two ways to reach Recovery mode on a Mac:
Hold down the OPTION key during boot and choose the “Recovery” option, or Hold down Command+R keys during boot to access the Recovery HD partition. Which method you will want to use depends on your Mac model, but the OPTION trick works on every Mac.
You’ll know you’re in recovery mode because the standard desktop won’t be displayed, replaced with a limited Mac OS X Utilities window and a simple Mac OS X menu bar. Here you can use Disk Utility, Time Machine, and restore the OS. Read more »
Bored with how your iPhone looks? If you have it jailbroken, you can install iPhone themes and make the device look a lot different than iOS by using an app called Dreamboard.
Many Dreamboard themes are available via Cydia, here’s a handful:
Endroid – Android HTC lookalike with updating weather widget and clock, this is the default Android theme
OS7 – Makes iPhone look like Windows Phone 7, complete with tile animations
WebOS – If you want your iPhone to look like a now extinct Palm device
Kindle Fire for iPhone – Gives the iPhone an interface like the Kindle Fire
OS X Lion Ultimatum – one of the fancier themes, makes iOS look like Mac OS X Lion
Apple Desk – looks like an actual desk, complete with iMac and keyboard
There are plenty more, and while a lot of the themes are free, others cost a buck of two. Some paid themes have to be downloaded manually and then moved to the iPhone with SSH and SFTP from a Mac or PC, others can be installed directly on the phone.
The problems updating to Mac OS X 10.7.3 aren’t the only issues with Apple’s recently released Mac OS X updates, as MacRumors reports that SecurityUpdate 2012-001 aimed at Mac OS X 10.6.8 has caused significant problems with Rosetta apps in Snow Leopard.
Applications effected seem to be anything that relies on Rosetta PowerPC support to run on Intel Macs, including Microsoft Office 2004 and X, Adobe Photoshop, Quicken, FileMaker Pro, AppleWorks, and others.
If you use Mac OS X 10.6 and you have not yet installed Security Update 2012-001, you may wish to avoid doing so until the problems have been resolved. If you already updated and you now have apps crashing left and right, read on…
Fixing the Rosetta Problems in Snow Leopard
Restoring to a pre-Security Update 2012-001 Time Machine backup is ideal, but if you can’t do that the next best thing is to use a bandaid patch created by an Apple Discussion Board user that restores Rosetta app functionality:
Use the patch at your own discretion, and be sure to follow the instructions:
This fix MAY NOT resolve your issue… This is the installer that we are most confident in. It replaces all of the files that were replaced by the Security Update 2012-001 and should be similar to a “reversioner”. Once you have installed the Package, please make sure to repair permissions and restart your computer in order for the changes to take effect.
Presumably Apple will release an update in the near future to resolve these issues, although there is no time frame on when that could happen.
Update: Apple has apparently released Security Update 2012-001 version 1.1 to address the Rosetta issues. It’s available through Software Update.
Update 2: Security Update 2012-001 version 1.1 is now available to download directly from Apple support here. You can install this over existing Snow Leopard installations.
If you need to delete sensitive information and have it completely inaccessible, you’ll want to use the “Secure Empty Trash” feature. This works by writing random patterns of data over a trashed file immediately after it has been emptied, or removed from the filesystem, such a process which otherwise takes place over time throughout normal computer usage as more files are created and deleted.
There are two easy ways to secure empty the Trash on the Mac. In order for either option to be visible to you, you must have some file or folder within the Trash can, otherwise the option will not be visible since there is nothing to trash.


 All Macs with OS X Mavericks, Yosemite, Lion, Mountain Lion, have a bootable Recovery partition that can be accessed in case of system problems, allowing you to troubleshoot, restore from Time Machine backups, and even reinstall Mac OS X. There are two ways to reach Recovery mode on a Mac: