Eject a Disk on a Mac
 There are a few ways to properly eject a disk on a Mac, the first and perhaps the easiest method is to use the Disk Eject Key which is located in the upper right hand corner of a Mac keyboard (it looks like the image to the right). The disc eject key applies to all Macs with built-in disk drives and all Apple Wireless keyboards, but of course not all Macs these days do have SuperDrives, and these newer machines will want to use a different ejection method. If the Mac does not have a disc eject key, then you can use one of the following tips to eject the disk (or disc) from the Mac instead.
We’ll show you three additional options to eject a disk, drive, disc, or volume work from any Mac, and with any disk or drive type, whether it’s a DVD, CD, network volume, disk image, external USB hard drive, or any other attached storage device.
How to Eject a Disk from Mac in OS X
Use any of these tricks to eject these types of disk:
- Dragging the Disk(s) or drive(s) icon into the Trash, which will eject it
- Highlighting the disk in the Mac Finder, and then hitting Command+E to eject the drive through a keyboard shortcut
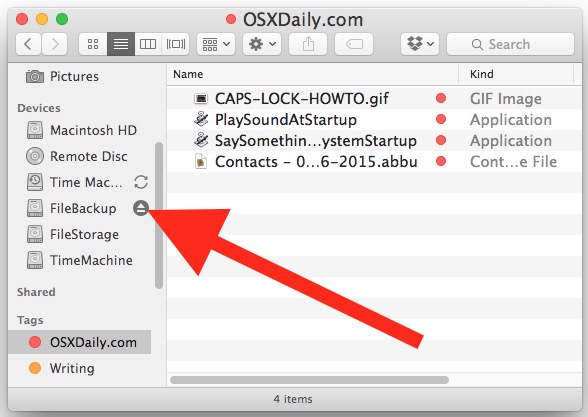
- Selecting a disk through the Finder sidebar “Devices” list, then clicking the eject icon next to the drives name in a Finder window, as seen in the below screenshot
- Use the Disc Eject key on the Mac keyboard (if applicable)
Whichever approach you choose, wait a moment or two until the disk removal process is completed.
These methods are how you safely eject a disk on a Mac, and you should pay special attention to do this properly when using an external hard drive to prevent any data loss from occurring. This can happen when you improperly eject a disk or drive, and you’ll get an error message to warn you that says “The disk was not ejected properly” like the screenshot below:

Getting in the habit of properly ejecting a disk is important to ensure the health of external drives and to help prevent a loss of data. This is particularly true for external hard disks to ensure that the disk head is parked before it is moved, because having an unparked disk head move improperly or suddenly could potentially cause data loss or damage to the drive.
![]()
You’ll also want to be sure any filesystem activity involving the disk is completed before the drive is removed, because prematurely ejecting a disk or forcibly removing a drive while it’s in use can also cause data loss or problems with the file system, if not just incomplete file transfers.

Because there are always extreme cases where a disk is quite literally stuck inside a machine and this process doesn’t always go smoothly, you may want to find out what to do if you have an exceptionally stubborn stuck disk in a Mac DVD drive, this works for many Macs and desktop machines. On the other hand, if it’s stuck in a portable Mac, learn how to eject a stuck DVD from a MacBook & MacBook Pro, which involves an advanced tip sent in by a Mac Genius and works when almost nothing else does. Use your own discretion, of course.

I have been getting the “The disk was not ejected properly .” message for months. How do I get rid of the message?
I turns my MAC on from its Sleep mode quite often.