How to Transfer Photos from iPhone to Windows 10 PC

If you have an iPhone and Windows 10 PC, you probably would like to know how to transfer photos from the iPhone to the computer. With Windows 10, there are several ways to quickly copy files to the PC, and we’ll show you two of the best approaches using the Windows 10 Photos app to directly import photos to the PC (similar to copying pictures from iPhone into Photos app on Mac), and the more hands-on method of using Windows Explorer to copy photos to Windows 10 via the file system.
Before beginning, be sure that you have installed iTunes onto the Windows 10 PC, this insures that iPhone can properly communicate with the Windows 10 computer. Aside from that, you just need a USB cable to transfer the photos over from the iPhone. And no, you won’t be using iTunes here to copy or transfer any pictures, but installing iTunes allows the Windows 10 PC to easily communicate with iPhone.
How to Transfer Photos from iPhone to Windows 10 Photos App
Perhaps the easiest way to transfer photos from an iPhone to Windows 10 on a PC is with the Windows Photos app. This allows for easy bulk transfer of pictures from the iPhone onto the PC with little effort.
- Connect the iPhone to the Windows 10 PC using a USB cable
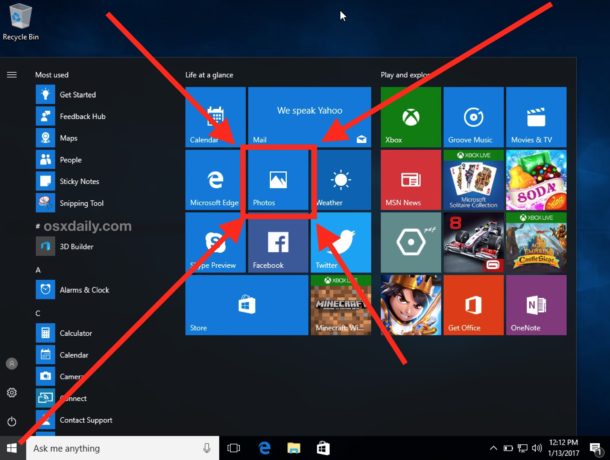
- Go to the Start menu in Windows and choose “Photos” app, if you don’t have it in the Start menu you can use the search bar and type ‘Photos’ instead
- When Photos in Windows opens, click the Import button in the upper right corner (Import looks like a downward facing arrow)
- Select the pictures you want to import to Windows 10, then click on the “Import” button to start the process


Importing photos into Photos on Windows 10 is pretty fast thanks to high speed USB transfer. Once the pictures have been imported into Windows 10, you can browse them on the PC through Photos app.
The Photos app in Windows offers probably the simplest way to copy pictures from iPhone to a PC with Windows 10 but there are other methods available as well.
How to Use Windows Explorer to Transfer Photos from iPhone to Windows 10
If you don’t want to use the Windows Photos app, you can also use Windows Explorer to manually copy pictures over to your computer just like you would from a memory card or other disk.
- Open Windows Explorer and navigate to “This PC” in the sidebar
- Choose the name of your iPhone from the sidebar menu
- Open the “Internal Storage” directory, and then open “DCIM” to access photos
- Select all folders and files if you want to copy all pictures, then right-click and choose Copy (or use the toolbar Copy)
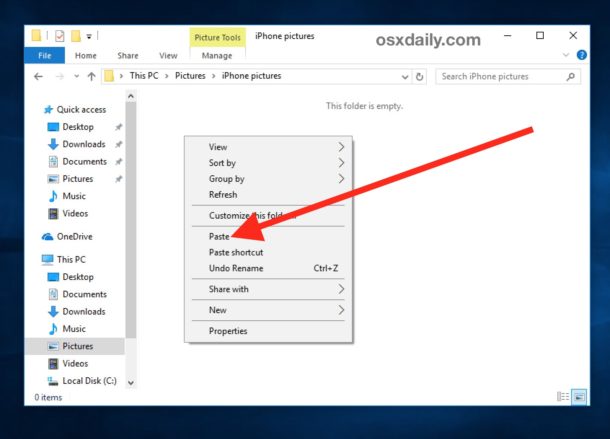
- Next, navigate to a folder like “Pictures” or “Documents” and, optionally create a new subfolder, then use the “Paste” command to import the pictures from iPhone to the Windows 10 PC via Windows Explorer file system
You can also use the AutoPlay approach to transfer pictures from an iPhone to Windows computer as discussed here, that works in basically all versions of Windows and is not exclusive to Windows 10.
For those wondering, yes this works to copy pictures from an iPhone to Windows 10, regardless of what Windows 10 is running on. That means whether Windows 10 is installed directly onto a PC, on a partition in Boot Camp, or even if Windows 10 is running in VirtualBox on a Mac or through another virtual machine, this will work the same. And yes, this also works to transfer pictures from an iPad or iPod touch to Windows 10 Photos app as well as iPhone.
Know of a better way to get pictures from iPhone to Windows 10? Let us know in the comments.


This works great! Thank you so much my son needs to transfer his photos to his pc. I showed it to him and he said to tell him thank you!
My Window is perfect….so soon I‘m at home it loads automatically in One Driver , so I Don‘t need to connect
iPhone to it 🤓
Thanks again for sharing!
damn good article
this method worked perfectly for me. Thanks.
Connect iPhone to computer but do not get permissions screen on iPhone. Also, assuming iPhone does connect, it will only show new pics and some previously downloaded. It never has shown me ALL of the pics on the phone. Even when trying the Explorer method, even fewer pictures show up! What gives?
I like how this article mentions both the use of the Photos app and File Explorer. However, I have several questions:
1. This article covers a one-time use. Suppose you have done this once, using either method mentioned here, then use your iDevice to take more photos. How do you come back and import only the newly added photos?
2. Once I open the DCIM folder, I see a whole lot of subfolders with meaningless (to me) names. Inside those folders are the photos I want to copy. The solution here is to search for *.jpg and then, from the search results, select all, then copy them to your computer.
3. A warning: If you have edited photos on iOS, I think that the edits are stored in a “side file” (a la Picasa). If you copy the jpeg to another computer, you don’t get the edits.
4. Another warning: Apparently you can add “titles” to photos in iOS. Again, it’s not clear whether these titles are in the jpeg metadata and travel with the jpeg when sent or copied to other computers.
5. Same with “renaming” a photo in iOS.
6. Same with “Markup.”
I think we ALWAYS want to know if an edit or file name change is in the actual jpeg itself or kept separate. Apple might want to “simplify” this by keeping the details hidden, but as soon as something goes awry, Apple customers are left scrambling for good answers.
Both ways work well, however, it would take more time for me than using AirMore to transfer photos from iPhone to PC. As sometimes I just need a few photos, and I have to unselect other photos in “Photos” app, and I need to find a certain picture in Windows Explorer when I have a lot of photos.
I must transfer some software to my new iPhone 7. Verizon transferred my documents I downloaded. I don’know how to do it.
I have the opposite situation… a lumia with a MacBook Pro and i do throw OneDrive and its a Good option. But in some cases I wish my Mac support mi lumia with Windows 10 by cable for big files.
If you are on Windows 10: You can copy pictures from Lumia to MacBook Pro in Windows 10 using Photos app as described above, use a USB cable and it can import the pictures from the device. Also you can use Windows Explorer (my preferred method).
If you are on Mac OS: You can copy pictures from your Lumia to MacBook Pro with a USB cable and Image Capture or the Photos app for Mac to import pictures to the computer.
I use Windows 10 regularly and find it to be pretty good and it’s highly compatible with iPhone, though iTunes is a mess still but it is everywhere. iCloud works well for Windows as well and offers another way to download all pictures to Windows from iCloud or iPhone.
I use iCloud for Windows which automatically syncs iOS photos the same way it does on macOS.
iCloud for Windows works well to download pictures from iCloud on iPhone to Windows 10, I agree.
I prefer the WIndows Explorer method of copying pictures from iPhone to Windows, but I am old-fashioned. I manage the pictures myself.
Windows Photos can also pull pictures and manage them after they are downloaded from iCloud from the iPhone too.