How to Make a Bootable OS X Yosemite Beta USB Install Drive
Now that the OS X Yosemite Beta is available to the public (you can still sign up and download it if you’re interested in running the beta release on your Mac), you might be wanting to make a bootable installer drive out of an external USB flash disk to make installation easier. Sure, you can always just copy the “Install OS X Yosemite Beta” application to other Macs and run it directly from the Applications folders of different machines, but the bootable installer option allows you multiple benefits; you can erase and partition drives directly from the bootable drive, you can perform clean Yosemite Beta installs, and you can make a single USB key to install Yosemite on multiple Macs. These aspects make installer drives preferable for many advanced users in particular, but it can be useful for everyone, even novices.
Quick side note: if you’ve been having problems downloading the Yosemite Beta, try these tips to resolve the download issues.
Creating an OS X Yosemite Beta bootable installer disk out of a USB key or external volume is really quite easy, and the requirements are fairly straightforward as well. You’ll need the following:
Requirements
- 8GB+ USB drive that you don’t mind formatting
- The OS X Yosemite Beta installer app downloaded on the Mac, sitting in the /Applications/ folder (that means you downloaded the installer but have not yet used it, using the installer app automatically deletes it after completion)
- A Mac that can run Yosemite, which is basically any Mac that can run Mavericks
Once you have those basics met, you can create the bootable installer and then use it to get Yosemite beta running.
How to Build a Bootable OS X Yosemite Beta Installer Drive
Creating a bootable Yosemite beta installer uses the same createinstallmedia trick that works with OS X Mavericks bootable installers, with the only differences being in file naming.
- Download the OS X Yosemite Beta installer from the App Store (you must be a registered participant in the beta program, you can sign up to get it)
- When the splash screen launches, quit the installer app – DO NOT install Yosemite yet
- Launch Disk Utility from the /Applications/Utilities/ folder
- Attach the 8GB+ USB drive to the Mac
- From Disk Utility, erase the USB drive to be Mac OS Extended
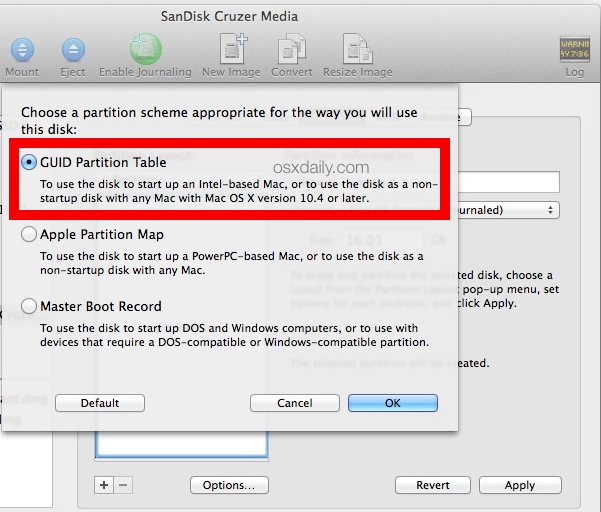
- Still in Disk Utility, go to “Partitions” and click ‘Options’ to set the partition table to be GUID – this is necessary to make the drive bootable
- Now launch Terminal, also found in /Applications/Utilities/
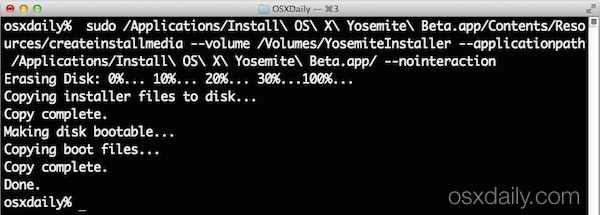
- Enter the following command string, modifying the DRIVENAME syntax to match the name of the external USB drive you wish to use as the bootable installer*:
- Let the bootable installer process complete, it’ll run through the process of erasing the disk, copying the installer files, and making it bootable (no that is not redundant). When it says “Done.” and you’re back at the command prompt, you’re good to go
sudo /Applications/Install\ OS\ X\ Yosemite\ Beta.app/Contents/Resources/createinstallmedia --volume /Volumes/DRIVENAME --applicationpath /Applications/Install\ OS\ X\ Yosemite\ Beta.app --nointeraction
* Be sure to replace “DRIVENAME” with the name of the external USB drive to turn into the bootable installer – do NOT use your hard drive name, this overwrites data on the target drive, so be sure you put the proper volume name here – in our example we used “YosemiteInstaller” but you can use whatever you want, or go with the “Untitled” option that is the default after formatting a drive.
Now that you’re finished making the bootable installer drive, you can proceed to install it on whatever Mac(s) you want.
Always back up the Mac with Time Machine or your backup method of choice before beginning. We advise against installing Yosemite Beta as your primary Mac OS without at least partitioning the drive so that you can dual boot OS X between Yosemite and Mavericks, but you can also install Yosemite onto an external hard drive if you want to keep the experience separate.
Booting from the OS X Yosemite USB Drive & Installing OS X 10.10 Beta
You backed up the Mac, right? OK good, now here’s how to use the bootable installer drive to get Yosemite going on the destination computer:
- Connect the USB drive to the Mac in question and reboot the computer, holding down the OPTION key to bring up the boot selection menu
- Choose “OS X Yosemite” and follow the installation instructions
- IMPORTANT: Remember to select the Yosemite partition or external drive, otherwise it will install Yosemite Beta on top of your primary Mac OS X install – that is not a good idea, this is a beta release and subject to bugs and quirks
That’s all there is to it. Enjoy beta testing OS X Yosemite, and don’t forget to file bug reports and feedback requests! This is a public beta for a reason, Apple is specifically seeking testing, feedback, opinions, and suggestions from a wider variety of users, meaning this is your chance to have your voice heard, and maybe even shape the future of OS X!

Is it possibl to create a bootable USB drive for Yosemite on windows machine, and using to MacBook?
Please answer.
It will take time to transfer (20-30 mins?) If lights on USB stick are flashing then it’s working
Yes correct, it can take a while to copy over the installer files, It depends on the speed of the USB drive and your USB port. 20 minutes to 1 hour is normal.
The actual OS X Yosemite install can take many hours if you have a busy hard drive, like 20 hours. It’s crazy, Apple did not test Yosemite well, shocking they held a public beta and still released this buggy thing.
be careful copying thiis command sequence from this site to say “Notes” for future use….something happened in copying it to save it….letters started moving almost like animation script make letters move…..made system preferences in operable—could be a hack….
Had to wipe everything and install again….
/Volumes/Untitled is not a valid volume mount point.
me an error
Yea I got this too and changed USB disc name using disc util then it worked fine
Any idea why it might be freezing on “Copying installer files to disk…”? I can’t get it to move past that part.
It will take about 20-30mins to copy the files over and as long as the lights are flashing on your USB drive then it’s all good
hey thank you for the guide using it now!
Apple really dropped the ball with the new icons and look of Yosemite Sam.
I feel like I am using an OS designed by a 3rd grade art class.
Apple, 1996 called and wants it flat look crap back.
submit feedback (Under other) as I.. Don’t like the Windows/Linux GUI Look either
Matt, you are making a bootable install disk, which will only install OS X on another disk. You could partition your main HD and just install Yosemitr on there, which will leave your OS X Mavericks partition fully intact.
Hello, silly question I’m sure!! Will doing this mean I’m just running Yosemite off of the USB drive (as in it won’t touch my main Mac and the two are separate) or will it install Yosemite on to my Mac like any other program?
Thanks!
No, it’s meant to install Yosemite onto your Mac without first having to install a prior operating system and then upgrade to Yosemite. Basically, it’s a clean installation. Some people, me included, don’t like upgrade on top of upgrade on top of upgrade. Clean installations boot faster, they come with less mess, and you can easily save gigabytes of space. This last point is very helpful when you’re talking about SSDs which already come with limited space.
I always use ‘Diskmaker X’ (Google it) for making USB installer disks. It works with OSX 10.7 10.8 10.9
No terminal hassle!
Yes, however it doesn’t (yet) work with Yosemite.
Works great, just used this to make a Yosemite flash drive and install a clean OS X Yosemite install on a MacBook Air.
nice article.
but is it possible to make a bootable Windows 7/8 USB install drive?
in this case, for bootcamp use?
yes there is google : Windows Bootcamp USB Install, you may have to edit 1 .plist file inside bootcamp but past that its all good.
Yes, just use your Windows 7 or 8 ISO to create a USB install drive, in Boot Camp Setup.
You can install this beta straight over MOUNTAIN LION!! I JUST DID IT!!!