How to Rotate Video on iPhone & iPad with iMovie
Many people record video on the iPhone or iPad and have the device oriented vertically, and while there is nothing inherently wrong with that, a side effect is you end up capturing vertical videos with large black bars on the sides. Fortunately there’s an easy way to rotate movies in iOS with little effort, which means you can fix a vertically aligned video by converting it to horizontal, go the other direction by rotating a horizontal video to vertical format, or even flip a video upside down.
To rotate the video we’re going to use the iMovie app in iOS, which comes free on new iPhone and iPad devices. If you have an older device, you can download iMovie from the App Store. And yes this works to rotate any video type, whether the movie is 4K, slow motion, regular speed, time-lapse, and whether it’s your own video or someone elses on your device.
How to Rotate or Flip Video on iPhone and iPad with iMovie
You can rotate any movie on your iOS device 90 degrees, 180 degrees, 270 degrees, or if you feel like going back to the default view you can rotate the video 360 degrees as well. This isn’t particularly obvious, but it’s easy, so here’s how to do it:
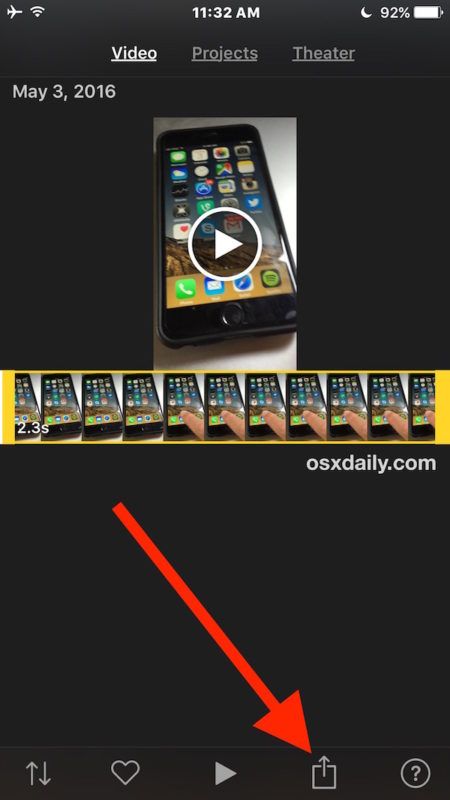
- Open iMovie on the iPhone or iPad
- Choose the video you want to rotate from the video selection list, then tap on the ‘Share’ / action button, it looks like a box with an arrow flying out the top of it
- Choose “Create Movie”
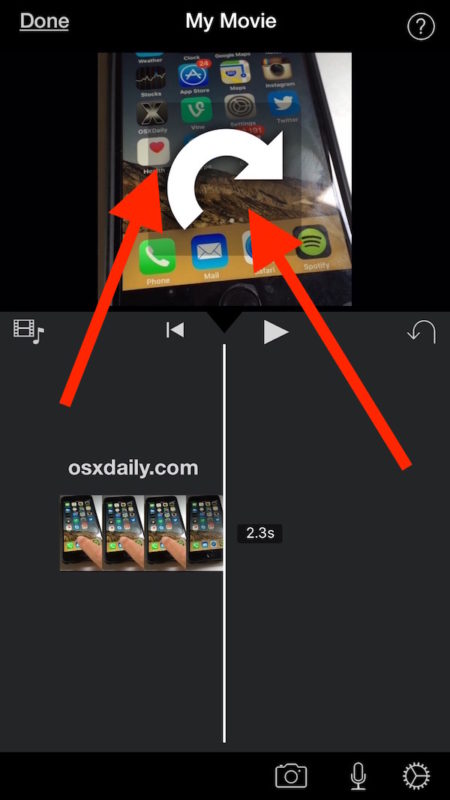
- Place two fingers about an inch apart on the video in iMovie, and rotate them like you’re turning a dial to the direction you want to flip or rotate the video to, a little white rotate image will appear on the display
- When the video has been rotated to the orientation you’d like to keep, tap on the “Done” button in the upper left corner
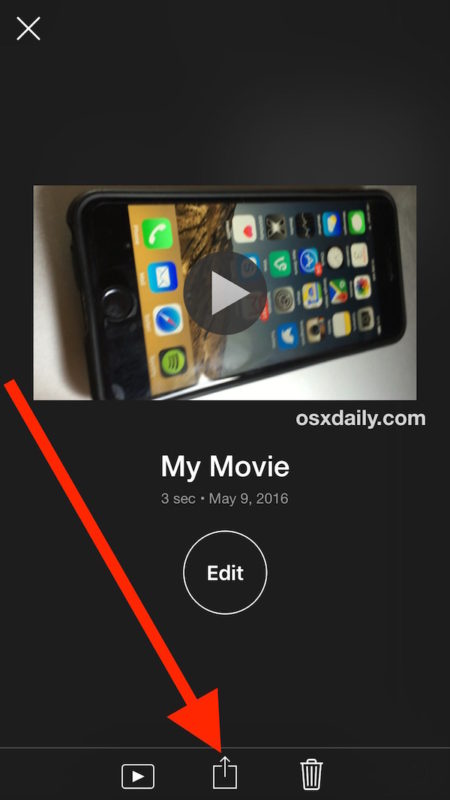
- Now tap the Sharing button again (it’s the box with the arrow flying out of the top)
- This time choose “Save Video” (optionally, you can share it on Facebook, YouTube, iCloud, etc, but we’re saving the rotated video here)
- Select the video resolution you’d like to export the movie as: 360p, 540p, 720p, or 1080p
- When finished, iMovie will alert you the video has been saved to your Photos Library, so you can open the Photo app to look at your rotated video
![]()


That’s all there is to it, your video has now been rotated and saved as a separate movie file onto your iPhone, iPad, or iPod touch.
And yes, your iPhone and iPad videos are stored in the Photos app, not in the Videos app. This leads to a lot of confusion for newcomers to the iOS platform, but given that both are typically recorded with your own camera, it makes some degree of sense. You can make it easier to locate your videos within the photos app by using the Videos album to display movies only in iOS, otherwise just launch the Photos app and you will find the movie you just saved.
![]()
By the way, we also covered how to rotate videos on the Mac using QuickTime, which offers a super simple desktop based solution to reorientate videos if you’re in Mac OS X or have copied the videos to your computer. Similar offerings are available on Windows too.
If you find yourself rotating videos constantly, a great recording tip is to just reorient the camera yourself and turn the iPhone or iPad sideways when recording video, that way you won’t end up with the vertical video to begin with.

The video clips in iCloud are copied both on Mac and iPhone. To rotate a video clip, I would use the Photo app on iPhone instead (iOS 13.3). It doesn’t require any extension:
– Open the Photos app on the iPhone
– Browse the photos to find your video clip
– Tap on the video clip
– Tap on the Edit on the top right of the screen
– Choose the rotate/crop icon on the bottom right
– Rotate the video clip as you like
– Done. It automatically saves the change.
Perfect. Just what I needed. Thanks so much, Paul for taking the time to compose and post this.
I found your instructions helpful and easy to follow. Great work on the screen captures too.
So today, I was making a video of a stray dog we rescued a few days ago. We needed a video to show to the kind folks donating money to support her recovery. I made two videos. One came out perfectly in landscape orientation. The second one ended up being in portrait, which I didn’t want. Probably switched on me without me knowing.
Did a quick search and fixed it all on my phone in minutes thanks to you.
Keep up the great work. 🙏🏽
mark
You can rotate a video on an iPhone/iPad a lot quicker using the Video Tools app. You can also zoom in, reverse, flip, or change a video’s speed. Right from within the Photos app with the Photos editing extension.
Here’s a video showing how:
https://www.youtube.com/watch?v=z1nTFw4wwx8&feature=youtu.be
Thank you!!!! you are awesome!!!
Thank you you are the best. 5 stars :D
😭thank you!! I was lost about how to do this and had a video of my daughter that I would of been heart broken over if I never was able to fix it, so thanks to you!
Two solutions:
1) Sync automatically to Google Photo. Turn it there. Problem solved.
2) Buy a Samsung. Problem solved.
In both cases Google is involved.
Thanks it worked just fine for me
You don’t have to open iMovie. When viewing your video in Photos, go to Edit, the (…) button, and you’ll see iMovie appear as a plugin – open that, then rotate the video with two fingers, then hit Done, and it’ll save.
love the tip, very helpful, I would of cried if I didn’t have this tip. :)
-sincerely, a happy customer
A serious thanks , step by step approach with images helped made my work easy.
Was easy and very helpful. Thank you.
Please help. Having carefully followed the recommendations on rotating a video received on my iPhone 7 Plus by using IMovie, the top of the head and bottom of the video are clipped off. What can I do? It should not be so difficult to simply rotate a video.
What happens to me often is I’m moving fast and whip the phone up (in landscape orientation) while pressing the record button. Or I’m shooting straight down. Anyway, I have shot it in landscape but the inertia sensor lagged and flagged it for portrait video. So I’ve shot it right but it plays back wrong.
I’m with NoVerticalVideos, There should be a toggle to lock the phone in horizontal capture regardless of orientation.
I used an app call Rotate and Flip which was perfect except that it renders crap choppy video. Something wrong with their codec.
This share to imovie tip works 100% better!
Thanks so much!
patrick
Rade’s method above should be the preferred method described in the article. It’s easier, it replaces the original file, and it preserves the time stamp of the video so it stays in the right collection.
This didn’t work for me. It would not rotate. But the tip that Rade Martinovic left above, worked like a charm.
This trip was perfect for someone who has no idea. I followed the steps, rotated my video, and exported it back to my photos. I can’t thank you enough. Best advice I found on the web.
*** tip not trip. :)
This worked perfectly! Thank you!
There is a simpler way if you have iOS 10 installed.
Go to Photos, choose clip you’d like to rotate, tap Edit (icon with sliders), then in edit mode tap three dots icon for extensions, choose iMovie extension, then rotate video using two finger method. Go back, Done and Done.
You da BOMB Rade!
Perfect!! thank you
I was just looking for a rotate button in the extension. Glad you pointed this out. I would love to know how you found it.
Thanks for the tutorial. Worked great on a video my wife took.
Personally, I think Apple should have an option that allows you to capture horizontal video regardless of phone orientation. There is no reason why this can’t be done by appropriate cropping of the very large sensor area. You probably can’t get 4K video when holding the phone vertically, but you should easily be able to get normal HD video resolutions. There is something “inherently wrong” with capturing vertical video. It should NEVER be allowed! (even if it’s more convenient to hold the phone vertically..)
I agree with this, the vertical video issue is basically a software problem that Apple hasn’t addressed. There is little reason to have vertical videos, and little need to rotate them, the camera should be smart enough to adjust it automatically. The hardware has the resolution, the software needs to fit.
So what you are saying is that Apple should cater for the fact that people are too dumb to turn their phone through 90 degrees…
Technology for the sake of it?
Not sure what PB is saying, but I don’t think it’s a matter of catering to “too dumb”. It is a fact that holding the phone vertically is more natural (since this is the way you hold it almost ALL the time..), and even for people who understand about VVS, sometimes mistakes are made. If the device has a mode which prevents this mistake, it is a clear feature. It makes it easier to use properly. Another minor advantage of this mode is that you can use vertical orientation to give narrower field of view. Or even provide auto-horizon leveling. There is actually an app out that does all this (“Horizon”), but it suffers from degraded image quality when filming in vertical orientation. This is because it does not crop at the sensor, but at the video frame level. Since Apple would have complete access to sensor data, they could provide something similar in standard “Camara” app with fewer compromises.
Why not take it the ‘right’ way round in the first place?
How many monitors and TVs are set up in portrait orientation? That’s right, only advertising ones.
Videos that are shot vertically frankly just look stupid.
Agree on the vertical video. You can see how silly it looks if the video happens to make it onto the news. I’ve had at least one instance of a video shot landscape yet the video is rotated by the phone. That’s what caused me to research how to correct it, as neither Photos nor Lightroom offers an obvious way to do it.
Ridiculous that this is so hard to do for a company that is supposed to be about making technology simple for the everyday man. Jobs had a good eye for catching things like this and fixing some of the ease of use items before the product got out of the gate. It’s something Apple misses since his passing. Seems like nobody is filling that QA role well.
Nice, thank you. Those who need it will understand how useful this tip is :-)
I’m sorry, but this tip is stupid/bogus.
The video is NOT rendered to a different orientation, which is what most people want. It is just physically rotated.
A video shot vertical and viewed rotated will is not usable? Are we supposed to turn our head 90 degrees to see it properly?
iMovie and other tools, at least on the Mac, can truly rotate the video and re-render, but that means the image has to be cropped or zoomed up to fit the frame and the result is usually not what anybody wants.
Nice one, thanks!