How to Clean Install macOS Sierra
Some advanced Mac users may like to perform a clean install of macOS Sierra, which is essentially the process of erasing a hard drive and then starting fresh with a new clean installation of macOS Sierra 10.12. After the clean install is complete, a separate backup of any necessary files is manually transferred back over to restore personal data. A clean install can be desirable for many reasons, including to start anew, or as a troubleshooting method to extreme problems, but it’s really not appropriate for all Mac users.
Because the clean installation process involves manually backing up important files and data from a Mac (not just using Time Machine), formatting the hard drive and erasing everything in the process, using a boot installer disk to perform a clean installation of Sierra, and then manual file transfers to restore personal data, this is best reserved for advanced users. The vast majority of Mac users will be better served updating to macOS Sierra using the standard install and update method via the Mac App Store.
If you understand the objective and are comfortable with the clean installation process, you will need the following:
- Bootable macOS Sierra installer drive
- A Mac compatible with macOS Sierra (see list of Sierra compatible Macs here)
- A manual backup of your personal files, data, photos, and important information
Important note: a clean install will erase everything on the Mac and then install macOS Sierra, nothing else will be on the Mac. Wiping over and starting over clean is the entire point of this. Therefore you must backup your data manually beforehand, using a method of your choice. This is NOT the same as using Time Machine and restoring. If you don’t know what you’re doing with making manual file backups or with a clean install of macOS Sierra, don’t proceed, you will lose all data on the Mac.
How to Clean Install macOS Sierra
- Complete a backup to Time Machine before beginning. We recommend having a full Time Machine backup in addition to your manual file backup which you intend to manually restore data from. Be sure to back up your important files, pictures, data, or whatever else – do not skip this. Performing a clean install will erase the Mac and you will lose any data you do not save to an external volume
- Attach the boot macOS Sierra install drive to the Mac
- Reboot the computer, as soon as you hear the boot chime start holding the OPTION key during boot up
- Continue holding OPTION key until you see a boot menu appear, choose the “Install macOS Sierra” volume from this menu
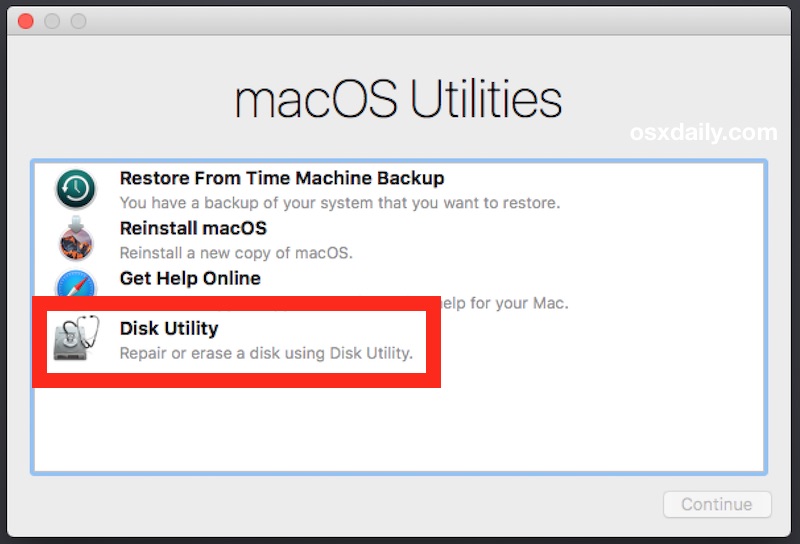
- When the “macOS Utilities” screen loads, choose “Disk Utility” from the list
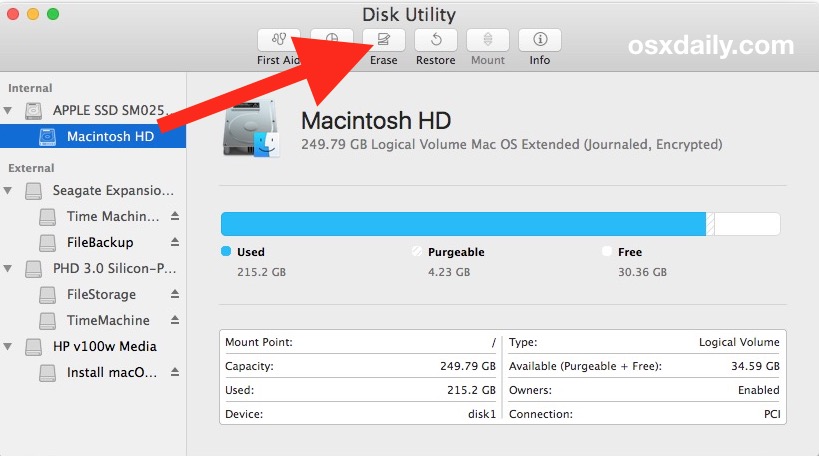
- Select “Macintosh HD” (or the name of your target Mac drive to format and clean install Sierra onto), then choose the “Erase” button
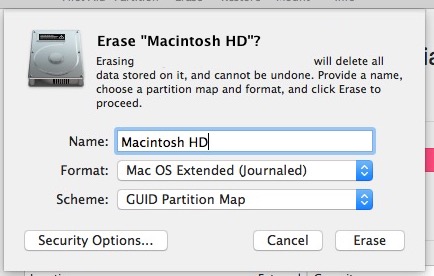
- Keep the drive named “Macintosh HD” (or rename it if you want), and go to “Format” and choose “Mac OS Extended (Journaled)”, then click on “Erase” – ALL DATA ON THE MAC WILL BE REMOVED AND ERASED, THIS IS IRREVERSIBLE
- After the drive is finished formatting, quit out of Disk Utility to return to the macOS Utilities screen
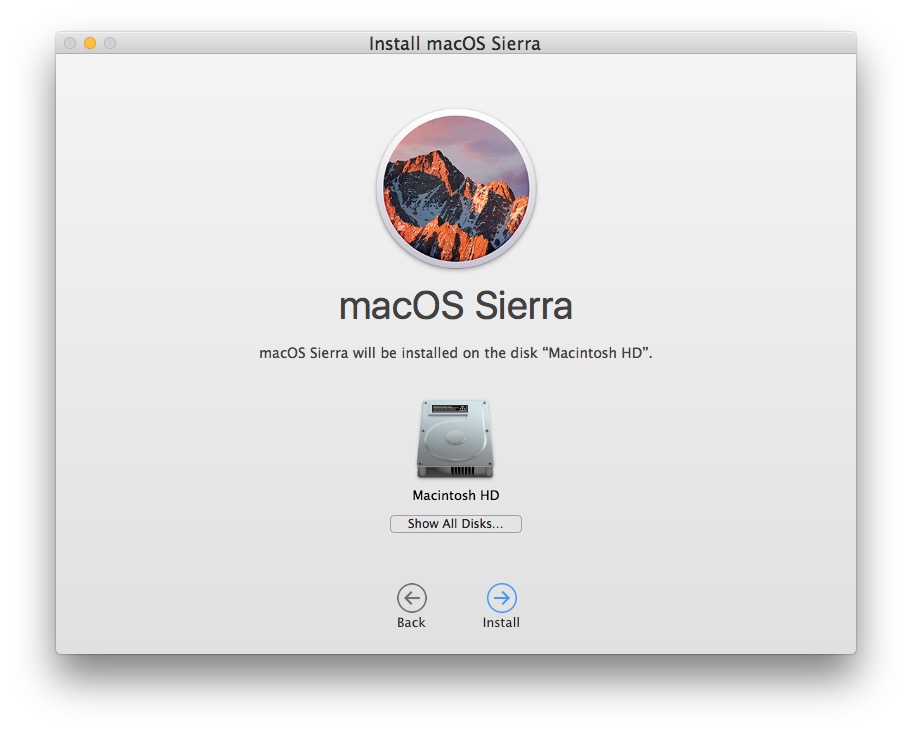
- Choose “Install macOS Sierra” from the menu options
- Click on “Continue” and agree to the terms, then select “Macintosh HD” (or the target drive name) from the drive list and then choose “Install”
- Let macOS Sierra install, the entire installation process can take a while so be prepared to wait

When macOS Sierra has completed installing, it will boot back into a clean install of macOS Sierra and directly into the Mac OS setup process.
The Mac will have nothing on it, just macOS Sierra. There will be no third party apps, no data, no personal files, no pictures, no music, no personal information, it’s much like getting a brand new Mac in that sense, which is the entire purpose of the clean install process.
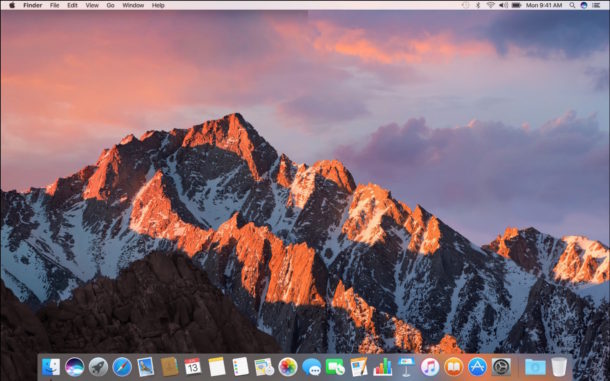
Once you’re at the mac OS 10.12 desktop, you’re ready to manually copy your files, apps, and personal data back over to the Mac, or you can start fresh with nothing on the computer at all. Enjoy! And don’t miss checking out some of the best macOS features.

I get a -5 min remaing during the installation.And its there forever. What happened?😧
After step 10.. nothing happens.. it doesn’t even show me the “macintosh HD” “install” it only tells me continue. then it gives me a “verify with your apple id” and an option that says hit “continue” then it stays back on step 10. what should i do…
Followed everything exact. Created bootable USB, erased HD, went back to macOS utilities menu but when I select “install macOS” it will not let me continue. I’m stuck, what can I do?
Help pls…
I just bought the 2016 Macbook pro and needed to reinstall everything so i did. But now is the installation taking forever, about 4 hours now, i got like 400 kbp/s download speed.
Please reply
In the “Erase Macintosh HD” window, there is no “Scheme” option to choose GUID partition map.
Hi,
I bought anew hard drive because my old one was no good. I installed the new hard drive and created a bootable copy of sierra on a flash drive. I followed all of the steps to the last one but for some reason when I got to Step #10 to Install sierra, the new hard drive isn’t showing up as an option. So there is actually nothing Install Sierra onto.
How can I get the new hard drive to show up?
Did I miss something?
You may not have formatted the new disk properly. In Disk Utility, be sure to select “Mac OS Extended (Journaled)” from the format menu.
I have an iMac 2011, I’ve followed all the steps and I’ve not tried to install macOS Sierra and when click continue and then continue it has just stopped and isn’t doing anything. Any suggestions?
Why do you need a boot stick for a clean install? Just use the OS installer and let Disk Utility erase the boot disk first.
Very helpful info… Thanks
I performed a clean install by creating a second partition on my mac’s hard drive with Disk Utility, installing Sierra on it, booting into the new partition and then deleting the original.
You only need about 15GB free space to do it this way and it’s helluva lot quicker / less fiddly than creating a bootable macOS Sierra installer drive, I reckon. Plus you don’t need to go out and buy a USB flash drive and it preserves your Bootcamp partition if you have one.
Guy that’s not a clean install, anything infecting your HDD is still there.
ok…… you know nothing
I just want to know where i would get a bootable sierra do i have to buy it rather than updating for free?
I really thought you would end it the way I do (I’ve been a Mac IT pro for 25 years), with using Migration Assistant to get the data and apps back the easy way. No, it’s not a “clean” install, but I’ve never seen it not work (unless the drive has many problems before). It makes the upgrade process much easier than trying to manually restore your apps and data and settings.
Also, SuperDuper has been broken for awhile (no scheduling). Everyone uses Carbon Copy Cloner, also because it can restore your Recovery Partition.
Carlos, that’s a creative approach and should work well, but you’re right it’s not quite a “clean install” at that point.
Are you using Migration Assistant from a Time Machine backup in this process?
Are you able to only focus on user settings, apps, and user data?
Obviously the most important aspect of the clean install is the clean system software, I wonder if your Migration Assistant approach accomplishes that goal. If you can confirm, I may try that myself. Typically I just copy the user folders and then re download and reinstall apps, but yes it leaves a lot of configuration to do afterwards.
SuperDuper is not broken, it works just fine. I have multiple Macs all with multiple partitions and OS’ that have scheduled smart backups nightly and not one issue for years.
Such comments should IMO be removed by the OSXDaily editors for untrue statements.
If I use bootcamp and reinstall Mac OS as described, it will not break bootcamp loader and other OS?
Clean installs are a MASSIVE waste of time. If you have a corrupt file in your user files or imported apps, all you do is infest the clean install.
SuperDuper or CarbonCopyCloner are the best ways to back up. Forget Time Machine, it’s unreliable, difficult to boot or retrieve files from, and a huge resource waste.
My backup regime is as follows for my MBP using SuperDuper:
2nd internal SSD clones from primary nightly, then powers down computer. This power down tells me the backup completed.
2 external drives, set to smart back up whenever they are connected and quit SD when complete. (again this tells me the backup completed). I plug these in at the end of the day before I go to bed.
1 offsite drive also set up to smart backup when connected and quit SD when complete that I get to at least once a week.
Set up on this took but a few minutes, and was a one time deal. Everything is automatic by schedule or connection.
These clones are fully bootable on any Mac qualified to run the installed OSX version simply by connecting and starting while holding the Option key, Fully clone capable to any mac qualified for the installed OSX version, and file access is the same as any drive. This system has been used for years and never, ever failed me. I do NOT use TM, as I find it overkill and unreliable. (Had 2 TM drives fail to recover).
Yes that is true for most people a clean install is not necessary. However, clean installs tend to be the only solution for handling severe problems with a Mac OS update. For example, many of the issues described here: https://osxdaily.com/2016/09/24/troubleshooting-macos-sierra-problems/ are only resolved by clean installing macOS Sierra.
Sierra works great for the vast majority of Mac users, but a select group (myself included, lucky me) have experienced more problems with macOS Sierra than with any Mac OS update since perhaps Mac OS 7.5.2.
I’m with Paul,
I’ve never had any issues with any other Mac OS before not even running in VM’s but MacOS Sierra crippled my 2015 rMBP. Nothing worked properly, the display turned different colors and would refresh very slowly. I restored el Capitan and everything was fine again. I have backed everything up and made a clone of my drive and hopefully the clean install fares better.
Sorry to hear that macOS Sierra was problematic for you too. A clean install may help, but I have reinstalled Sierra on a 2015 retina MacBook Pro and it is still very broken unfortunately. Were you able to restore and downgrade back to El Capitan using Time Machine?
I think you’re using the phrase “clean installs” differently than what’s being referred to here.
You mention this: “If you have a corrupt file in your user files or imported apps, all you do is infest the clean install.”
A Clean Install doesn’t bring any User account files with it. You create a brand new User Account. Nothing is brought over. Same with “Imported Apps.” No app is brought over; they are each reinstalled from scratch (either from the DVD or by downloading).
I have read somewhere that clean installs can’t be done on a Fusion drive. Is that true?
I also own an iMac 5k with 3TB Fusion Drive. I don’t want to have any troubles my Fusion Drive getting corrupted and do all the terminal things again, like happened with El Capitan
Check out this link: https://discussions.apple.com/thread/7255973?start=0&tstart=0
kindly help me
I have macbook pro late 2011 and i tried to install fresh by flash desk and it takes long time to install and stop ‘ about 0 second to remaining’ more than 5 hours and i reinstall it many times and tried to install recovery for osx 10.7 and after i download 10.12 and try to install it on 10.7 but still stop on same page and take long long time.
what should i do??
As someone who’s a big fan of 100% completely clean installs (on 12 Macs in a small office), I’ll add a few additional things to this article that hopefully will help and save heartache:
1. Do a completely backup of everything to another Hard Drive (this is separate from the Time Machine update). Everything. Even stuff you think you won’t use or need. A completely carbon copy clone. You’ll be amazed how hidden some stuff (like Pages personalized templates) can be, and you’ll want everything just in case. You can always toss this 5 months down the road, once you’re certain
2. Do a Time Machine update, and iCloud backup.
3. Take screenshots of the following:
a. All applications (alphabetically, in List View)
b. All Mail preference windows (even the tabs in each setting)
c. All System Preference settings that are customized/important (especially 3rd party extensions). Especially email/SMTP/password settings.
4. Create separate backup files of: Calendar, 1Password (or whatever you use), browser bookmarks.
5. Zero the drive, install the OS.
6. Use the SAME PASSWORD and SAME NAME for your new admin account. I’ve heard some people don’t experience permissions issues if using new name/password, but I’ve run into trouble before. Better to alter the password later.
7. Set up 1Password (or whatever you use) first, since you’ll need to access a lot of passwords and product purchase IDs right away.
8. Install any keyboard macros/shortcuts.
9. Do fresh installs/downloads of all your apps and utilities.
10. Drag over and replace the Documents Folder, Music Library, Photo Library.
More, but that will get you started.
This is really great advice for a clean install, thanks tuqqer!
If you are planning on doing a clean install on more than a couple of Macs, have a look at DeployStudio and AutoDMG. You can set this up on a USB HDD and it will erase, install a fully patched the OS and 3rd-party apps in one go. And all in about half the time it takes to do an manual install.
Combine this with something like Munki and Autopkg and you have a complete small office software management solution that takes out so much of the grind.
Use Homebrew Cask and MAS command line utilities to script the installation of all your apps and utilities if you really want to have fun
check out Homebrew/homebrew-bundle on github
A lot of System Preference settings can be scripted as well using `defaults write` in Terminal for the plist that controls the settings for each preference. All of them can be easily googled.
I recently updated my Macbook to macOS Sierra, and all I wanted was to fresh install the OS. There were so many things that were bugging me. Thank you for sharing the tip. I might have to redo the whole stuff.
hm, thats the same way as for 10.11, 10.10, 10.9 …
anyway: what is the best way to “backup” an clean installed macOS?
to do an complete clean install takes a lot of time, it would be better to have an backup-image to overwrite the existing system to an clean installed macOS – if possible in a half of time?
is Time Machine the only (maybe best?) way?
Most people who do a clean install perform a manual backup of their files. Quite literally, copying specific files, photos, configuration files, etc, over to an external hard drive, which are then copied back once the clean install is finished. Then you reinstall apps one by one as necessary. It’s a slow process, but it’s designed to start fresh without any old clutter.
Time Machine will restore but it’s not a “clean install” at that point, it will bring along other data from the original OS backup. It’s still a good idea to backup to Time Machine before beginning just in case you decide to abandon the entire idea and want to be setup quickly again.
Superduper is a reliable app for taking a complete & bootable copy for your system disk off to an external drive. This point in time image is restorable to your system disk by restoring & overwriting the current occupant of your system disk.
Also you can be selective what files to restore from the external backup. Thus allowing you to selectively overlay personal files (pics, docs, etc) onto a cleanly installed OS Sierra.
Apps are the real nuisances.
Your current apps are in installed image form. Which means that for many of your current apps they live as more than .app files. They of course have preference files. They may also have files for plugins, bundles, etc.
Unless you were heads up enuf to have saved the original installer .dmg files, your forced to muddle your way thru each app, copying the .app file over to your Sierra image and launching it to see what falls out.
This is hell if you have more than handful of fav 3rd party apps. So Ive start to archive the app’s installer .dmg files.
If I understand correctly, you’re not asking how to backup a non-clean system to restore it but how to backup a clean system.
In that case, once you install, it does the “Restarting in 10 seconds” thing, right? Hold option while it does that, and boot from the install disk instead of your new system. Now you can go into Disk Utility and make an image of the completely clean, not-even-once-booted system and save it onto an external HD or USB drive. If you want to restore it, just boot from the install disk again and use Disk Utility to restore the image you made previously.
That’s just from memory and may be wrong. If you have any trouble, you can click my name to go to my website and contact me from there.
Good luck :)