How to Install & Setup iCloud for Windows PC

iCloud can be used on a Windows PC, which is particularly helpful to iPhone and iPad users who have a PC but not a Mac, or Mac users who have installed Windows 10 in Boot Camp, or even to those who have both Mac and Windows computers, and want to be able to access all of their iCloud content through the PC as well as their other Apple devices. This includes the ability to access iCloud Drive, iCloud Photos, iCloud data syncing like contacts, emails, and bookmarks, and more.
This article will walk through you how to download, install, and setup iCloud for Windows.
iCloud requires an Apple ID as the two are associated together, so we’re assuming you already have an Apple ID ready to use and that it matches the same Apple ID and iCloud login in use on the iPhone, iPad, or iPod touch as well. If for some reason you don’t have one yet, you can learn how to create a new Apple ID.
How to Install & Setup iCloud for Windows PC
Using iCloud for Windows is available for Windows 7 and Windows 10 or later, so if the Windows version is much earlier then it likely won’t be compatible with iCloud.
- First, download the iCloudSetup.exe for Windows installer. For Windows 10 and later, you can download it directly from Microsoft Store here for free, otherwise you can get it from Apple here
- If the iCloudSetup.exe file doesn’t launch automatically to install, locate the iCloudSetup.exe file through Windows File Explorer and launch it directly
- Go through the process of installing iCloud for Windows on the PC, then reboot the computer when it is finished
- iCloud for Windows should be open automatically upon reboot, if not go to the Start menu then choose Apps / Programs > iCloud
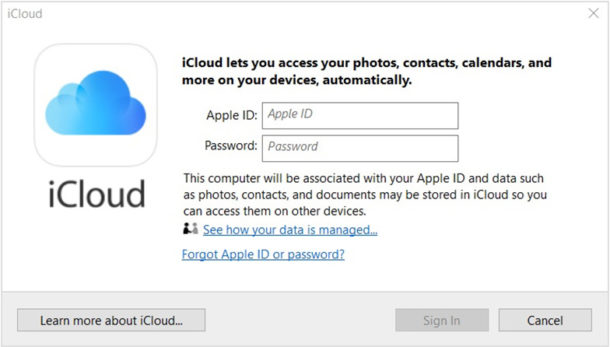
- Login with your Apple ID to sign into iCloud on Windows
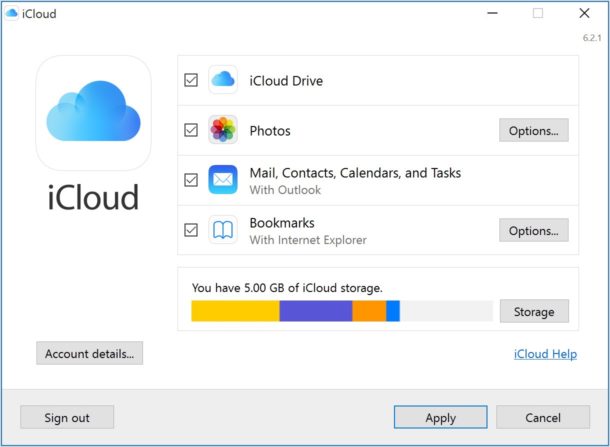
- Select the iCloud features you want to enable (iCloud Drive, iCloud Photos, Mail, Contacts, & Calendar, Bookmarks, Notes, etc), then click Apply
Now you have iCloud setup and installed in Windows, and you’ll be able to access the iCloud features you enabled and plan on using on the Windows PC.
If you’re an iPhone owner with a Windows PC, it’s highly recommended to go through the process of installing iCloud on the PC as you’ll gain access to syncing features like iCloud Drive and iCloud Photos that wouldn’t be available otherwise in Windows (though you can always download photos from iCloud with these instructions on Mac or PC by using the iCloud.com web interface).
Of course if you’re an iPhone or iPad owner with a Windows PC, or running Windows in Boot Camp on a Mac, you’ll also want to make sure the computer has the latest version of iTunes installed on it too, and keep that app up to date so that you can always sync your device with Windows at any time.
While iCloud features are built-in to MacOS, in the Windows world you’ll need to download, install, and setup iCloud for PC separately as shown here. But aside from that initial setup difference, many of the features are available to Windows users as they are to Mac, so don’t ignore a Windows PC as it works just fine with iPhone and iPad. And similarly if you have a Mac with Boot Camp, it can be a nice feature to have iCloud available in the Windows side of things there too.
Did you setup and install iCloud in Windows? Do you use iCloud for Windows if you have a PC, or use it with Windows 10 in Boot Camp on Mac? Let us know your experiences, thoughts, and opinions in the comments below.

Very helpful, step by step guide. Saved me a lot of time. I appreciate this resource!
Great going guys, this really was helpful, thanks a bunch👍
I would like to know why the photos in icloud on PC show up totally unorganized and with ids that are about 50 letters long. WIt is realy impossible to use it on the PC.
Maybe there is a way to organize them but I have not succeeded to understand how to get to it.
Thanks.