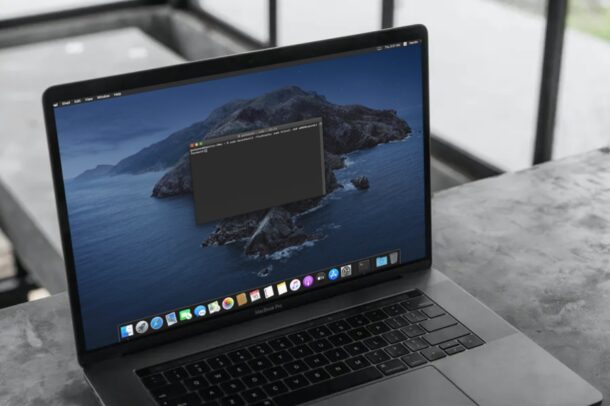
How to Flush DNS Cache in MacOS Catalina & Big Sur
MacOS users may occasionally need to flush DNS cache on their Macs in order to access certain websites, domains, or for troubleshooting purposes. Flushing DNS cache is particularly common with web developers and network admins, but it’s used with some regularity by other advanced users too. This guide will walk through how to flush DNS cache in MacOS Big Sur and MacOS Catalina.
If you’re unable to access a website that you visited recently, then of course the first thing you’d check is whether you have a working internet connection. But if you’re only facing connectivity issues on that particular website, then it could be a DNS error, and this is an example when clearing out DNS cache can be helpful.
Your Mac stores the IP addresses of web servers that contain pages that you’ve recently visited. However, if this IP address changes prior to the entry in your DNS cache updates, you won’t be able to access the site without resetting your DNS cache. Flushing the DNS cache on your Mac removes all the invalid entries and forces the system to recollect those addresses the next time you visit the website.
How to Flush DNS Cache in macOS Catalina & Big Sur
Before you go ahead with the following procedure, make sure that your Mac is running macOS Catalina or later, as clearing DNS cache on older versions of macOS varies slightly. Now, without further ado, let’s take a look at the necessary steps.
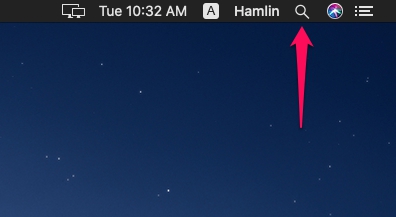
- We’ll be using Terminal to flush the DNS cache on your machine. You can open Terminal using Spotlight search. Click on the “magnifying glass” icon located at the top-right corner of your desktop to access Spotlight search. Alternatively, you can open Spotlight by pressing Command + Space bar.

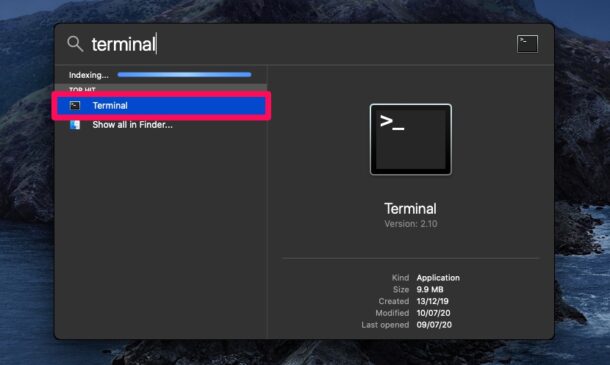
- Next, type “Terminal” in the search field and open the app from the search results.
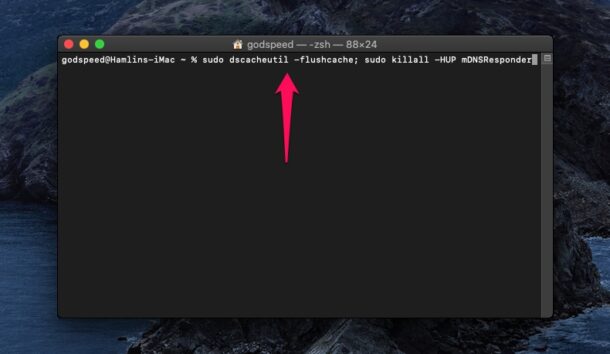
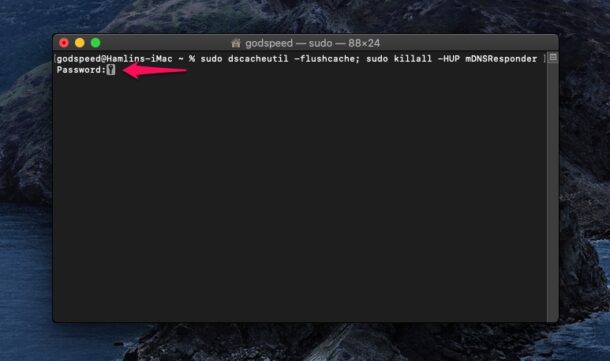
- Now, type the following the following command in terminal.
sudo dscacheutil -flushcache; sudo killall -HUP mDNSResponder
- Hit the Return key and you’ll now be prompted to enter the macOS user password. Type in your password and press Return again.
Close the Terminal window when finished.
That’s pretty much all there is to it. You’ve successfully cleared and reset the DNS cache on your macOS machine.
It’s worth noting that you won’t get a “successful” message after you’ve typed in the command. Just know that it’s done and you can confirm it by opening the website you weren’t able to access before.
It’s good to clear DNS cache every now and then, as occasionally, they could get corrupted due to technical glitches. Similarly, your Wi-Fi router has a DNS cache as well. This is why most people recommend rebooting the router as a troubleshooting step, as it flushes the DNS cache as well.
If your Mac is running an older version of macOS, you might want to learn how to reset DNS cache in macOS High Sierra, or flushing the DNS cache in macOS Sierra and so on. The procedure is similar and involves the Terminal, except for the fact that you’d be typing in a slightly different command.
We hope you were able to correct whatever network issues you were experiencing, or you’re able to access all the websites again after flushing the DNS cache on your Mac. And if you’re having general internet connectivity problems, you may want to try troubleshooting steps to resolve Wi-Fi connectivity issues on your Mac as well.
If you know of another approach to flushing DNS cache on the latest macOS releases, or you have any particular insight, opinions, or advice, share in the comments!

This did not work for me. I am running MacOS Catalina. If I telnet to an address the Mac returns the wrong IP (old) address. The TTL on the IP address is 60 seconds. It was changed more than a week ago. If I do an nslookup or dig it returns the correct IP address from the local firewall/router. I have changed wireless networks, turned wireless off, run dns-sd and every possible option of dnscacheutil and even moved the computer to a completely external network and it still brings up the wrong value when I ping, dns-sd or telnet, but not when I dig or nslookup.
I don’t have a password for my Mac, but if I just hit return without typing a password, it says the wrong password. So frustrating!
You have to enter the admin password for the Mac, every Mac has an admin password since they are required when setting up the first account on the Mac
onyx has an option to clear the dns cache too.
https://www.titanium-software.fr/en/onyx.html
In case this helps someone in a similar situation: I experienced a strange issue where public web urls for the company I work for could not be resolved by DNS on one of my machines on my home network even though they resolved using the dig command in terminal. I tried every terminal command I could find (including the tips in this article) for clearing cache and bouncing the service to no avail. It eventually occurred to me that some time ago, I installed the company VPN and it had not worked very well and I still saw the company name servers in the output of ctutil –dns as resolver #9. I looked into /etc/resolver and found two files with company dns server ip addresses, removed them and the problem went away.
Running Big Sur. Unable to enter my password
Type the password in the terminal and hit return anyway, the password does not show in the command line as a security mechanism.
https://osxdaily.com/2015/02/04/terminal-wont-show-password-when-typed/
Does this clear the DNS for the user account as well as the administrator account?
Running Catalina. Unable to enter my password.
Same here.
Simply enter the password at the prompt and then press Return. Done.
I have a fear of Terminal. But TechTool Pro has a tool for rebuilding the DNS cache and 4 others. Would that be as good?
I trust OSXDaily, so I select and copy their Terminal commands, open Terminal on my Macs, then paste the command & then hit the return key. Very easy!
No fear of accidentally messing up the commands.
Another way, which is often more convenient with wifi is to toggle wifi off/on.
Thanks for this tip! Just cleared all our Mac’s DNS caches.