How to Factory Reset M1 Mac (MacBook Pro, Air, iMac, Mac mini)
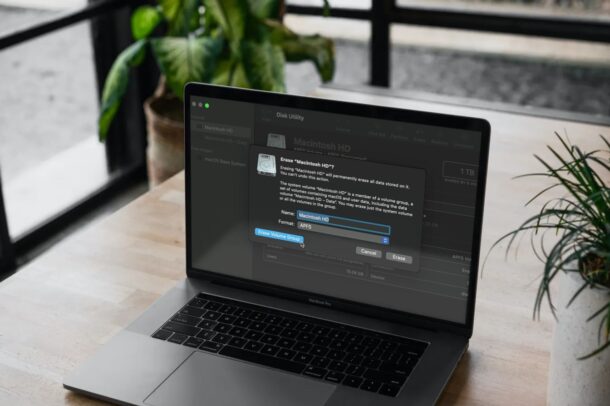
Do you have an M1 Mac that you’d like to factory reset as if it were brand new? The process of factory resetting the M1 Mac line to restore the Mac to factory defaults – basically erasing all data and reinstalling a blank macOS – is different with the M1 Mac line, including M1 MacBook Pro, M1 Mac mini, M1 iMac, and M1 MacBook Air, so let’s review how the process works.
First, a quick summary for the unfamiliar; A factory reset or a reset to factory settings involves erasing all the contents stored on your Mac – all files, data, and the OS itself – and restoring it to factory settings. If you’re switching from Windows, it’s similar to how you would perform a clean installation of Windows on a computer. Likewise, in this case, we’re basically just wiping the Mac and reinstalling macOS from scratch. This is essentially reformatting the Mac and then reinstalling MacOS, a process which is often necessary for users transferring ownership of a Mac, sending the computer in for repair, or for troubleshooting purposes.
It doesn’t really matter whether you own the new 13-inch MacBook Pro, MacBook Air, iMac, or Mac Mini, as the resetting to factory settings procedure remains identical on all M1 Macs.
How to Factory Reset M1 Mac to Wipe & Reinstall macOS
Before you go ahead with the steps mentioned below, make sure you back up the Mac and all the important files and data you want to keep as they will be permanently erased during the factory restoration. Without a backup, you will not be able to get those files back. Once everything’s complete, you’ll have nothing but the stock version of the operating system that shipped with your Mac, as if the Mac were brand new.
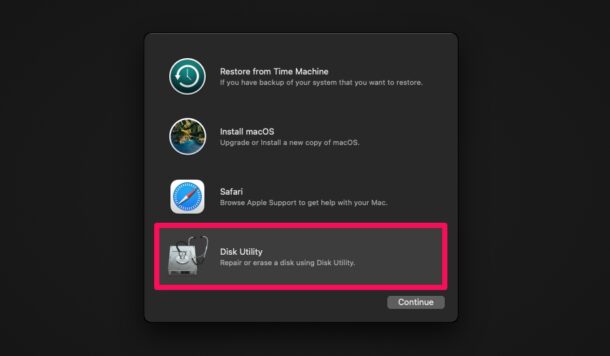
- Entering recovery mode is different on Apple silicon Macs. You need to shut down your Mac and then hold down the Touch ID/power button until you see “Loading startup options”. Now, choosing “Options” will take you to macOS Utilities. Here, select “Disk Utility” and click on “Continue” to get started.

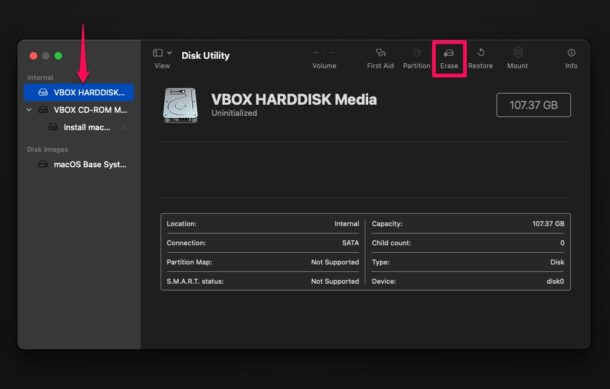
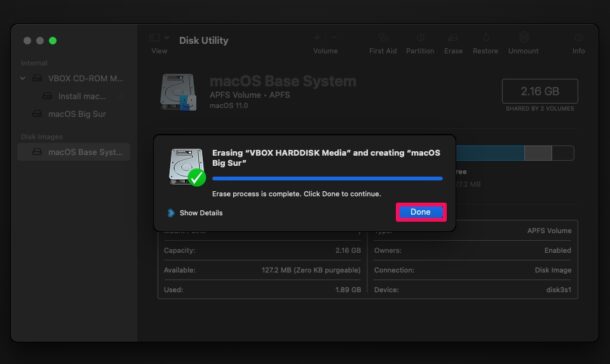
- Next, select the hard drive where macOS is currently installed from the left pane, typically “Macintosh HD”, and click on the “Erase” option located at the top of the window.

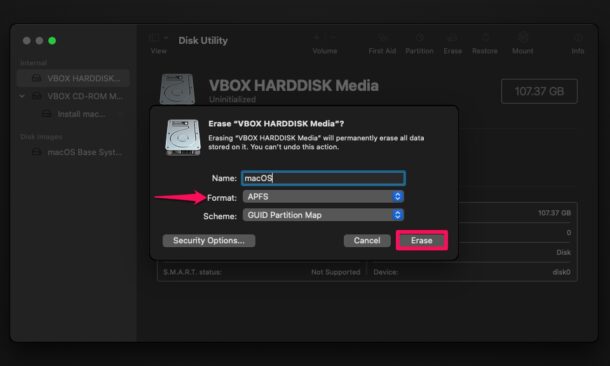
- Next, select the drive format as “APFS” and click on “Erase Volume Group” (or “Erase” if that is not available).

- This will initiate the drive wipe. It may take a few seconds to complete. Click “Done” to continue.

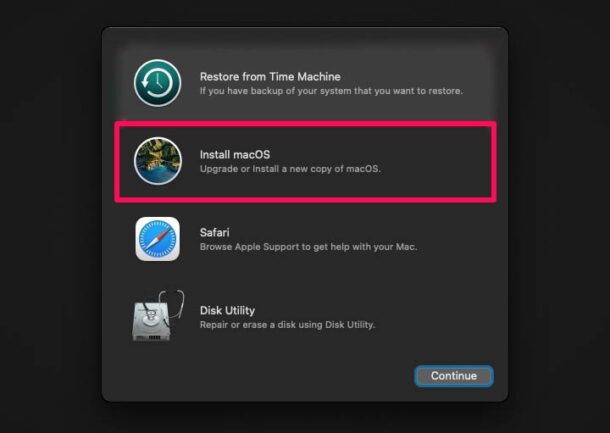
- Now, go back to the macOS Utilities screen, select “Install macOS” and click on “Continue”. You’ll be prompted to select the drive where you want to install macOS. Make the selection and click on “Install” to begin installing the factory version of macOS.

That’s all you need to do to perform a factory reset. At this point, you just need to patiently wait for the installation process to complete which could take a while. After the factory reset, you’ll need to go through the initial set-up screen like it’s a brand new Mac.
Resolving the “No users available for authorization” Error Message when Installing MacOS
Some users may run into a “no users available for authorization” error message when trying to reinstall macOS on an Apple Silicon ARM Mac. This usually happens when only part of the hard disk was erased, and not the Data component. This is why you should choose to “Erase Volume Group” in the above instructions, if that is available.
One way to resolve this is to go back to Recovery Mode > Disk Utility, then select “Macintosh HD – Data” (or name of drive – Data), and click to Erase the Data portion. Quit Disk Utility and you will probably see a screen about activating the Mac, so go through that.
When complete, you can choose “Reinstall macOS” from the Utilities window within Recovery Mode.
What version of macOS gets reinstalled in a factory reset?
You will be installing the macOS version that shipped with your M1 Mac from the factory by following this method.
If you want to install a newer version of macOS after erasing the Mac, you can do so by updating macOS when the installation has completed.
Alternatively, you can also create a bootable macOS installer USB drive with the version you wish to use. Once the drive is connected, you’ll need to reboot the Mac and hold down the OPTION key to enter the boot menu.
–
For those wondering, the initial drive wipe before installing macOS is what makes this a factory reset. However, if your intention is not to lose any data in the process, you can simply reinstall macOS on your system from the macOS Recovery menu without formatting the drive. In addition to this, macOS Utilities menu can also be used to restore your M1 Mac from a Time Machine backup, which could come in handy if you want to downgrade to an older macOS version.
Did you successfully factory reset your M1 Mac to default settings? Did you run into any issues or problems? Let us know your experiences, suggestions, tips, and thoughts in the comments.


I have new MB Air with M2 chip. how i can reinstall OS as it requires internet connection but wifi option is not showing in recover mode. How i can trun on Wifi in recovery mode.
Thanks for these instructions — worked as advertised on a M1 Mac Mini
Complete rubish, this is in a VM, not a real device.
Take screen shots of a read device and try.
Oh thats right proberly no money for a real m1.
Hi bob,
All of our writers have M1 Macs, including MacBook Pro, MacBook Air, Mac mini, and iMac.
It is not possible to take screenshots of the M1 boot sequence, or from recovery, therefore if you wish to take screenshots of pre-boot states and recovery boot states on a Mac, you must use a VM.
If you have any particular experience with factory resetting an M1 Mac, feel free to share. We aim to keep comments on topic.
Cheers,
– Paul
PS: Don’t be a jerk.
Bob also needs to learn how to spell properly. Oh and I agree, he is a jerk of the highest order!
Nice article, certainly true the Apple silicon Mac’s are a different animal then the Intel Mac’s. I have read several cases where the M1 resets went horribly wrong. Probably because users assumed the procedures was the same and found out the hard way it was not.
If this goes wrong with an M1 Mac it’s a big hassle to deal with. You need ANOTHER Mac (but only one that has USB-C!) to use Apple Configurator tool to perform a DFU restore, as if the device was an iPhone except needing special software to manage.
Check this out, it may be useful but what a pain:
– Install Apple Configurator 2 on your working Mac.
– Connect the two Macs using a USB-C cable. On the non-working M1 MacBook Pro it needs to go into the left-hand side port that is nearest the back of the Mac.
– Run Apple Configurator 2
– Put the non-working M1 MacBook Pro in DFU mode by pressing the power button and holding it down and simultaneously pressing and holding the right shift key, the left option key and the left control key – all for 10 seconds.
– After 10 seconds release all keys except the power button.
– The M1 MacBook Pro should now appear in Apple Configurator 2. Select it and click Actions > Restore.
From the horses mouth::::
https://support.apple.com/en-gb/guide/apple-configurator-2/apdd5f3c75ad/mac
Apple obviously needs to build this functionality into Finder since that is the device manager now, but also make it WAY easier.
There have been reports that once in the Utilities section to open Terminal and type resetpassword and hit enter and then from the one menu select Erase Mac… Has cleared some issues like not being able to create a local account again if enrolling into MDM.
Apple helped me last week. One thing was different, then what you said. In picture #2, when Disk Utility is open, right beside the word “disk utility”, there is a dropdown that says “view”….Click there and make sure you select delete everything.
Re: “Alternatively, you can also create a bootable macOS installer USB drive with the version you wish to use. Once the drive is connected, you’ll need to reboot the Mac and hold down the OPTION key to enter the boot menu.”
No.
On M1 Macs the Option key no longer brings up a boot menu on M1 Macs. You need to boot into recovery mode as described in the article.
Also note you cannot boot an M1 Mac from an external drive if the internal drive is totally dead since the Mac’s firmware is stored on the internal drive.
Finally, it’s highly unlikely you can boot an M1 Mac from an external USB drive. An external Thunderbolt SSD, maybe.
You can boot an M1 Mac from an external USB but you must enable the ability to boot from external boot volumes.
Apple is really locking down their systems, so it is getting harder to do things like our own repair work and now troubleshooting too. They solder the SSD onto the logic board now, so if the drive fails, the entire computer has to be replaced. And the OS is getting locked down, so soon beyond the simple ‘reinstall’ anything complex will require sending in to Apple for repair.
The Right To Repair movement is trying to fight this battle, but it’s a tiny group of enthusiasts versus Goliaths and the techno-technocracy.
m1 silicon booting fine of samsung t7 external SSD