How to Convert Images to Webp on Mac from Command Line

Do you need to convert images to webp format from the Mac? Converting images to WebP offers tremendous file size savings, often compressing an image up to 70% without losing image quality, so it’s understandable why many Mac users and web developers, designers, and workers would wish to convert and compress images into WebP format.
While it’s super easy to convert webp to JPG and other images file formats on the Mac, going the other direction is curiously absent at the moment. But with a little command line action, we can easily convert images like JPG or PNG to webp on MacOS.
This article is a little advanced because it uses the command line to achieve the conversion, so we’re going to assume you’re comfortable engaging with the Terminal. With that said, it’s not super difficult, it’s just that the command line is unfamiliar to many users.
You’re going to need to install Homebrew on your Mac running MacOS Sonoma, Ventura, or newer. If you haven’t yet installed Homebrew, do that first. HomeBrew is necessary because it makes installing Google’s webp encoder super easy on the Mac, and it’s that command line encoding tool that we’ll be using to convert PNG, TIFF, JPG, to WebP format.
How to Convert Images to WEBP on Mac via Terminal
You can convert any JPG/JPEG, TIFF, PNG, or webp file to a compressed webp image using this method:
- Launch Terminal if you haven’t done so already on the Mac
- If you haven’t yet installed Homebrew, do that first with these instructions
- Assuming you have Homebrew installed on the Mac, now we’re going to install the webp package with the following Homebrew command;
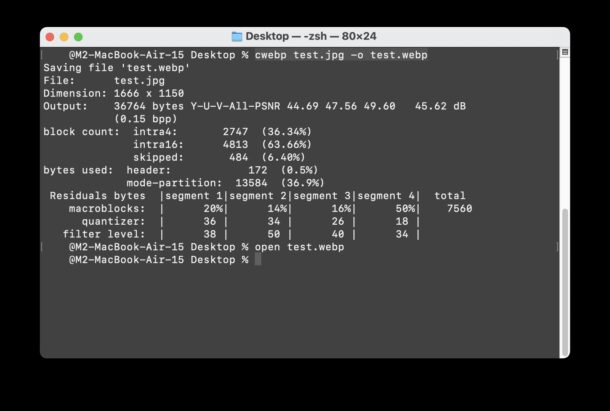
- Hit return and let webp finish installing. When done you’re ready to start converting images with the webp encoder from the command line. Use the following syntax to convert an image to webp, replacing test.jpg with the input image, and test.webp with the desired filename of your converted webp image:
- Hit return and you’ll quickly convert the input image file to webp format
- Repeat with other files you wish to convert to webp images as needed
brew install webp
cwebp test.jpg -o test.webp

Again, your input images files can be PNG, JPEG, TIFF, or webp. Other image file formats are not supported (yet anyway) by the cwebp encoder.
If you have an image file that is not compatible with the cwebp encoder, like a GIF or PSD file, you can convert those images to JPG or PNG directly in the Mac Finder with these instructions, with Preview, or by using your image conversion tool of choice. Once the image has been converted to a compatible format, you can then run it through cwebp to convert and compress that image into WebP format.
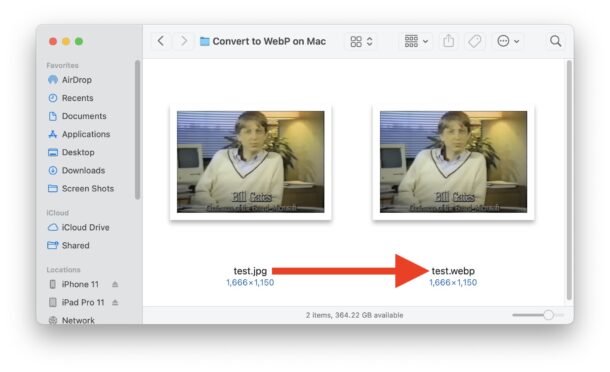
Image compression with webp is really quite impressive, and the example JPG image was compressed from 175kb to just 37kb, with no reduction in image quality!
While this is using the command line to compress and convert images to WebP, as you can see it’s not particularly difficult. Yes the Terminal is considered advanced, but many terminal commands are not that complicated once you learn how to use them.
It’s possible (likely even?) that a future version of MacOS will support webp conversion natively in the Finder and within Preview app, especially given that you can open webp files in Finder, with Quick Look, or with Preview, and you can easily convert WebP to JPG in the Finder, and you can convert webp to JPG in Preview too either as a single image or even batch conversions. Thus, going the other direction from various image formats and converting, compressing, and encoding them to WebP doesn’t seem like some extremely far-fetched fantasy.
Do you use the WebP image format? Do you convert image files to WebP on the Mac? Did you use the command line method mentioned above, or do you use another approach for your webp encoding and compression? Share with us your own WebP conversion methods for MacOS in the comments!


Go to file location on terminal =>
Type cd and the file path on the terminal
ex:
cd /Users/admin/Documents
You can copy a path in finder by
Right clic + ⌥ (Option key) on a folder
This shell script can easily be integrated into an automator workflow:
***
for f in “$@”
do
/opt/homebrew/bin/cwebp “$f” -o “${f%.*}.webp”
done
***
No need to wait for next macOS ;-)
PS: the path may need to be adjusted. I am on an M2 machine…
Great tip, thank you.
I’ve been wondering when Apple will natively support webp for converting like this but preferably in Finder through Services. Maybe in the next macOS?
This little script can easily be turned into an Automator workflow – no need to wait for the next macOS:
for f in “$@”
do
/opt/homebrew/bin/cwebp “$f” -o “${f%.*}.webp”
done