How to Use Apple Watch as Viewfinder & Remote for iPhone Camera
Did you know that your Apple Watch can be used as a viewfinder and shutter button for the camera on your iPhone? Sure, some of you may already know this, but a lot of new Apple Watch users aren’t aware of this nifty feature that can come in handy while taking photos in a variety of scenarios.
Apple Watch has a Camera Remote app which can helpful in a lot of different scenarios. Let’s say you want to take a group photo but you want everyone in the picture. You can position your iPhone to frame the shot and when everyone’s ready, you can press the shutter button using your Apple Watch. This basically removes the need for an extra hand, as long as you’re able to position your iPhone accordingly.
We’ll help you get started using your Apple Watch as a viewfinder and remote control for your iPhone’s camera.
How to Use Apple Watch as Viewfinder & Remote for iPhone Camera
This is a feature that has been available since the release of the original Apple Watch back in 2015, so you don’t have to be on a specific watchOS version. Just follow the steps below to learn how it’s done:
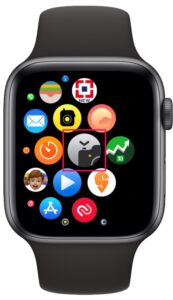
- Press the Digital Crown on your Apple Watch to access the home screen full of apps. Scroll around and tap on the Camera Remote app as shown below.

- Opening the app will also launch the Camera app on your iPhone. Apple Watch will now mirror what your iPhone’s camera is seeing, so position your iPhone to frame the shot. You can use the Digital Crown to zoom in or zoom out. To access additional camera options, you can tap on the triple-dot icon.
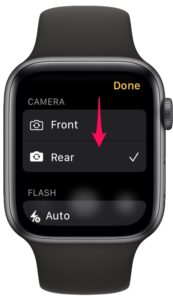
- Here, you’ll be able to remove the default 3-second timer, switch between front and rear cameras, turn on/off flash, enable/disable Live Photo and HDR features.
- When you’re ready to take a picture, you simply need to press the shutter button. After taking a picture, you will be able to view it as a preview within the app.


That’s it, you’ve now learned how to use Apple Watch to take pictures on your iPhone.
It’s worth pointing out that if you’re using the default timer setting to take pictures, your iPhone will be taking burst shots consisting of 10 images. However, if you’re looking to take a single shot, you will have to disable the timer and there’s no other way to go about it.
Additionally, if you exit and relaunch the Camera Remote app, the photos you just took will not be available for Preview and you’ll need to use your iPhone to see all the pictures in your Photos library. As for burst shots, you’ll only be able to view the best shot out of the 10 images that were captured. Also, your Apple Watch display will go black during the entire duration of the burst shot, probably due to the latency it introduces.
Hopefully, you were able to take some great pictures in scenarios where you couldn’t unless you had an extra hand, or person. What are your overall thoughts on the Camera Remote app? How often do you find this useful? Let us know your valuable opinions and share your experiences in the comments section down below, and check out more Apple Watch tips while you’re at it.

This didn’t work for me. iPhone 15 max plus and watch 7 . It doesn’t show what the camera sees on the watch. Didn’t start the camera app on the phone but does let me take a picture after I open camera app.