How to Add a Mac to Universal Control in macOS Sequoia, Sonoma, Ventura System Settings

Wondering how you can add another Mac to Universal Control in macOS Sequoia, Sonoma, or Ventura System Settings? It’s pretty easy, but enabling the feature and connecting a new Mac is a bit different than what you may have been accustomed to in prior MacOS versions.
Universal Control is the incredible feature in MacOS that allows you to control multiple Macs with a single keyboard and mouse, effectively linking multiple Macs together. You can even drag and drop files between them, and share the clipboard, making it a serious productivity booster.
Let’s walk through how you can add another Mac to connect to Universal Control, linking your keyboard and mouse to that other Mac.
Before beginning, make sure that any and all Macs running MacOS Ventura or later are updated to MacOS Ventura 13.3.1 or newer. You do not need to update Macs that are running MacOS Monterey to Ventura, however. Universal Control works fine between a Mac running MacOS Ventura and another Mac running MacOS Monterey. Universal Control (and all other Continuity features) may not work for many users in Ventura 13.3 however, so avoid that particular release. The other Mac you wish to link must be running Monterey or newer, and be compatible with Universal Control.
How to Connect a Mac to Universal Control in macOS Sequoia/Sonoma/Ventura System Settings
From the Mac running MacOS Ventura or newer, do the following:
- Pull down the Apple menu, and choose “System Settings”
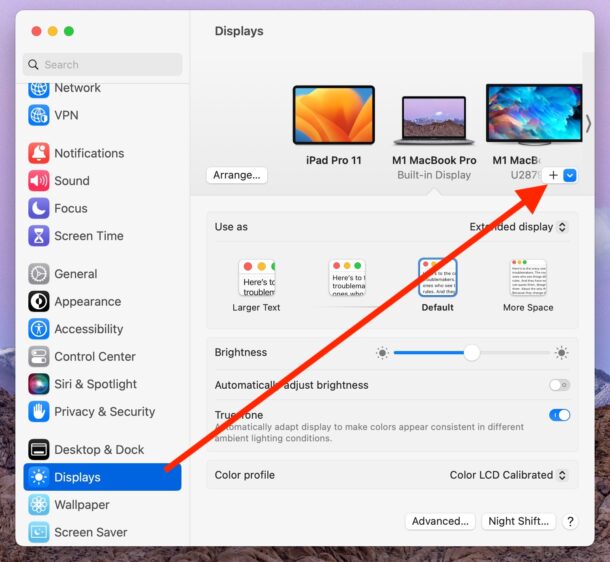
- Go to “Displays”
- Click on “Advanced” and toggle the switches ON for these three settings: “Allow your pointer and keyboard to move between any nearby Mac or iPad”, “Push through the edge of a display to connect a nearby Mac or iPad”, and “Automatically reconnect to any nearby Mac or iPad” then click Done
- Click the + add button in Displays
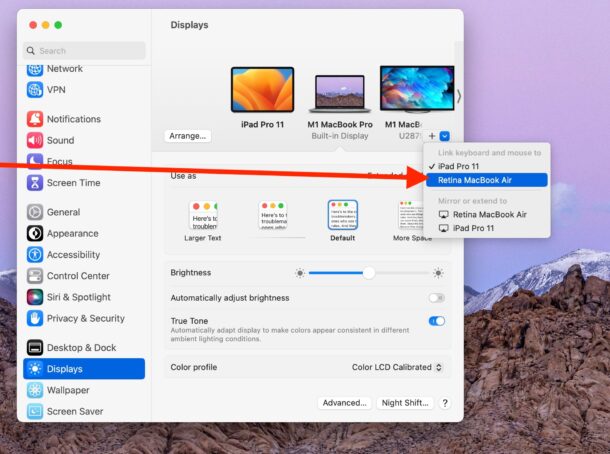
- Choose the name of the Mac from the dropdown list that you wish to add under “Mirror or extend to:”
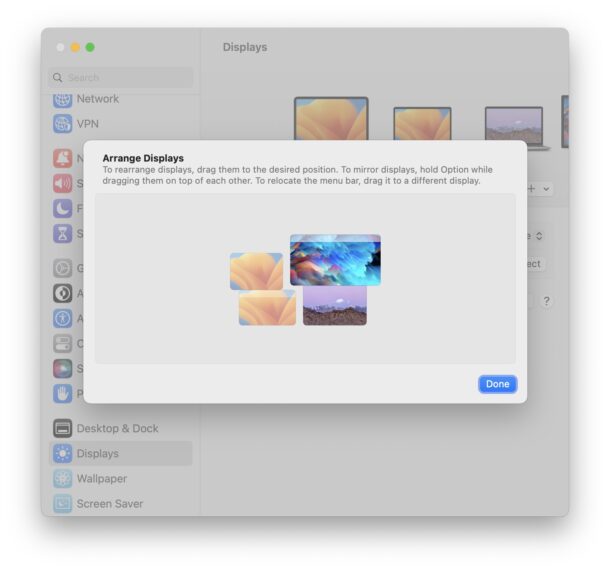
- Next, click on “Arrange” and choose the arrangement for the Mac(s) and displays you wish to use
- Move the cursor to the other Mac screen, it should work seamlessly

Universal Control works best when there are basically the two (or more) Macs on the same desk, since you can drag your cursor between them, share clipboards, drag and drop files, and seamlessly work on multiple Macs at the same time with this feature.
Now that you’ve got that other Mac added to Universal Control, be sure you read these tips for Universal Control to get the most out of the feature.
Similar to adding a Mac to Universal Control, you can also add an iPad, as you will see in the screenshots above. Just like linking the keyboard and mouse to another Mac, doing so will link the keyboard to that iPad as well, and it works great. Another option is to use the iPad for Sidecar in MacOS, which turns the iPad display into another Mac screen instead.
Do you use Universal Control to link your keyboard and mouse between multiple Macs or iPads? What do you think of this feature? Let us know your thoughts and experiences in the comments.
