How to Trim Video on iPhone & iPad Quickly
Recording video is one of the great features of the iPhone and iPad, but before you send that movie out to a friend, copy it to a computer, or upload to YouTube, you can make some quick edits right in iOS to clip the video. This is helpful if you want to shorten the video clip, or maybe just to ditch unnecessary parts of any recorded video, and you’ll find you can complete the entire process quickly right in iOS by using the built-in Trim feature.
How to Trim, Shorten, and Cut a Video Clip on iPhone or iPad
The process of trimming and clipping down movies is the same on all versions of iOS and for iPhone, iPad, iPod touch. Despite being video, the trim function is actually performed in the Photos app, but don’t let that confuse you because this is easy. Here’s what you’ll want to do:
- From the Camera app or Photos app of iOS, find and select the video you want to trim
- Tap on the video itself so that the editing, sharing, and playback buttons are shown on screen
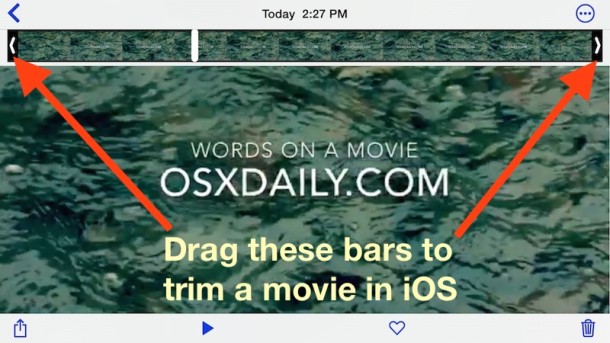
- Grab the handle on the left or right side and move inward, and adjust to accommodate the portion of the movie you want to shorten the clip to – you can use one or both handles to trim the video clip in either or both directions
- When finished, tap the “Trim” button
- Now you have two options for saving; trim the original video clip down to size, or split the trimmed selection out into a new video clip which will preserve the original video as untrimmed
In modern versions of iOS, the handlebars are initially black and somewhat subtle, but once you start dragging to trim the video they will turn yellow and encapsulate the timeline on the video, which indicates where the trim function is going to be applied :
This looks slightly differently depending on what version of iOS the device is running, here’s what it looks like on earlier revisions, the feature is otherwise identical in functionality:

When saving, you have the two options, this is consistent with all versions of iOS:

For sending small videos out from a much longer video, saving as a new clip is recommended. For editing out shaky video or parts of a movie that aren’t worth keeping, trimming the original is suggested.
Both of these options will lead to smaller file sizes because the video is shortened. To get the full HD quality video onto a computer you’ll still need to copy the video using a USB connection between the iOS device and the computer.
You’ll notice this is just like trimming in QuickTime on the Mac but it can be done right on your iPhone or iPad, which is quite nice.
Keep on shooting, and remember to hold the camera horizontally for best results!

Can’t edit video. When I choose the video the done button is not highlighted. That’s with me moving the anchor to cut out the end of video.
Awesome! I couldn’t find anywhere how to trim videos on my iPhone until i ran across your great and useful tutorial. So thank you very much for solving my problem.
Does trimming a movie on the iphone degrades it quality?
I tried.. But it freezes. And all goes black.. I just can hear but not see
This feature appears to have been removed from iOS 6. Very frustrating!!!
I’ve found the trim feature to be very unrefined, on the iPhone… it’s difficult to select the exact frames you want to edit out; I think the UI needs a bit of work.
So many little things Apple has thought of, amazing.