How to Downgrade MacOS High Sierra Beta to Sierra or El Capitan with Time Machine
A fair number of Mac have installed MacOS High Sierra public beta or the developer releases to test out the new features, but it’s not uncommon to test out beta system software and then decide to downgrade back to a stable release.
This tutorial will show you how to downgrade from MacOS High Sierra (10.13) beta back to MacOS Sierra (10.12.x) or OS X El Capitan (10.11.x) by using Time Machine to restore a previously made backup. Using a prior Time Machine backup offers the simplest way to downgrade MacOS High Sierra.
Important: If you do not have a Time Machine backup made from a prior install of MacOS Sierra or El Capitan, this approach will not work to downgrade because you will not have a Time Machine backup to restore from. Do not proceed without a Time Machine backup you can use to restore.
Warning: You will be formatting and erasing the hard drive in this process, this will destroy all files and data on the drive. Do not proceed without having a backup of your files and data. Failure to do so will result in permanent data loss.
Downgrading from MacOS High Sierra Beta
Before anything else, confirm that you have a Time Machine backup to restore to, and that you have a current backup of your important files and data.
- Connect the Time Machine volume to the Mac if you have not done so already
- Reboot the Mac and hold down Command + R keys together to boot into Recovery Mode
- At the “macOS Utilities” screen, choose “Disk Utility”
- Choose the partition or hard drive with MacOS High Sierra installed on it, then choose the “Erase” button
- Give the drive a new name and then select “Mac OS Extended (Journaled)” as the file system format, then click “Erase” – THIS DESTROYS ALL DATA ON THE DRIVE, DO NOT PROCEED WITHOUT A BACKUP
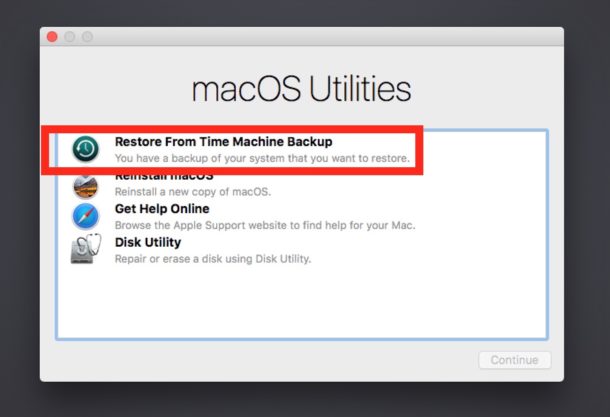
- After the drive has finished formatting, quit out of Disk Utility to return to the ‘macOS Utilities’ screen and now choose “Restore from Time Machine Backup”
- Choose your Time Machine volume as the backup source then click Continue
- At the “Select a Backup” screen, select the most recent backup available that corresponds to the version of MacOS you want to restore – remember that Sierra is “10.12” and El Capitan is “10.11” whereas High Sierra is “10.13” then choose Continue
- Select the destination to restore the Time Machine backup to, this will be the partition or drive you formatted in step 5, then choose “Restore” and confirm
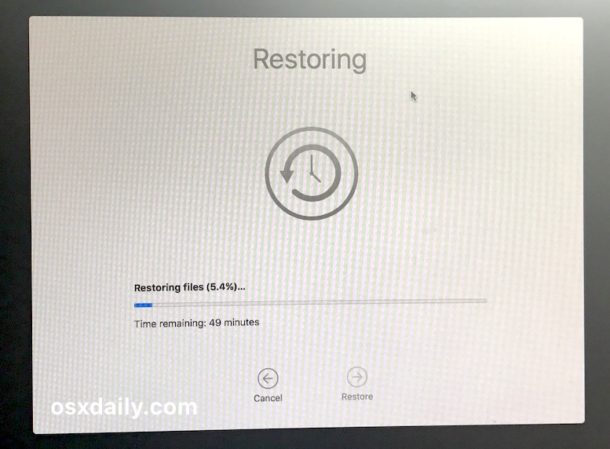
- Let the restore process complete, this can take a while depending on the size of the hard drive and backup
When finished, the Mac will reboot itself automatically and boot back into the MacOS version you restored to. MacOS High Sierra will have been removed in the erase and format process, and the prior macOS release will have been installed via the Time Machine restore process.
* Typically you can downgrade by simply restoring from a prior Time Machine backup to downgrade, but because MacOS High Sierra wants to use APFS file system (as opposed to HFS of prior Mac OS releases) you will want to format the hard drive back to the prior file system. That is not the case if you did not update to APFS or when downgrading from Sierra to El Capitan for example.
If you’re downgrading from macOS High Sierra beta because you found it to be unstable or have performance issues, you’ll likely want to wait until the final version of macOS High Sierra is available before installing it again – the final release is set for launch this fall.
Do you have any questions or comments about downgrading from macOS High Sierra beta back to a stable build of Sierra or El Capitan? Let us know in the comments below.

Thanks Paul
I have my system up to 10.13.4 now.
I’ll “opt out of the Beta testing for now.
Cheers
John
I have installed High Sierra, along with all the updates. After installing 10.13.3 the system automatically updated to 10.13.5 BETA.
I have restored to 10.13.2
How can I do the updates, without getting the 10.13.5 BETA install automatically?
Thanks
John B
Great question, you have to manually opt-out of receiving beta MacOS system software updates:
https://osxdaily.com/2014/12/05/stop-os-x-beta-software-updates-showing-app-store/
Will an El Capitan time machine backup work on the 2017 MacBook Pro?
Only if that prior backup was made on the same Mac, which is unlikely for a 2017 model unless it ran Sierra or El Capitan when it shipped. Otherwise whatever version shipped on the Mac is usually the earliest version of system software that can be installed because of hardware support and drivers in the OS.
I tried these instructions and it totally failed leaving me with a Mac that shut down during the restore and then wouldn’t start at all!!
Hence a long call to Apple Support to resolve matters…….
I am in the process of the same – I created a 10.12.6 sierra boot drive on a USB – booted to that, and it allows me to format the (previously APFS) drive back to HFS.
I’m now trying to install Sierra.
* APFS, whatever
I am unable to reformat the HD in Disk Utility. When erasing, I only have AFPD formats available. I cannot restore Sierra without reformatting the HD to Extended (Journaled).
Simple solution, and common sense, ALWAYS make a clone backup BEFORE upgrading the OS.
I prefer to partition my system drive and install the new version OS on a separate partition, and keep my current OS as well, creating a dual boot system which I can later remove the older OS if I choose.
In either case, you can simply clone the old OS to the new OS drive, and revert back to the version you were previously running. You can do this using either SuperDuper (my choice) or CarbonCopyCloner.
This is FAR more difficult to do with Time Machine, and I do not recommend it. Use a cloning application.
These instructions didn’t work for me … specifically, when I went to erase my disk it would only let me select from various APFS option (i.e. no HFS+ options were available). Makes it kinda impossible to go back to Sierra, which I really need to do since High Sierra Public Beta 2 rendered e-mail completely non-functional…
Time machine works to downgrade but you will need to get HFS as the format again. If you have a Sierra or Mavericks boot drive you could use that. Otherwise, if your Mac supports it, boot the Mac with Internet Recovery and then restore from there. What is likely happening is that you’re using the High Sierra Disk Utility and you updated to AFPS so that’s what it wants to use again.
Internet Recovery loads with holding down Command + Option + R upon boot. Reboot your Mac and hold that down immediately, make sure the computer is connected to the internet. Then you can restore from Time Machine and use the Disk Utility with that.
https://osxdaily.com/2014/12/14/reinstall-os-x-mac-internet-recovery/
Upgraded and immediately regretted it. Corrupted my fusion drive- split it into 3 drives – then locked me out even though I used my sign in credentials. Apple support were a big help but took ages to rebuild the fusion drive and revert to stable Sierra build.
Where can a i get a free copy of El Capitan ?
or
where is it sold and how much does it sell 4 ?
Advice/guidance required, please.
If you have El Capitan on the Time Machine backup that is what you will restore to when downgrading macOS High Sierra. If the Time Machine backup is Sierra it will downgrade to that instead. Whatever Time Machine has backups for, that will be restored.
Aside from downgrading but generally speaking, if you downloaded El Capitan before you can find it in the Purchases tab of the Mac App Store. Mac OS X El Capitan was/is always free. It can be downloaded from Apple:
https://itunes.apple.com/app/os-x-el-capitan/id1147835434?mt=12
have mac book osx el capitan 10.11-new to me-was downloading maps on tomtom g0 60s and computer went into sleep mode,downloading stopped. lost all my tomtom data. how can i permently delete sleep mode? would be grateful for reply.
Open System Preferences. Click on the Energy Saver Panel. Slide the Computer Sleep to Never. You can move it back or click on Restore Defaults later after your downloads.
Also make sure “Wake for Network Access” is checked.
caffeinate from terminal
https://osxdaily.com/2012/08/03/disable-sleep-mac-caffeinate-command/
Warning!!
You provide a lot of good tips. If one does not work for you, no man overboard. This one however, is a terrible idea. The risk of loosing data is huge, if not guaranteed.
First of all, Time Machine is a backup! In its nature, it provides a copy of the latest(!) state of the disk(s). TM does keep a history, but how much (read: complete), depends on a lot of factors. One of which is the size of the TM disk. It throws out (parts of) earlier backups, when it sees fit. E.g. when there’s a shortages of backup space.
After you installed a new system, a lot of data has been changed and will have been backuped shortly afterwards. A big chance that TM cleaned out (parts of the) historical backups to free up space. Trying to read back an older complete(!) backup, might not be possible anymore by the time you need it. It might not even be there at all anymore!
Same goes for you data. Older versions of current documents will not be up to date after reading back your entire disk. Sure, you can get them back from the latest TM part, but it will be a big challenge figuring out which. Not everyone keeps them neatly in de documents folder.
What to think of email? If you store mails locally, or still use POP to connect to servers, that state is also thrown back to weeks ago. Ever tried to figure out how to convert mails back to another format? Which messages you replied what to?
If this is still not enough. How sure are you that your old BU’s were errorless at that time?
You’ll find out all of this, after you wiped out your current disk in the first step.
“Don’t try this at home”, even if you think you can always go back to the backup of yesterday…..if that one is still complete by the time you come to the conclusion.
kind regards,
Marcel
(By the way, trying out a beta OS on your operational (and only?) computer, is not a good idea to begin with.)
Downgrading with Time Machine works fine, I have done it multiple times, but yes of course you need a Time Machine backup. That’s why it clearly says don’t do this if you don’t have backups made.
Frankly if you can’t figure out backups you have no business doing much of anything technical on a computer, and using beta software or downgrading is far beyond competency level at that point. macOS High Sierra beta feels like an early alpha build, I would not use it at all if you’re not a developer.
Sometimes the questions and comments confuse me.
I will stick with Sierra until macOS Higher Sierra has been out for a while, maybe 10.13.1 or 10.13.2.
The beta… well at this point I found macOS High Sierra to be too buggy and way too slow to be usable full time. Considering there is virtually nothing new in the operating system I am not sure of why the performance is so slow, beta or not, one would assume that there is nothing new to bog down the OS.
Not trying to highjack, but I am curious what experiences downgraders have had with APFS. There’s a lot of noise out there and I don’t have a spare machine to test the beta out on.
The former BeOS guy is certainly qualified to lead the effort, I just hope his efforts haven’t been hampered in any way.
I know 10.13 can’t quite be the new Snow Leopard but APFS should be one of the biggest developments to macOS in recent years. I hoping its functionality will grow, but right now I just hope its speed, reliability and security are all well done.
Thanks!