How to Add Text to Photos Easily Using Preview in Mac OS X

Adding text to images is a fairly simple process to begin with that is made even easier with Preview, the basic image viewing app that is bundled on all Macs. Most people don’t think of Preview when they think of making adjustments and edits to pictures like this, but it works just fine, and because Preview has shipped with every version of Mac OS X from the dawn of time, you’ll never have to download a third party app to just place some words onto a photo.
This allows you to place text, words, phrases, and characters onto any image file that can be opened in the Preview app, from JPEG, PICT, GIF, PSD, PDF, TIFF, and many other image file formats. If you’ve never delved into Preview’s font and text tools, here’s how to use them.
How to Add Text to Photos with Preview Text Tool on Mac
- Open the photo to add text to into Preview app
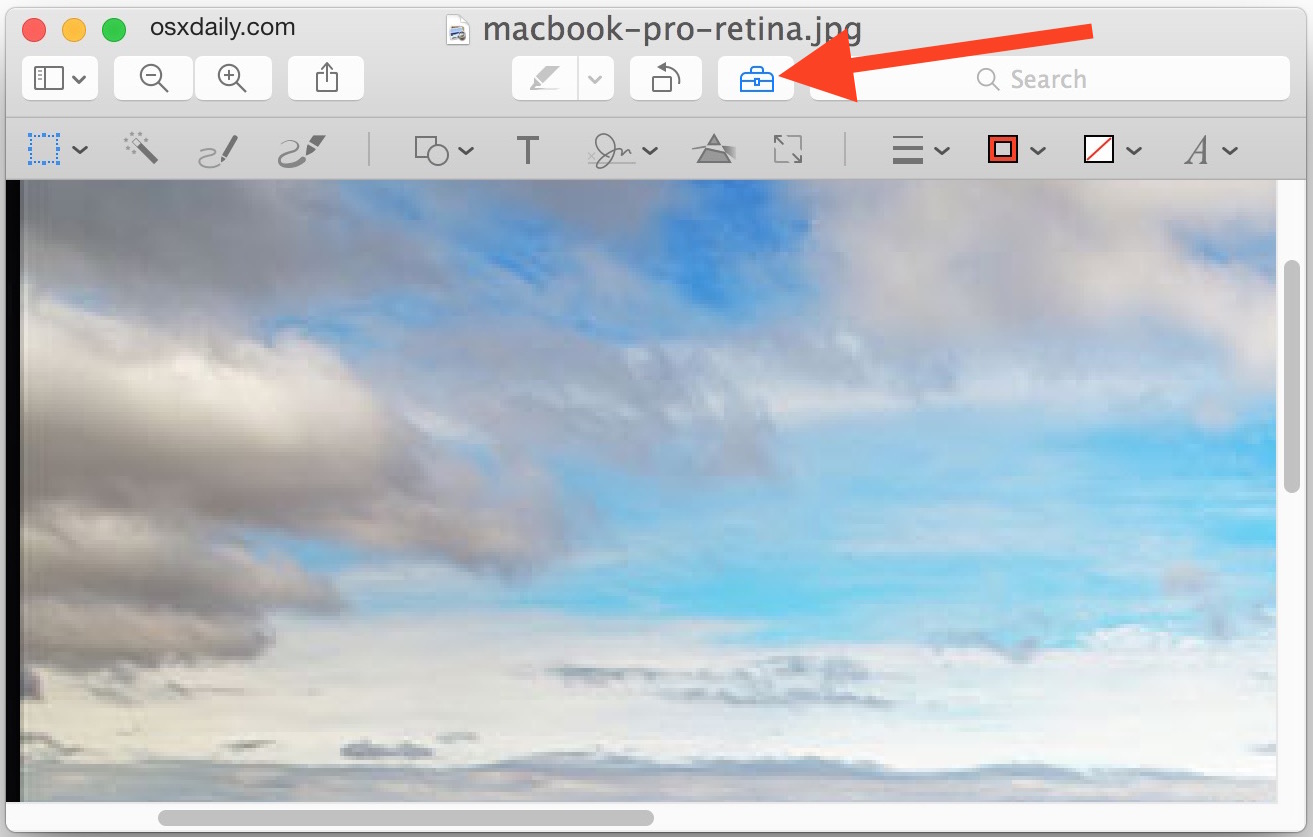
- Click the little toolbox icon button, which is the “Show Edit Toolbar” button in the toolbar*, then choose the “Text Tool” button
- Click with the text tool onto the section of photo where to add the text, then type out the words you want to add
(* Note that some versions of Preview show a little pencil icon as the Edit button, and newer versions of Preview use a little toolbox looking icon for the Edit button. You can also choose “Show Edit Toolbar” or “Show Markup Toolbar” from the “View” menu in Preview app to achieve the same effect and to show the editing options.)
How this looks depends slightly on the version of Preview running on the particular version of Mac OS X. Don’t worry, we’ve got both covered.
This is the button to press to reveal the Edit Toolbar, the text tool is the ‘T’ letter shown in the editing toolbar itself:
In prior versions of Preview the buttons to show the Edit tools and Text Tools are as follows:

Once the text is placed, you can move it around just by grabbing it with the cursor.
Changing the Font, Text Size, Color on Images in Preview on Mac
It’s simple enough to add text, but you can stylize it too by changing the font, font size, or color:
- Change the font or font size by selecting all the text (Command+A) and then hitting the “Show Fonts” button
- Change the color by selecting the text and selecting a new color from the Colors menu, or by choosing “Other Color” and finding one in the color picker
And here are the text tools, color selector, and font tools:

Here is what Preview looks like with both the font and color panels open:

When finished, save the photo as usual, or use “Save As” or “Export” to create a new file with the text placed on the image.
This video walkthrough shows how fast this entire process is, it takes under a minute to open a file, add some text to the photo, adjust it, then save the file. Not bad for a simple tool bundled with Mac OS X:
You can also use Preview to add cartoon style speech bubbles to pictures if you feel like going with a more goofy look.
Preview is pretty decent but if you’re looking for more options for stylizing the text you’ll need to turn to third party applications. Interestingly enough, you can’t add words or text to pictures with iPhoto, at least with the current versions, though that may change in the future. One simple and free third party solution is to use Skitch, which offers a few more text styling options like outlined text, or better yet, go all out and buy an app like Pixelmator, which is a full-fledged image editor and Photoshop competitor at a fraction of the cost ($15 as of writing).

I like the suggestion, however, I believe Apple is not given this options for older MacBooks, I really don’t have these options. The only Crapy thing I have is Markup on my Preview, really bad, very limited, it’s just like on the 90’s really crappy software. Too bad, I would love to be able to do what you can with your Mac.
Have no Toolbox
How do you delete prior text which has been added to a photo. Such that I can correct and add new text.
Thanks.
The text box that you type your text in relocates its position each time you add something to the photo. If you have much text to add, the text box will move off the photo and out of sight so you do not have a text box to use. When I save the photo then re-open it, the text box starts in the center of the photo once again. But, will still move off and out of sight when much text is added. How do you keep the text box in use?
Hello Paul,
You are right this was a very simple way to add text to a photo, and your explanations were so easy to understand.
Thank you so much…
I just have a tiny little glitch; I wanted to write my text in chinese, you know with the graphic chinese symbols; and even though I have a few chinese fonts listed in my font book, when i click on any of the chinese fonts I get the text in english. I was wondering if you know how to fix that.
I have a MacOS Sierra.
Thank you so much!
bjouxtel
Turned on preview first time it came up with all my saved pics.
Few min. Later I again pulled up preview and no pictures , nothing happened when I tried to open the file. Need some assistance
Shut down system. Could not complete action as preview had refused to shut down…. problems……forced shut down problems continue
I found this tip really useful. I struggled a bit with my first picture, but then got the hang of it and is easy to you, versatile with its shapes, colours, fonts etc. So a big THANK YOU for the explanation on how to do this. I didn’t even need to spend money on getting a third party app! Peter
This works Great! Can you remove the type once it’s saved? How do you do it? Thanks.
Hi, have followed the comment trail with interest…. but think I may be missing something. Currently using OS X YOSEMITE and Photos. On clicking a chosen picture (from the library) to annotate, then “edit”, “show edit tools”, there no text option. Only enhance, rotate, crop, filters, adjust, retouch and red-eye visible.
Over to you experts for comment and solution
Many thanks
Richard-
I was seeing exactly what you saw and your comment made me feel like i wasn’t totally losing it! (how could this be so hard?) Then for some reason I decided to try to open photo’s, and drag the photo icon of the photo I wanted to add text to, onto the desktop. THEN (this is where the magic FINALLY happened!) when I opened the photo from the desktop instead of inside photo’s… THERE was the little tool box icon and when I pushed that, there were text options. Hope this helps someone else!
Hi Richard
What you are describing is editing the picture using Photos. This article describes the procedure for adding text using Preview – which works!
You need to edit your picture using Preview, then you will be ok
I used this feature and it was beautiful. But when I print anything from preview they look horrible. The photos with text had lines through them!
Thank you, I found your directions to be easy to follow. I was looking for an app to write on photos and did not know I already had one! Thanks again you were very helpful.
Thanks Bro
I am newbie to MAC .. even though 62 yo…
Your tips really works..
Mimbar
Jakarta – Indonesia
Thank you so much for this, worked like a charm and saved me tons of time messing about. I am really grateful Monica :)
I have the latest OS and using Preview to add text to an image file is done by opening Tools on the top Menu Bar and selecting Annotate from the drop down list. The Annotate tab has selections such as Text or Speech Bubble to achieve what you want, plus basic shapes and signature.
I have OSX Yosimite, 10.10.1 .
Awesome, MjMcGillicuty ! Thanks so much. I would have never figured this out on my own. Works like a charm.
I’m having problems with Step 3: “Click with the text tool onto the section of photo where to add the text, then type out the words you want to add”
With the text tool selected, every time I try to type I get a beep & it doesn’t do anything…help please?
How do you delete a text box in Premiere?
To delete a text box in Preview you select it, and then hit the Delete key
What if you’ve already “Xed” out of it and you want to delete it. You cannot select it.
The show edit tool bar and text tool are not active when I bring up an image in preview. Ideas on how to turn them on?
I am running 10.6.8
Thanks! Lisa
I’m having same trouble as Lisa H. I’ve spent 45 minutes trying to get your instructions to work. I’ll think twice after this trying to get any help from osxdaily.
Step 2 shows revealing the toolbar, this is an essential step otherwise the Text Tools will not be visible.
You can also choose “Show Edit Toolbar” from the VIEW menu in Preview.
Of course this is in new versions of Mac OS X, if you’re on a very old unsupported version it may be different. What are you running?
Actually.. that was BRILLIANT solution.. some of the wording is a different on my Mac but I used my common sense and worked out the ‘annotate’.
Text.. Speachbubbles.. all sorts of loveliness.
So.. well done.. OSXDaily for helping where two days of searching ‘forums’ etc yielded nothing.
I was just about to download some Picasa type crap but.. now I don’t have to.
Cheers..