How to Create a OS X El Capitan Boot Installer USB Flash Drive
Many Mac users like to make a bootable installer drive for installing OS X El Capitan, whether for performing a clean install, or for making it easier to install OS X 10.11 onto multiple Macs. We will walk through creating a bootable install flash drive from OS X El Capitan with the final public version.
Before getting started, know the requirements necessary to make a bootable OS X El Capitan installer drive are as follows:
- An 8GB or larger USB Flash Drive like these
 , this will be formatted and turn into the OS X El Capitan bootable installer
 - The OS X El Capitan installer application must be on the Mac and in the /Applications/ folder, download OS X El Capitan here if you haven’t done so yet (yes. you can re-download it)
Presumably you have already made the USB flash drive into a Mac compatible format with Disk Utility, if not you can follow the directions here to format a drive for Mac OS X compatibility HFS+.
When you’re ready, plug the USB / flash drive into the Mac with the OS X El Capitan installer application on it.
1: Rename the USB Flash Drive to Become the OS X El Capitan Bootable Installer
The next thing you’ll want to do is rename the target volume that you wish to turn into a bootable installer drive, in this case an external USB flash drive. To avoid any confusion, we’re naming the USB drive to “ElCapInstaller” (without the quotations), though you can name it whatever you want as long as you adjust the command line syntax to match.
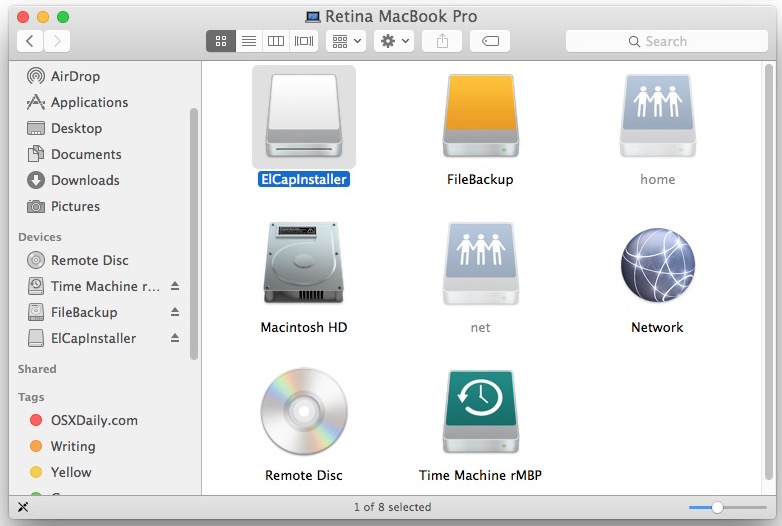
You can do this through the Terminal or the Finder as shown above.
2: Make the OS X El Capitan Bootable Installer Drive with a Terminal Command
Launch the Terminal application, found in /Applications/Utilities/ and enter the following command exactly (unless you changed the target volume name from ElCapInstaller to something else) onto a single line, the text will wrap because it is long, but it’s important to have proper syntax:
sudo /Applications/Install\ OS\ X\ El\ Capitan.app/Contents/Resources/createinstallmedia --volume /Volumes/ElCapInstaller --applicationpath /Applications/Install\ OS\ X\ El\ Capitan.app --nointeraction
Hit the Return key and enter the administrator password when requested.
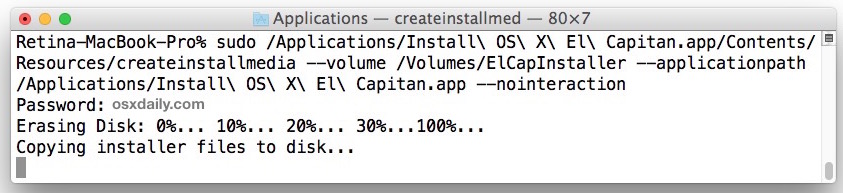
You’ll then see the following screen text in the Terminal:
“Erasing Disk: 0%… 10%… 20%… 30%…100%…
Copying installer files to disk…
Copy complete.
Making disk bootable…
Copying boot files…
Copy complete.
Done.”
The target USB disk or flash drive will be erased first and then copy the files to it so that it will become a bootable OS X El Capitan installer. This can take a while to complete, so wait for the “Done” message before continuing.
When you see “Done”, that’s it, your OS X El Capitan installer drive has been created, it’s bootable, and you can use it to update as many Macs as you want to with OS X 10.11.
To boot from the installer drive, hold down the Option key during Mac system start, and select it from the startup volume menu.

Otherwise, you can insert the installer USB disk / flash drive into any Mac and launch the installer directly from the drive.
Can you show me how to make an Install OS X El Capitan boot drive?
If you want to watch a video walkthrough of the entire process of making an OS X El Capitan bootable installer drive, we’ve got you covered, here it is embedded below for easy viewing:
If you have any questions, thoughts, or info about making an OS X El Capitan bootable installer drive, do let us know in the comments!

The process has frozen on Terminal at…
Copying installer files to disk…
Suggestion?
I have attempted several times
MacBook Pro (Retina, 15-inch, Early 2013)
10.15.7
2.7 GHz Quad-Core Intel Core i7
It can take a while, give it plenty of time to finish copying files to the USB drive
A little bit more clarification on the process
Apple has now made the El Capitan file from their website into a .dmg file. In order to use this file to create a bootable drive, you must do these steps before you are able to use the createinstallmedia command.
Step 1: Obtain the El Capitan file from Apple as mentioned above.
Step 2: Run and mount the InstallMacOSX.DMG file. This will open a screen with InstallMacOSX.pkg
Step 3: Open and run InstallMacOSX.pkg.
Step 4: Install the file to the drive that is currently being used to create the recovery drive. Installing the application to the bootable media will not work.
Once the application is installed you will have a application in your /Applications Folder called Install OS X El Capitan. At this point you will now be able to use the rest of the guide to create the bootable drive.
When trying to instqll on mycurrent stqrt-up disk I get :-
“The Install OS X El Capitan application can’t be used from this disk.
Copy this application to a writable Mac OS Extended formatted disk and reopen it to continue installation.”
I’m having the exact same problem. I read somewhere about changing the date but that doesn’t seem to work.
Hi everyone, if you are downloading El Capitan now from Apple it will come in a .dmg file (my was named InstallMacOSX.dmg) and the instructions in this article will not work.
Here what you have to do:
1. Open the .dmg file;
2. Open the .pkg file that will appears and follow the steps;
3. Rename the .app file to “Install OS X El Captain”;
4. Follow the instructions of this article.
Hope it helps.
Where did you download a DMG from apple from? The installer file is what arrives from the Mac App Store, and the instructions work as described for that.
Download El Capitan here (step 4):
https://support.apple.com/en-us/HT206886
Try turning off your Wi-Fi before installing.
The installer is named “Install OS X El Capitan”?
hello,
Right after I enter my password, I get this error message:
sudo: /Applications/Install OS X El Capitan.app/Contents/Resources/createinstallmedia: command not found
the name of the software in applications is “Installer OS X El Capitan” and the name of the USB drive is “ElCapInstaller”
do this if youve downloaded the dmg
open the dmg
rename blank usb Untitled
open terminal
copy following
sudo /Volumes/Install\ OS\ X\ El\ Capitan/Install\ OS\ X\ El\ Capitan.app/Contents/Resources/createinstallmedia –volume /Volumes/Untitled –applicationpath /Volumes/Install\ OS\ X\ El\ Capitan/Install\ OS\ X\ El\ Capitan.app –nointeraction
it’s working like a charm. as i am writing is copying the files to the usb disk.
If i can install from usb. Then My hhd data erase or keep?
Wow…after all these years this topic still is alive!
I thought I was the last of the Mohegans! (small joke)!
Anyway I too am having no sleep over this as I type this note at 413 am….My Mom needed to update due to web browser being outdated..I thought this was going to be easy….Nope…Now I am in deep doo doo cuz I did not back up her Pics..But at this point I am lost in space…Help ME!
I have my old OX original Disk but it wont take it! Damn Mac is not the same anymore…..!
Hello Techs,
I am facing the Issue in my macbook pro(early 2011, quite old(knew it)).
Well, I am not able to reach Recovery Mode, after apple logo appears, there’s nothing happening and getting stuck at white screen only.
I have already tried below mentioned solutions. Wondering if any one you have any solution other then these ones.
1-Internet Recovery also not working.
2-Reset NVRAM (or PRAM).
3-Start up in safe mode.
4-Tried to re-install MAC OS from another macbook pro, but still not luck..
5- Also tried to replace RAM and SSD/HDD as well…;(
Shall i consider it dead or if anyone of you do some magic for me.??
Waiting for your valuable suggestions..
BR
i am having a problem in mac os 10.5 and there is no Applications/Install\ OS\ X\ El\ Capitan.app file in the applications when i downloaded el capita. I need help to create bootable disk.
Hi
Worked perfectly; only needed to change “Untitled” to the name of my volume and it ran immediately.
Thanks
Cheers Pal, very good of you to provide this. I count get the syntax right and this helped me to resolve that – You rock guy!
J
Thanks! Worked great!
I have an old MacBook, not sure what year it is. My husband bought it “refurbished” online. I made the mistake of trying to update the software. Now it won’t boot the OS. I press the power button and the apple logo comes up and the spinning wheel appears and then nothing else happens. I have tried to boot in recovery mode. No luck. thought I might try a usb bootable drive. But only have a Windows PC to make the usb drive. Can this be done?
Try rebooting the MacBook holding down OPTION key and choose the Recovery partition on boot. You can also hold down COMMAND R keys on boot to go into recovery mode.
already tried that, didn’t work. The apple logo comes up and the spinning wheel. It just stays on that screen and goes no further.
UPDATE: problem solved: the issue was that the date of my mac did not match the download date of El Capitan. To solve the issue, I let my mac launch in recovery mode and accessed Terminal where I entered:
date MMDDhhmmYY
Simply fill in the date that applies to your download (i.e. 0101000015 for January 1st 2015 at midnight), hit enter and quit Terminal. Then you will be presented with the same list as before, where you click to re-install OS X and the load should proceed without a problem.
Hope this helps anyone with the same issue!
Hi everyone,
Following a corrupt HD I had to erase all the data and re-install OS X from recovery mode. After that didn’t work, I was brought to this article. The modifying of the flash drive worked fine and was bootable following the instructions. Here’s the problem though: after booting from the flash drive, OS X loads to about 60% – then stops and my max switches back to recovery mode, revealing the disk utility. Tried clicking on re-install OS X El Capitan, which results in the system telling me that the file is corrupted. Any pointers on how to resolve this? Thank you!!
Your hard drive may be failing, you should run fsck and give it a deep verify and repair, but it still may be on the way out of the drive is continuously screwing up even during software installs. Good luck, back up your data!
Guys, for all who have a problem with “command not found” – beware of spaces used in sythax command! Found great solution on apple forum
===
ou have El\Captian in your sudo command instead of El\ Capitan with a space after the \. Just fix those 2 misspellings/spacing and try again. Make sure El is E L not E I(eye).
Yours:
sudo /Applications/Install\ OS\ X\ EI\Captian.app/Contents/Resources/createinstallmedia –volume /Volumes/Captian –applicationpath /Applications/Install\ OS\ X\ EI\Captian.app –nointeraction
Should be:
sudo /Applications/Install\ OS\ X\ El\ Capitan.app/Contents/Resources/createinstallmedia –volume /Volumes/Capitan –applicationpath /Applications/Install\ OS\ X\ El\ Capitan.app –nointeraction
For Sierra it should be (make sure your external volume name is Sierra for the following to work):
sudo /Applications/Install\ macOS\ Sierra.app/Contents/Resources/createinstallmedia –volume /Volumes/Sierra –applicationpath /Applications/Install\ macOS\ Sierra.app –nointeraction
this worked, had to use another iMac to write usb (macbook air wouldn’t work) and had to use quality usb (eBay ones wouldn’t work).
Also setup wouldn’t start (would give error) unless i used terminal to change date to 2015 (open terminal from utilities on menu and type “date 0101010115”. install took about an hour, waited for ages while it said “about a second to go” then it restarted. all good
Hope this helps.
Anyone else having problems downloading OSX?
Every version except Sierra gives me an error saying it is not available. Even tried searching the app store, etc.
Is this an issue with my location (in Switzerland) or did Apple remove all older versions from the App store?
Hi,
If i can install from usb. Then My hhd data erase or keep?
Worked perfectly; only needed to change “Untitled” to the name of my volume and it ran immediately. Thank you very much.
HELP! My Terminal did not say “Done.”
I’m using a USB external hard drive
I typed in:
sudo /Applications/Install\ OS\ X\ El\ Capitan.app/Contents/Resources/createinstallmedia –volume /Volumes/Untitled –applicationpath /Applications/Install\ OS\ X\ El\ Capitan.app –nointeraction
After it says “Copying installer files to disk…”, the next line it says “The copy of the installer app failed.”
HELP!
Thanks for this brilliant guide. Used it to downgrade from Sierra due to non-working Filemaker plugins after upgrade.
I made a USB install disk for El Capitan and made bootable partition on an external HD. I then tried the same with Yosemite, on the other partition. I did have to change the date through terminal when booted from the ‘installer’ USB. It installed onto the external HD, with the progress thermometer going to the right, then stopped with one second to go. After a long wait it said “This copy of Yosemite application can’t be verified ….” Usually that happens at the beginning of the install. Afterwords the drive was completely empty.
Any advice how to install Yosemite on a separate partition with El Capitan on the other?
Note I used the above to make the bootable USB OS-X installer. The installer worked just fine but then stopped with one second to go, the progress bar all the way to the right. If finally stopped and the computer restarted. But on the drive with hopefully with a fresh install of the OS all there was was a folder called ‘OS X install data’
Any one ever had that happen?
two things. First I don’t think the location of the install OS X.app is critical. You just need to use the command
sudo ‘path to createinstallmedia’ –volume ‘destination’ — applicationpath ‘path to install OS X app’ –nointeraction
where the parts in ‘ ‘ can just be dragged into the terminal window. You can find createinstallmedia in the install OS X.app by right clicking and using ‘show package contents’ then digging down to Content/Resources
That said, the USB did boot just fine, but I had to change the time to something slightly after the release of that version OS X. But I had some trouble the installer, noted in next comment.
Also note, in the command given, all the ‘-‘ should be two dashes!
after writing the password I receiving this error message:
sudo: /Applications/Install OS X El Capitan.app/Contents/Resources/createinstallmedia: command not found
Im working with MacOS 10.11.1
any help?
Thanks
I tried to use this to fix a white screen of death however when I try to boot into it I still get the white screen of death any suggestions on fixing it?
i have changed the downloaded OS X application name by mistake . can you please guide what name should be kept according to your syntax .
The installer is named “Install OS X El Capitan”
Hi, I am trying to make USB ElCap Installer your way but I have received message “sudo: /Applications/Install OS X El Capitan.app/Contents/Resources/createinstallmedia: command not found”
Can you tell me where is the problem? The file exists, does it mean that there is any problem with it?
Thanks a lot, Radek
You are using the wrong syntax, or the installer file is not in the /Applications folder. You must use proper syntax.
sudo /Applications/Install\ OS\ X\ El\ Capitan.app/Contents/Resources/createinstallmedia --volume /Volumes/ElCapInstaller --applicationpath /Applications/Install\ OS\ X\ El\ Capitan.app --nointeractionNo exceptions.
I have faith this will work, but the “Copying installer files to disk…” has been the last message for almost 3 hours now. No error messages and the activity light on the USB stick is still flashing, so I think it’s still copying. Older system and USB2 is just really slow…
So for anyone else experiencing a REAL LONG copy time, here’s some hope:
It did finally complete. Duration was about 3hr 20min, from about 6:10am to 9:30am.
FYI, this process also works for macOS Sierra.
For what it’s worth, I just went through the process of making an El Capitan bootable USB stick. (Made it on my MBA to use on my late-2009 27″ iMac.) I first used an 8GB USB 3.0 stick and got the circle with a slash on the iMac. Then I dug up an old 16GB USB 2.0 stick, went through the same process, and hey presto, it worked.
i downloaded mac os x el capitan from Appstore but its a dmg file. so what to do?
Thanks. Good instructions, worked a treat!
So, I have MacBook that IOS Lion on it. Somehow or other I formatted the OS by following a video on how to restore the drive to factory settings. This would have worked IF Apple still made Lion downloadable from the utilities. So now I’m stuck without a functioning OS. I’ve downloaded El Cap to a USB drive and have followed every instruction to a T. It does not work for me. Does anybody have any clue why? I keep getting “sudo: command not found” in my Terminal.
When I have inserted the prompt into the terminal and entered the password on the computer it states that the command is not found. What has gone wrong?
Your simply the Best.
Thanks for this efficient piece of text *roll*
keep getting this message after the password.
/Volumes/ElCapInstaller is not a valid volume mount point.
Worked perfectly, thanks.
Worked perfect, Thanks
Thanks, I was trying from the Apple page and got messed seriously because I am not too much into IT stuff. This article was for my level of understanding and It took no time to have the USB installer.
Hello, do you know how much time does the entire copy thing lasts?
My terminal screen just says: Copying installer files to disk…
But it has like 10 minutes in that stage.
just wait…. it´s about 6gb and not just copying ;)
Late to the party but am having problems. I created a bootable USB El Capitan installer. Was able to start installation from it. However everything hung up on the Apple logo screen with the gray bar stopping for 24 hrs at about 3/4 of the way across the bar. How do I get this to install. I’ve tried downloading and installing with a crash and log; starting in SafeMode where the install stopped when the keychain couldn’t be found (could not use any keys to dismiss or reset this); starting in Recovery Mode. Not luck with anything. This is a Macbook Pro 2009. Any suggestions?
I am also getting the “This installer is corrupt, please re-download” type of message when I try to use my USB key. Brand new USB stick 64GB, followed directions exact, as I’ve done this with every other version (10.7,10.8,10.9.) except 10.10, and this time i bricked and totally messed me up!
I see that at least one other user has this issue. Any ideas WHY this happens sometimes? Is it really just a “corrupt” bit somewhere? I have a feeling this is more on Apple’s end than my hard drive’s…
Yes I can do i but it should be easier, period. For example Mac app, “Create Installer Disk”. just plain BS, I have spent the last 20 years writing SW to make users lives easier.
Dead links, a 6 GB download with no progress feedback, my 4th MACBook Pro and I grow weary of this crap. Over priced systems that hassle you just to create a startup disk for a mediocre OS. Not to mention the loss of entire disk partitions from upgrading the OS. The only thing that has kept me going is the lack of viruses.
Of course I also think anyone caught intentionally writing a computer virus or malware should get no less than 10 years in federal prison, but that’s just me.
Here is a detailed tutorial about how to easily create an OS X El Capitan installer drive that is bootable;
https://osxdaily.com/2015/09/30/create-os-x-el-capitan-boot-install-drive/
All that is required is the installer app from the App Store, a USB key, and a command line syntax to be executed properly.
I agree in that it would be nice if you launched the installer app and the app itself had an option to make the boot installer drive, but the command line process is pretty easy.
My attempts at work and home fail with the following text:
sudo: /Applications/Install OS X El Capitan.app/Contents/Resources/createinstallmedia: command not found
Any help would be great?
It also doesn’t say anything like “copying files” just the Apple logo and progress bar.
So, I had problems with my sad and an doing a clean install after wiping it. I’ve got the Apple startup screen and the progress bar has been stuck halfway thru for about an hour now. No movement. Is this normal?
The long “delay” in section “Copying installer files to disk…” is due to the write speed of the chosen USB stick. If U use a 5 mb/sek stick, it takes a looooong time to copy the files.
Using a faster stick drastically shortens the copying time if U are impatient.
IMPORTANT left out information( if you are not too familiar with Terminal)
to enter password: just type it in – it will not show up ( for security reasons?) AND you have to confirm it with hitting your ENTER key.
Then the process should start and will show:
Erasing Disk: 0%… 10%… 20%… 30%…100%…
Copying installer files to disk…
‘‘‘‘‘‘‘‘‘‘‘‘““
NOW THERE WILL BE A VERY LONG TIME of NOTHING HAPPENING: in my case 30 minutes ( but someelse noted 1 hr in the comments), before the rest appeared:
Copy complete.
Making disk bootable…
Copying boot files…
Copy complete.
Done.
Hope this helps clarify…
Thanks, that’s vital if you’ve never worked with terminal before.
I got the following from 10.11.5 trying to make the disk.
“The copy of the installer app failed”
No other apps were running, so I instead used Install Disk Creator mentioned above.
Hi,
I want to make a clone/copy of my OS X El Capitan Bootable Memory Stick. Is it possible? How do I make one?
everything goes smoothly until i input my password and i get “command not found” message and the bar just seems to forever load. what do i do? thanks
I have followed the steps, and made the bootable USB drive with succes according to the steps. My problem is, that it isnt visible when booting my mac? I only have HD showing.
Will it be the same clean install, if i acces the installer directly from the drive?
hi im getting this message:
Failed to start erase of disk due to error (-9999, 0).
A error occurred erasing the disk.
can someone help me?
The “Failed to start erase of disk due to error (-9999, 0).” error is usually due to trying to create a USB installer disk from an older version of Mac OS like Snow Leopard, or because the target disk is locked or in use (maybe you are in that target disk in the command line, for example). If you’re on one of those earlier versions of Mac OS X you will need to use the DMG file instead of the createinstallmedia from the command line. Any newer version can use createinstallmedia approach, assuming the target flash disk is not locked
thank you!! its working. some days ago i did the same thing to install yosemite but yeah a bit different commands. its the best ever way and method to install OS X using usb. its amazing. i am now gonna erase my os x and install fresh mac os x el capitan,
happy that this method works so cool
Note that if you named the partition something different from the USB drive, then you need the partition name in the bash command.
Hi,
A question: I am creating a bootable stick on my MacBook Pro 2012 as you described and I want to use it to install a couple of MacBook Air’s from 2012. Is this possible or do I need to create a stick on one of the Air’s? They all run pretty old Mac software and I can’t reinstall them because I don’t have those old versions on my Apple ID. The Air’s are pretty sluggish at the moment and downloading El Capitain seems to fail every time. I created an other Stick following the same procedure and this seems to fail at installation with the Mac telling me the stick is damaged. (that’s why I’m now creating a new one).
As you cannot use an iOs package from an iPad on an iPhone, I thought there also might be differences between the MacBook Air and MacBook Pro packages?
They should be the same, it would only fail if the airs entirely can’t handle El Capitan.
So if you can install it at all on the MacBook Airs, USB created on a pro would work just fine.
The createinstallmedia command worked on my MacBook Pro so I took the USB stick and plugged it into my friends MacBook Pro with a new blank hdd in it and it booted fine. I used disk utility to format the hdd as HFS+ Journaled and that worked fine. Whenever I go to install OS X, however, it tells me that the installer is corrupt. I redownloaded the installer and made me install media and got the same error. What do I do?
I just reformatted my SanDisk USB and did the Terminal command as per this article and the process went accordingly. After it said “done,” I quit Terminal and checked the flash drive and saw the “install el capitan app” installed. I was thinking I’d see more files, so I opened Start Up Disk Preferences and did not see the USB drive listed. Supposedly, this is now a bootable drive. As such, shouldn’t it appear as an optional drive to use on start up? I’m a bit confused here.
Any clarification would be helpful. Thanks!
The only app on the USB installer drive will be for installing OS X El Capitan (usually labeled Install OS X El Capitan.app).
It should show up in Disk Utility, it won’t be listed as a startup disk until you boot from it. To verify it is bootable – it should be if you followed the instructions – Reboot the Mac and hold down the OPTION / ALT key to be able to select the installer. You can then quit and reboot again without installing OS X if you just want to verify that it is bootable and works as intended.
Thanks, Paul.
Today is 4-14-16 and 10.11.4 is the current version available.
I just tried this process and the command line is now outdated and needs some modification as the Install OSX app no longer shows in Applications but rather as an invisible but mounted Volume. Here’s the terminal command I used:
sudo /Volumes/Install\ OS\ X\ El\ Capitan/Install\ OS\ X\ El\ Capitan.app/Contents/Resources/createinstallmedia –volume /Volumes/ElCapInstaller –applicationpath /Volumes/Install\ OS\ X\ El\ Capitan/Install\ OS\ X\ El\ Capitan.app –nointeraction
will this process delete all data from my mac’s hard drive ?
Thank you, Russell :) you’ve saved me from throwing my freaking macbook out of the window :D
does anyone know can the bootable drive be a partitioned external or is there a “has to be” usb? thanks so much!
I made a bootable OS X ElCapitan USB, replaced my MacBook HD with a new SSD and tried to boot up with the OS X. I pressed the option key immediately after the booting up chime and held it down. After a few minutes I saw a flashing folder icon with a question mark on it. Any idea what this means? Please help. Thank you.
I have two partitions in my mac machine i.e HD and HD2 and I want to format only HD on which my Yosemite is available now while installing el caption in disk utility I select only HD and erased it, and installation is completed then can I lose data on HD2 or not…?
I bought a Mac Pro in Hong Kong, I lived there. It was all in Cantonese and the admin and password weren’t mine. On return – I wiped the hard drive and followed these instructions. I now have the same problem – all inCantonese – how is this possible?
can i use this for install mac os x on pc?
The installer doesn’t HAVE to be in /Applications. The following worked for me:
(533) $sudo /Users/prwssd/Dropbox/Excess\ Files/OSX\ Install\ Apps/OS\ X\ El\ Capitan\ 10-11-3.app/Contents/Resources/createinstallmedia –volume /Volumes/ElCapitanInstall –applicationpath /Users/prwssd/Dropbox/Excess\ Files/OSX\ Install\ Apps/OS\ X\ El\ Capitan\ 10-11-3.app –nointeraction
Erasing Disk: 0%… 10%… 20%… 30%…100%…
Copying installer files to disk…
Copy complete.
Making disk bootable…
Copying boot files…
Copy complete.
Done.
You can get the path to the installer by making Finder display the installer application, control-click on the app, and select Copy from the pop-up menu.
Then switch to Terminal. Pressing paste (Command-V) pastes only the path into Terminal.
You do have to copy and paste the other portions of the command, though. And the comment systems often removes the backslashes that force the spaces to be path of the path.
2009 MBP HDD failed so I removed it and bought SSD drive. Using USB-SATA adapter I followed above process and installed El Capitan installer on new drive. About to put in MBP and boot it up to hopefully install the system on the same drive. Everything here refers to using USB thumb drives and I am just wondering if this sounds like the right procedure please. The format/terminal/renaming to “install os x El Capitan” all seemed to have gone just fine but I’d love some input PLEASE! Thanks so much!
WARNING: Improper use of the sudo command could lead to data loss
or the deletion of important system files. Please double-check your
typing when using sudo. Type “man sudo” for more information.
To proceed, enter your password, or type Ctrl-C to abort.
Password:
pls.. help what is that mean..
Its the routine warning that comes up when you use sudo.
sudo is a unix command (and mac OS X has a flavour of unix underlying it, which you are accessing using “Terminal”), that allows “non-root” (non-administrator) users to do things usually restricted to administrator users.
The fact that you are asking it to do “adminstrator restricted” stuff is why it asks for an administrator password.
Because administrators can delete “really important files”, and thus “sudo” can do so too, it warns you to make sure you are typing what you really want to type, as if you (in error) delete some really important files, you’ll be in trouble.
So, either use one of the automated packages that will do this all for you, or follow the instructions exactly (and you can even copy and paste the “sudo …..” command to make sure you are typing it correctly and not making a transcription error…..
If you follow the instructions exactly, you’ll be fine :)
so i bought a new hard drive since mine was making loud clicking sounds i did this to a usb but how do i install it to a completely blank hard drive with no os on it?
If a hard drive is making a loud clicking sound you should return it and replace the damaged drive, the hard drive has a physical problem and is likely about to fail. A failing drive eventually won’t work at all and everything on it will be lost.
Put the blank hard drive into the Mac and boot from the USB installer (hold Option at startup, choose USB at the menu), then install OS X as usual. Hopefully you made file backups!
Hi,
Im trying to follow the instructions but keep getting the following message in terminal after I input my password.
sudo: /Applications/Install OS X El Capitan.app/Contents/Resources/createinstallmedia: command not found
that error usually means you don’t have the el capitan installer in the /applications/ folder
If you didn’t get the El Cap installer directly from the Mac App Store (i.e. dl from torrent, stored on backup network share someplace, pulled from another machine, etc..) then the problem is likely missing execute permissions for ‘createinstallmedia’.
Try this first:
sudo chmod +x /Applications/Install\ OS\ X\ El\ Capitan.app/Contents/Resources/createinstallmedia
Then see if you can create the install media.
Thank you this man, permissions was the problem, thank you, thank you, thank you
Works great! I installed this on a $4.59 Kingston 8 GB DataTraveler.
Curiously, the flash drive does not show up as an option in System Preferences: Startup Disk, but it does show up on the boot screen after restarting with the Option key.
It takes several minutes to boot from a flash drive, but it does work. I’ll be using it this weekend to a replace a spinner with an SSD.
I should also add that the Install OS X El Capitan installer icon is showing on my USB stick.
I get all the way to the Copying Installer Files to Disk and nothing happens after that. I left it run overnight and the same message is still there, any thoughts?
Obviously, if you don’t have the file under Applications anymore, but got a pen drive and want to just copy from one another, you can do it with just one line:
sudo /Volumes/Install\ OS\ X\ El\ Capitan/Install\ OS\ X\ El\ Capitan.app/Contents/Resources/createinstallmedia --volume /Volumes/ElCapInstaller --applicationpath /Volumes/Install\ OS\ X\ El\ Capitan/Install\ OS\ X\ El\ Capitan.app --nointeraction
I have 3 machines. One I want to do a clean install on, the others I just want to do an update, and not lose all my data and client folder structures. All machines have a bootable clone made. Do I boot from thumb drive to do a clean install, and boot normally to do an update? Or what is the process? Also, does this OS play well with older machines? I mean, iOS 8 really screwed my two iPad 2’s. One of my machines is an older core Duo Mac mini with 8gb ram, one is a 2009 MacPro tower. Will they run this okay? Both are still on OSX 10.6.8.
I’ve followed all the steps. Everything goes well except I can boot my USB. Whenever I press Option while powering on my MBP, it only detects Macintosh HD and the USB of the installer is nowhere to be found. How do I proceed?
I can’t* boot my USB.
I HAVE FOUND THE SOLUTION.
After I hold the “Option” key while powering up my MBP, I did not insert the USB drive inside the USB slot first. After going into the start up menu, then only I insert the USB drive. Next thing, the Install OS X El Capitan menu will appear. Not sure why it did not appear when the drive is pre-insert prior to booting. Just try to insert the drive after you see the boot up menu screen. Good luck!
Thanks! After browsing through a lot of web sites when not finding the bootable USB-drive, this was the only solution that worked.
I have the Installed.dmg file only, how do I use this command for that image?
Been trying all night. Can leave it go for an hour and process still stuck at either 8.1 meg or 13.9 meg. Results are the same using the terminal command as from Disk Maker X 5. 2 different USB sticks. If its not one error it is another…
The disk could not be created because of an error: An error occured: -10006. Finder got an error: Can’t set disk “Install OS X El Capitan” to “DMX_Workdisk”.
thanks
very good
I go through the whole process and have tried it several times and the same statement comes up before saying its done.
Erasing Disk: 0%… 10%… 20%… 30%…100%…
Copying installer files to disk…
Copy complete.
Making disk bootable…
Copying boot files…
Failed to copy kernelcache, “prelinkedkernel” couldn’t be copied to “.IABootFiles”.
Done.
Did the process work?
How long does it take to finish?
I too got same result (got that prelinkedkernel couldn’t be copied to .iabootfiles error when making media from the 10.11.6 installer); even tried to boot to that installer in case it didn’t matter, but the USB stick didn’t show up as an option (and this was on a machine that could boot to USB 3.0; i.e. no need to worry about firmware update or using 2.0 as another factor or “sudo diskutil enableownership /dev/disk3s2” type command).
Since I used my keyboard hub (Mac Pro), decided to try with the USB directly attached to the back of my Mac: still same error; so, since I also happen to have 10.11.5, tried with that minor earlier version: createinstallmedia run works without the aformentioned error!
I could have also not been stubborn and tried another USB stick (so if you aren’t lucky enough to have hoarded another minor version of El Capitan, maybe try another stick, because that might just work as well?).
Note: since this years later, maybe this is just for another reader? So why not still post, especially since some of the older Intel chips are limited to El Capitan 10.11.6 now (like pre 2010); and, side note: if you have one of them earliest Intel Macs that can’t get past Lion, probably time to pitch it or use it offline!).
I have been trying several times to make a bootable drive out of a 64 gb drive and I continue to get the error message below.
sudo /Applications/Install\ OS\ X\ El\ Capitan.app/Contents/Resources/createinstallmedia –volume /Volumes/ElCapInstaller –applicationpath /Applications/Install\ OS\ X\ El\ Capitan.app –nointeraction
sudo: /Applications/Install OS X El Capitan.app/Contents/Resources/createinstallmedia: command not found
rename your drive “ElCapInstaller”
Everyting goes fine with the format of the USB, the create of the installer on the USB and I can even launch the installer from the mounted USB in Finder after it’s created.
BUT….When I use the option key to boot the MAC, I get the USB Install Option, it thinks for a while as it loads and then I get a circle with a line through it and it stops. It can’t boot to it.
Is there a way to fix the boot process?
Same problem..here!
Mid 2010 15″ Pro 2.8 i7 4 gig 500HD
Same problem here. Everything appears to be ok (USB drive shows bootable, etc.). But while booting from USB, after a minute or so, I get a CIRCLE with a LINE through it.
exact same issue here, did you ever find a fix for this?
I did this, but every time I boot my Mac up with the flash drive, it goes straight to Recovery Mode. I was trying to go back to OS X El Capitan 10.11.1 after being in the beta, so I erased my hard drive and tried to do this.
Safe to clean install El Capitan… saw there was an update in the app store and reviews trash the new update… will all these random issues affect the clean install?
Convinced of the usefulness of such a bootable USB OS X El Capitan, I’m grateful for the instructions to make it, which have worked perfectly.
Had a 32GB USB which was formatted as exFat before I started.
Started the usual recovery mode using CMD+R, went into Disk Utility and erased my USB which resulted in an Extended (Journaled), quit utility and selected install OS X, then selected my USB drive, didn’t have to use terminal commands at all nor download an installer from app store…just went with the ‘Install OS X’ option.
Hope I’m not a lesser geek for not using Terminal commands!
Macs-MacBook-Air:~ macos$ sudo /Applications/Install\ OS\ X\ El\ Capitan.app/Contents/Resources/createinstallmedia –volume /Volumes/ElCapInstaller –applicationpath /Applications/Install\ OS\ X\ El\ Capitan.app –nointeraction
Password:
sudo: /Applications/Install OS X El Capitan.app/Contents/Resources/createinstallmedia: command not found
Macs-MacBook-Air:~ macos$
whats wrong?
Thanks
Awesome, thanks! Worked perfectly first time.
Took 30 minutes on a 16GB USB3 stick.
Thanks Paul!
Hi there.
I keep getting this after entering the code and my password.
/Volumes/ElCapInstaller is not a valid volume mount point.
Victorias-MBP:~ Victoria$
I’m determined to make this work for a clean install on my old MacBook Pro (June 2007)
Any thoughts? Should I try another usb? I’ve followed the instruction through several times.
Thanks in advance.
Sounds like you haven’t formatted your USB properly. Trying another USB might be a good option but I just think you aren’t formatting the USB properly.
I think I know why the installer takes so freaking long to make a usb key. If you open up activity monitor and watch the speed at which it writes to the USB key you will probably see it is terribly slow. Mine measures around 4.5MB per sec. Which is nowhere near the 30MB to 45MB I get when i xfer a file to that same drive. I have tried many many things and it was stuck at around 35KBps before I disabled Spotlight. is anyone else receiving terrible throughput when creating? I have tried multiple keys and all, but after about 40 mins it did finally finish. :)
If your installation seems to be stuck on “Copying installer files to disk…” you can get a bit of status as follows:
1. Open a new Finder window
2. Click on your installation drive, which the installer renames as “Install OS X El Capitan”
3. Watch the file size change.
I did not downloaded the file at the apple store but a torrent, so I only have the installESD.dmg , because my mac app store not wanted to download.
how do I do the installation from this file on creatmediainstaller?
After entering my password I receive the message /Applications/Install OS X El Capitan.app/Contents/Resources/createinstallmedia: command not found. I am using the correct name that I created in my Mac OS X (Extended Journaled Partition) Does anyone have an idea why?
Did you specifically download the El Capitan Installer onto your computer (into your applications folder)?
You need to go to the Apple web site (App Store) and download OS X El Capitan.
When you try to, it will (presumably) tell you “You already have El Capitan installed on this computer. Hit continue if you want to download a full copy of the Installer.” Hit continue and then let it download (took 5+ minutes for me).
Then your computer will automatically launch the Installer program on your computer. “Quit” out of it and then use Finder to double-check that “Install OS X El Capitan” is in your Applications folder.
You should be good to go after that.
After entering my password, I get this, /Applications/Install OS X El Capitan.app/Contents/Resources/createinstallmedia: command not found.
I’m from the Netherlands and the Installer in Applications changed it’s name to OS X El Capitan-installatie .
Can this be achieved using an SD card instead of a USB drive? I have a Macbook Pro 2013 model with native SD slot and plenty of 16GB Sandisk Extreme SD’s laying around doing nothing.
My iMac can’t change its USB drive name to ElCapInstaller…I just used Installer instead.
Why are people having so much trouble?
Just copy the El Capitan installer, without changing its name, to the Application folder.
Then follow the Paul’s instructions.
1. Change USB drive’s name to match the command line –> ElCapInstaller
2. Copy and paste the terminal command lines and run it in Terminal
3. Enter a password and wait for the done word
Can’t verify the bootable USB?
Follow Paul’s date change.
Very simple and worked.
Mine was reset to 2000 went I unplugged my battery.
https://osxdaily.com/2015/01/19/fix-os-x-install-errors-cant-be-verified-error-occurred-preparing-mac/
HELP! My IMAC (2012) will not create an El Capitan install disk. I tried the method you recommend with terminal and i also used Diskmaker X5. For both ways, the system went thru the entire copying process. However, at the end the last two lines show “Erasing 0%, . .10% . .20% . .30% . .100%” and then “The copy of the installer app failed.” I tried multiple time using different USB sticks and re-downloading El Capitan from the app store. but it keeps giving the same results (the copy of the installer app failed).
I am not familiar with Diskmaker X5 but have formatted the USB properly? I’d make sure you use Disk Utility to format the USB properly.
Will it work on latest MacBook pro 2015 (Apple service centre says 2015 macs need to download individually and cant be done using bootable usb). pl clarify
My problem is “to copy kernelcache” See here:
Password:
Erasing Disk: 0%… 10%… 20%… 30%…100%…
Copying installer files to disk…
Copy complete.
Making disk bootable…
Copying boot files…
Failed to copy kernelcache, Het bestand ‘prelinkedkernel’ kan niet worden geopend, omdat het bestand niet bestaat.
Done.
What can i do?
Arno
My problem is solved!! I restarted the MAC and started from the begin and….
Password:
Erasing Disk: 0%… 10%… 20%… 30%…100%…
Copying installer files to disk…
Copy complete.
Making disk bootable…
Copying boot files…
Copy complete.
Done.
I don’t no why but it works ;-)
Arno
Arno thanks dude!
The problem was that the installer was ready to roll and therefore the command was failing, so I quit it. I also restated my machine and then it worked!
Slow…but steady on a 8GB Flash Drive
The error is caused by the El Capital installer having a hold on the file. Just close it (Cmd-tab to see it) and restart the operation.
In case this helps anyone, I was getting a similar error and found that simply using a different flash drive corrected the problem. Apparently my mac didn’t like the first one i tried.
This syntax is not working for me:
sudo /Applications/Install os x ElCapitan.app/Contents/Resources/createinstallmedia –volume/Volumes/ElCapitan –applicationpath /Application/Install os x El Capitan.app –no interaction
(had to change the name of the USB to just “ElCapitan” because my SanDrive said “ElCapitanInstaller” was too long.
Terminal gave me this message:
sudo: /Applications/Install: command not found
you’re not escaping the command properly and there are inappropriate spaces in the syntax
use copy and paste, exact syntax is important
I did copy and paste. Only changed the name of my USB drive.
Tried changing capitalization to see if that helped. Here’s the latest attempt:
sudo /Applications/Install OS X El Capitan.app/Contents/Resources/createinstallmedia –volume/Volumes/ElCapitan –-applicationpath /Applications/Install OS X El Capitan.app –no interaction
Still getting: sudo: /Applications/Install: command not found
Correct, the syntax is still wrong in your example because you’re not escaping the space characters with a backslash, so the command is looking in a directory which doesn’t exist, just command line syntax handling stuff. Try this one if the drive is named ElCapitan:
sudo /Applications/Install\ OS\ X\ El\ Capitan.app/Contents/Resources/createinstallmedia --volume /Volumes/ElCapitan --applicationpath /Applications/Install\ OS\ X\ El\ Capitan.app --nointeractionYou can also use quotation marks rather than backslashes to get around the space escape necessity, like “/Applications/Install OS X El Capitan.app/Contents/Resources/createinstallmedia”
i got same problem, but finally its work for me, thanks Daryl
Hey i’m having the same problem. I’m not sure if i’m understanding the spacing rule correctly. I had to name my drive ElCapitan as well. For some reason even when I copy and paste the computer is responding command not found
PLEASE HELP!
Ok,
comments are full of trolls: “why would you do that?”, the bless command (this freaking method of using createinstallmedia command included in new OS X installers has been out since 3 years…)
Come on, get a life.
Hi guys,
i tried to install the OS X driver following these instructions but i only get this reply from Terminal: “sudo: /Applications/Install OS X El Capitan.app/Contents/Resources/createinstallmedia: command not found”.
Any ideas on where i’m getting it wrong? I’m using a small 8GB USB, Mac OS extended (journaled) with GUID partition, which according to system information has 7,65GB left. however, disk utility says only has 2,5 GB remains since i created this GUID partition (the driver is empty though). Bit confused here. Any suggestions?
“command not found” means you probably don’t have the installer app in your applications folder, or your syntax is wrong. It’s one or the other.
Thanks a ton! worked just fine for me.
Cheers!!!
For some reason, the disk creates without a problem in another mac, 1 partition, GUID, Mac Journaled Extended, then I paste the createinstallmedia and it runs, 0%, 10%, 20%… done!
Then I boot the mac that needs the clean install, I press option, startup options appear. The regular OSX disk appears, the recovery disk appears, but the external HDD with ‘Install’ won’t appear!
How do we prepare the flash drive first?
Use the Disk Utility to partition the USB.
i got this:
Couldn’t mount dmg /Volumes/Install OS X El Capitan/Install OS X El Capitan.app/Contents/SharedSupport/InstallESD.dmg (error code 110)Mount of outer dmg failed.
Done.
Hi guys, thanks for the guide but I have a issue.
When I press option and I choose to boot from USB, it shows a strange sign (like the a “no parking sign” grey) and then it boots automatically from the normal partition of the hard drive.
Does someone knows how to resolve this issue?
You probably have an OS X build mismatch. The build that is assigned to the image you create with this workflow depends on when you downloaded the el cap install app from the app store. Since el cap is the newest release, Apple is still releasing new builds in the App Store.
The Mac you’re using to option boot your USB drive has a different build than the OS X flavor you put on the USB drive.
see this article for more information on builds
https://support.apple.com/en-us/HT204319
I’m having the same issue. Trying to gather what you’re saying. It sounds like you’re saying that the option boot mac is a different build than the version of el capo downloaded from the other mac. If this is the case, can this be changed or adapted to work with the option boot mac? I’m trying to use my flash installer on an old 2007 mac. Everything went fine in terminal, it’s just on the install i’m having trouble with
my typed this
sudo /Applications/Install os x ElCapitan.app/Contents/Resources/createinstallmedia –volume/Volumes/ElCapInstaller –applicationpath /Application/Install os x El Capitan.app –nointeraction
did you name the volume you’re actually restoring to “ElCapInstaller”?
You need to make sure that the volume / USB drive name you’re restoring to is identical to the one the OP is referring to or the code when pasted into terminal won’t work.
sudo /Applications/Install os x ElCapitan.app/Contents/Resources/createinstallmedia –volume/Volumes/INSERTNAMEOFYOURVOLUMEHERE –applicationpath /Application/Install os x El Capitan.app –nointeraction
Make sure the area where I typed, “INSERTNAMEOFYOURVOLUMEHERE” matches exactly with the name of your external volume.
I need your help i am getting this message
sudo: /Applications/Install os x ElCapitan.app/Contents/Resources/createinstallmedia: command not found
JOYs-MacBook-Pro:~ joyjacob$
Terminal is stuck on copying installer files to disk. Has been copying for over 30 mins and still has not finished. Is it supposed to take this long to copy the files?
Chandan, there is a mention in the article about how long it takes to build the installer drive for OS X El Captain:
It has not completed until you see that ‘Done’ message.
1. I have to download & put ‘Install OS X El Capitan.app’ in /Applications folder
2. I have to format USB and make the name as ElCapInstaller
3. I must quote ‘Install OS X El Capitan.app’ instead of Install\ OS\ X\ E1\
sudo /Applications/’Install OS X El Capitan.app’/Contents/Resources/createinstallmedia –volume /Volumes/ElCapInstaller –applicationpath /Applications/’Install OS X El Capitan.app’ –nointeraction
I get this message- sudo: /Applications/Install OS X El Capitan.app/Contents/Resources/createinstallmedia: command not found
Specifically-
MacMans-MBP:~ macman$ sudo /Applications/Install\ OS\ X\ El\ Capitan.app/Contents/Resources/createinstallmedia –volume /Volumes/Untitled –applicationpath /Applications/Install\ OS\ X\ El\ Capitan.app –nointeraction
Password:
sudo: /Applications/Install OS X El Capitan.app/Contents/Resources/createinstallmedia: command not found
MacMans-MBP:~ macman$
It sounds like you don’t have the ‘Install OS X El Capitan.app’ application in the /Applications/ folder so the command within the app contents isn’t being located. Make sure the app is in /Applications/ and then start from there. If you already installed El Capitan, you’d need to download it again.
sudo /Applications/Install\ OS\ X\ El\ Capitan.app/Contents/Resources/createinstallmedia --volume /Volumes/Untitled --applicationpath /Applications/Install\ OS\ X\ El\ Capitan.app –nointeraction1. I have to download & put ‘Install OS X El Capitan.app’ in /Applications folder
2. I have to format USB and make the name as ElCapInstaller
3. I must quote ‘Install OS X El Capitan.app’ instead of Install\ OS\ X\ E1\
sudo /Applications/’Install OS X El Capitan.app’/Contents/Resources/createinstallmedia –volume /Volumes/ElCapInstaller –applicationpath /Applications/’Install OS X El Capitan.app’ –nointeraction
keeps coming up with this when i try the code
Failed to start erase of disk due to error (-9999, 0).
A error occurred erasing the disk.
Same here, ejected USB ,plugged it back and relaunch terminal, it should work, also relaunch finder
didnt work for me
to make a partition >8 in internal to be a bootable medium for fresh installing also OK actually,
if you do not have usb externals.
I downloaded El Capitan last night, but when I try install it I get a crash error report. I looked for solutions online and they suggested to use a USB drive which I tried and it still didn’t work. Now I can’t access my user account, desktop, documents at all. It seems to be stuck in a loop every time I reboot or try again. I’m using a Macbook Pro 15″ Retina with 16GB RAM. How can I solve this?
if a OS partition where your documents stored can not be started anyway,then….only way i know… start from another partition with an OS installed, copy out your data ,and re-install .?|
if you are using one partition in your mac,and don’t have an external with OS at hand. Oh,it is a trouble!
?maybe pros have other means?
I booted off the newly created El Capitan USB Flash drive, then tried to perform a clean install to a hard drive, and got the “failed to verify this copy of the installer” error. The original downloaded installer works fine.
I read your article on this issue which says to change the time settings, but there are no time settings when booting off the flash drive.
Thoughts?
Very good, I´m gonna try it soon. Thank you!
After installing el capita in on the Mac can the flash drive be used as a normal one again
yes of course. to gain more space, you need to delete the contents of or erase/format your usb stick. if you need to use the stick on a pc as well, format it to msdos fat.
how long does it take to make a USB Flash drive. it says
Copying installer files to disk….
its been like this for the past 30mins.
MEH!!!
It will tell you ‘Done’ when it has finished creating the USB install drive, it can take an hour.
Thanks. That’s a rather important piece of information missing from the article! I would have expected it to finish quickly – it’s only 6GB or so after all – so it looks as if terminal has hung.
Been searching everywhere for this nugget of information! I assumed it had failed because it was out running errands and it still said copying when I got back so I quit Terminal and tried again to the same effect. I guess I’ll just leave it overnight and hope it’s done in the morning.
I didn’t see DiskMaker X 5 mentioned. For most, it is a better option, and it’s donationware.
http://diskmakerx.com/whats-this/
Used it many times. It’s a fine solution.
I have made the installer flash drive. I used the “option” key and rebooted. The installer did its thing, but didn’t erase my HD. After the install finished my settings and files were still there. What did I do wrong??
You need to enter Disk Utility while booted into the USB. Then you need to erase your HD.
Thank you for the clear and easy instructions. Even though I have a fast internet at home, my office is blocking Apple updates because of the heavy bandwidth being used since the iPhones were released. They will unblock this later, but for now, there is no other way to update. Also, a friend has no wifi at home, and uses her Mac tethered to her phone. She doesn’t have enough data to download a 6 GB installer. I’ll lend my stick to her, too. Great article. Thank you.
Most difficult part here is creation of bootable disk.
This morning I used http://diskmakerx.com/ for this, very simple.
Hi folks,
what is with the slash after the /volume name/ –app… ?
I guess there have to be a sign too.
grz
/volumes is used to contain something that holds information, in this case the flash drive name . Each flash drive, external disk, device connected to your Mac may be considered a volumne. In this case you are just letting the createinstallmedia command know that the volume containing the installation “media” know that you can boot from it.
Grant me this, that I base the above information on multiple years of Unix experience without delving into the details of each command and that I’ve been out of that world for 15+ years and right now I’m using all the wonderful information here to recover a hard drive that failed with the intent of using a clean install of El Capitan on a late 2008 MacBook (core 2 duo) with a hybrid drive that crashed by replacing the hybrid with an SSD (currently external) that once I have this bootable USB will use it to install El Capitan, then use my time machine backup to recover the data.
(Also grant me that back in the day, long sentences were used to tie together several subjects/concepts into one, where now, everyone wants single bullet points. So, to achieve that:
HD (hybrid) crash.
Have time machine backup.
Want clean OS (not multiple upgrades) on SSD.
Use this article’s info to achieve. (Plus it’s reusable.)
Have just (20180524.2330CT) completed USB bootable. (“Done.”, as in article “You’ll then see the following screen text in the Terminal:”)
Will attempt clean install tomorrow.
Restore data from time machine backup when I have time.)
Thank you original article posters (PaulH/Binary?).
When pasting your lines in Terminal, I get this message: “sudo: unable to stat /etc/sudoers: No such file or directory
sudo: no valid sudoers sources found, quitting”.
Any easy helping hand? TIA
Your account may not have sudo access – you may not be an administrator of your Mac. Is parental controls or some kind of mobile device management running on your Mac?
If your Mac isn’t yours (like a school’s or business’s) then you may need to ask permission to run this kind of install.
Thanks for the reply.
Actually, the Mac is mine; bought it last year, with OS already on it. All i did at that time was to install Yosemite over Mavericks..
Is there an easy way, now, to gain or regain sudo access?
I have never been able to make my 32 GB USB drive bootable from my machine. The drive is visible once the OS has loaded (including the installer on the drive) but my Mac doesn’t see it as a bootable drive. If i follow the instructions for a external HDD (spinning type) it boots no problem. It just seems my Mac can’t make USB sticks bootable. Any ideas?
Running into the same problem here, as well. I’ve successfully done this procedure for Mavericks and Yosemite, so I’m concerned about El Capitain.
Have you ever found a solution to this or even a reason it should not work?
I have a 32GB SanDisk and cannot believe it starts booting then goes nowhere
When I follow your directions above I get the erasing disk…. copying installer files….. and I notice my San cruiser name is changed from ElCapInstaller to Install OS X El Capitan. Then after a long while I get this message:
Copy complete.
Making disk bootable…
Couldn’t mount dmg /Volumes/Install OS X El Capitan/Install OS X El Capitan.app/Contents/SharedSupport/InstallESD.dmg (error code 112)Mount of outer dmg failed.
Done.
Quit out of the “Install OS X El Capitan” application if it’s currently open. Also quit out of Disk Utility and make sure there isn’t any other activity going on with the DMG file, the installer, or the target USB flash drive.
The 112 outer dmg failed error typically happens when the OS X El Capitan installer file fails to download properly, or if there is something wrong with the target USB flash drive.
You can attempt to verify the DMG file with this:
hdiutil verify /Applications/Install\ OS\ X\ El\ Capitan.app/Contents/SharedSupport/InstallESD.dmgBut, you almost certainly need to either re-download the OS X El Capitan installer again, or use a different USB flash drive to begin with, either should remedy the “error code 112” ‘Mount of outer dmg failed’ message
Sadly downloads can still get corrupted – I wish there was more file hashing available to these relatively critical downloads like OS updates.
Be glad you didn’t make an installer based on a bad download! :)
I deleted installer file. Downloaded it again. Performed the upgrade. Downloaded the installer again and then made my bootable installer disk. Worked perfectly! Thank god for my 150Mbps. Thanks for the reply.
Last time I created a bootable drive I had to do something like:
sudo bless -folder /Volumes/ezq/System/Library/CoreServices
How come you don’t have to “bless” anything?
The included createinstallmedia command makes the USB volume bootable automatically, which is basically what a ‘bless’ command does. It shouldn’t be necessary to do anything else, as long as the USB flash drive is already formatted to HFS+ format for the Mac.
Why would you do that? You can download it anytime you need to. And the download was super fast.
Bootable installers are good for many reasons
– don’t need to download it again
– download once, install on many Macs
– have a bootable repair drive handy if need be
– clean installing OS X El Capitan,
etc
You don’t need it to clean install. You can also do that by using the Recovery Partition.
My main reason for doing this that I have a iMac that pooped out. I can fix it by booting it from a bootable drive. Did this to my a thumb drive, voilà, I can now boot my hurt machine with a new OS.
Test is a dumbdum. Great article.
Why?
I have three machines to update. My internet connection is 3Mbps at max. The connection to Apple is downloading at 40kB/s.
So the short answer is YOU don’t have to do it. Others may, and are very grateful for this information. Enjoy your speed! Hope to have something like yours some day in the near future.
You don’t need to download it for each machine, you do t once and keep the installer for further use.
Don’t be so obtuse… once you install it on the machine you’ve downloaded the installer deletes itself.
The same way it has on the last of the five OS X releases over the internet.
Trust me, this article is actually useful to people – maybe not you – but many others.
You make a copy of the installer and save it in another folder or external HD before installing.
Now you have it forever and is a faster and easier procedure than making a bootable copy in a pendrive. I think this helps.
Because I’m replacing the HD in my old Mac mini with an SSD.
Same here, this is a great find!
You can install without an internet connection. THIS was what I needed.
I have to upgrade 50+ Machines and I have a terrible wifi connection being shared with 30 other employees, some people do need this.
Seems Apple has removed the downloads… another good reason to make an installer *before* it is not possible.
I have an external hard drive with multiple volumes and I was wondering if this command will erase the whole drive or just the volume specified in the command?
It only affects the volume specified.
after entering command in terminal can’t type my password, i can’t type anything. any fix?
A password will be entered if you type it, but the password does not show up in the Terminal as you type, that is a security precaution that exists with the command line. More info here:
https://osxdaily.com/2015/02/04/terminal-wont-show-password-when-typed/
Do you have the terminal instructions to create an El Capitan install disk using Snow Leopard?
Should be the same. But there is also this utility that does everything for you: http://macdaddy.io/install-disk-creator/
Nope, none of these tools support Snow Leopard. Been trying to use a Snow Leopard Macbook Pro to create an El Capitan install USB stick or recovery partition creator for a botched El Capitan Macbook Pro that has no recovery partition, and none of the tools run under OSX 10.6.
Ben, did you find a solution?
I downloaded El Capitan, and am using a Snow Leopard. DiskMakerX that creates the image doesn’t work on my system, and earlier versions of DiskMaker don’t make images of El Capitan.
I tried the Terminal commands, but also didn’t work. Kept showing errors.
Please give advice if you got any!
Many thanks,
Jawad
I copied the syntax and tried typing osxdaily.com as password but failed all the times. any help please?
Why would you type a website as the password unless that is your password? Type your own password, not something else.
Hahahaha…
hahaha
Where’s the “any” key?
SOLVED!!!
I face trouble in creating el capitan USB then i found this link to buy the USB,
They provide USB 16 GB with VERY EASY installation manual by which people like me can install El Capitan perfectly.
El Capitan USB 16 GB installer – Mac OS X – VERY EASY CLEAN INSTALL – YOU CAN DO IT – Easy Instruction Included. BONUS: you will get 16GB USB later after when your installtion completed.
http://www.amazon.com/dp/B0145QIW7W/ref=as_li_ss_tl?ie=UTF8&linkCode=sl1&tag=oxd-20
That make my life easy bcoz I save my time to engage more on my work.
what a news Belal,
So happy you got now time to engage more on your work by trying to advertise your key…
That’s pretty lame Belal, trying to make a buck off of someone else’s work. Folks, don’t click his link that has an Amazon referral code that pays this douchebag a commission on whatever you buy at Amazon