How to Clean Install OS X El Capitan on a Mac
Some Mac users may like to perform what is known as a clean install with OS X El Capitan. Basically, a clean install involves erasing the Mac drive and starting fresh with a new installation of OS X 10.11, and users who opt for clean installs usually rely on their own personal backups to restore their personal file and data.
While most Mac users are well served by running the normal update process to OS X El Capitan after it has been downloaded from the Mac App Store, this guide is for users who want to start fresh.
You will need to have made a bootable OS X El Capitan installer drive with a USB flash key to perform a clean install. If you have already installed OS X 10.11 on the Mac, you can download it again and create a boot installer with these instructions.
Remember, a clean install will erase everything, format the hard drive, and then install OS X El Capitan with nothing else on the Mac. If you are choosing to do this, you need to backup your data yourself, as erasing the volume and performing a clean install means nothing is coming with it. This is generally best for advanced users. If you don’t know what you’re doing with a clean install, and you have not made backups, don’t try this, you will lose data.
How to Clean Install OS X El Capitan & Start Fresh
- Start and complete a backup with Time Machine before beginning. Alternatively, perform your own backups manually. Be sure to back up your important files, pictures, data, or whatever else – do not skip this. Performing a clean install will erase the Mac and you will lose any data you do not save to an external volume
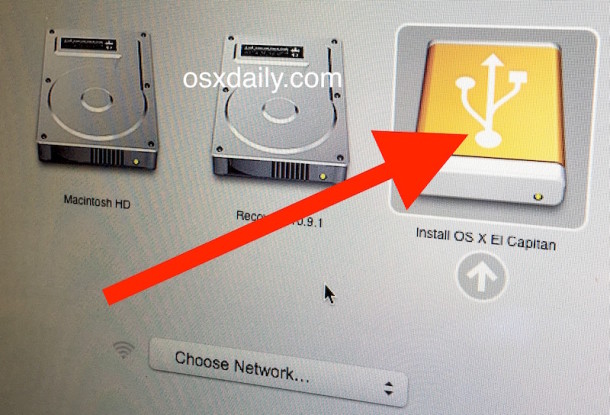
- Connect the bootable USB El Capitan install drive to the Mac, then reboot the Mac
- After you hear the boot chime, immediately start holding the OPTION key during boot, continue to hold until you see a boot loader menu appear, at this screen choose “Install OS X El Capitan”
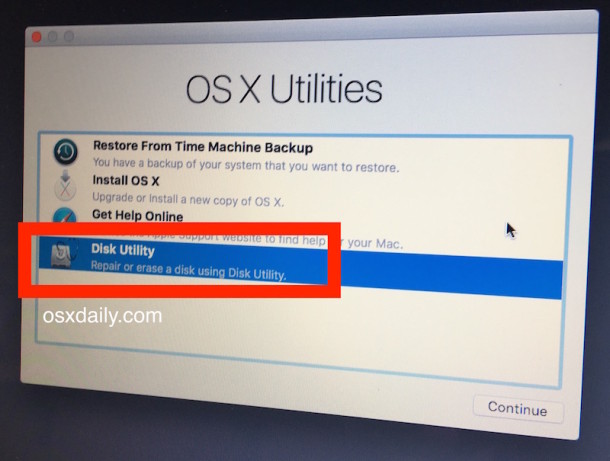
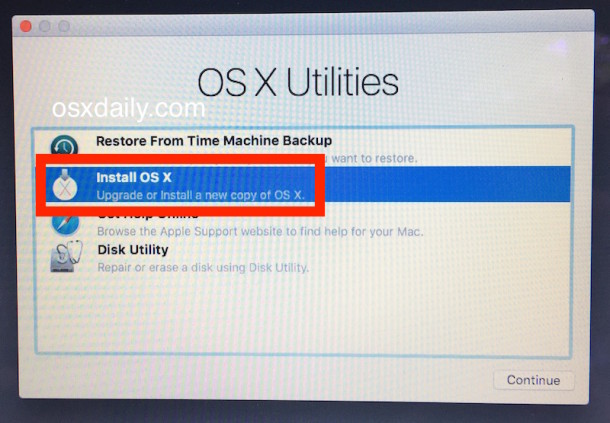
- At the “OS X Utilities” screen, select “Disk Utility”
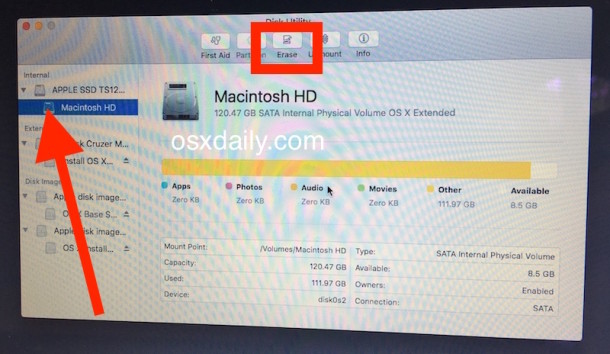
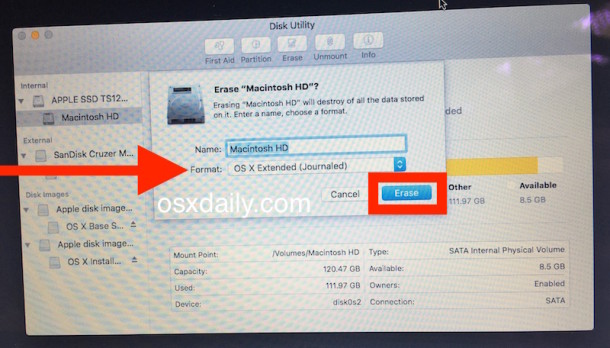
- Select “Macintosh HD” (or whatever the name of the target Mac drive), then click on the “Erase” button
- Give the drive a name or keep it the same, and under “Format” choose “OS X Extended (Journaled)”, then click on “Erase” – THIS ERASES EVERYTHING ON THE MAC, THIS IS NOT REVERSIBLE
- When the drive is finished erasing, quit out of Disk Utility to return to the “OS X Utilities” screen
- Now choose “Install OS X” from the menu, click Continue
- Agree to the terms, and choose “Macintosh HD” (or matching whatever the name you formatted the drive to) from the list and click on “Install”
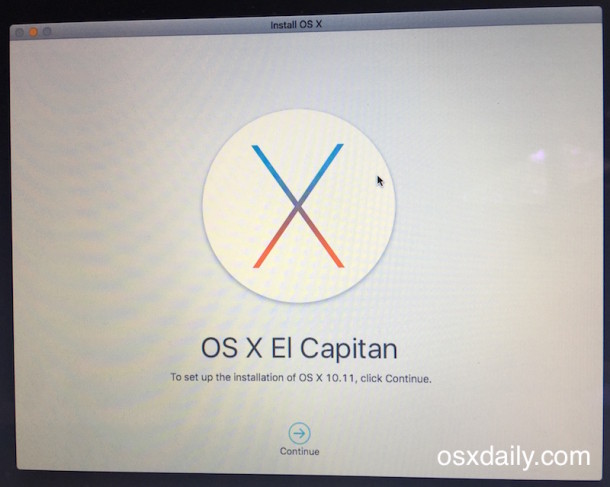
That’s it, OS X El Capitan will perform a fresh installation on a now empty hard disk volume that you just formatted. Completing a fresh installation of OS X 10.11 can take a while, so be prepared for at least 30 minutes to several hours, depending on the speed of the drives in use.

When finished, OS X El Capitan will boot into a brand new clean install, running through the initial OS X setup process on the Mac as if the Mac was brand new. No files, no data, nothing will be on the Mac except for what comes with OS X El Capitan, that is what a clean install is for.
Now you’re ready to manually move your files and data back to the Mac, or start as new with nothing on the Mac, whatever works for you.

I’ve tried this process with no success. I downloaded the El Capitan from here: but when I boot up my iMac holding the option key and select my external hard drive with the operating system it appears like it’s going through the install process until it gives me this error message “No packages were eligible for install. Contact the software manufacturer for assistance. Quit the installer to restart your computer and try again” I think it may be a problem with the software I downloaded from MacGo. Is anyone aware of another place I can download El Capitan? I followed this process for setting up the bootable flash drive https://osxdaily.com/2015/09/30/create-os-x-el-capitan-boot-install-drive/ . Model No: A1224 Thank you!
You should only download Mac OS X and macOS installers directly from Apple, you can find some helpful links here:
https://osxdaily.com/where-download-macos-installers/
El Capitan directly from Apple is available at this link:
http://updates-http.cdn-apple.com/2019/cert/061-41424-20191024-218af9ec-cf50-4516-9011-228c78eda3d2/InstallMacOSX.dmg
Boot with these args -v -x
Bro reboot it in safe mode or try these boot args -v -x
All I’ll say is don’t do it on a pen drive, I tried and left my computer running for 2 days and eventually gave up…
Then I tried with a clean partition on a firewire external hard drive and was up and running in about an hour…
Mac Pro 3.1 with SSD and I made the installer using Disk X
Thank you. Days of lost work, being brought to tears, pages and pages of other instructions that all seemed to leave out one important step and I finally found yours and the instructions were as straightforward as a recipe for Rice Krispie squares. I’ve reclaimed my computer (and income).
At Step 6 I get the message “Wiping volume data to prevent future accidental probing failed.”
So I get as far as the screen in step 4. At that point, nothing happens. Hitting return key or clicking the trackpad on the option chosen — nada! Now what? Please!
How do i do a clean factory Restore to get my Mac ready for OS Sierra On Tuesday.
I done this clean install by this way once but again I cant access to utility menu by bootable flash.
When I select bootable flash , my macbook go to the white screen and mac’s fan take double action and shut down my mac suddenly. Again and again I cant access.
What is your idia about this problem ?
Try resetting your Mac SMC
https://osxdaily.com/2010/03/24/when-and-how-to-reset-your-mac-system-management-controller-smc/
Next try to reset Mac NVRAM
https://osxdaily.com/2010/11/15/reset-pram-mac/
It is possible you have a hardware problem if that does not fix the issue.
I am trying to follow this. Have gotten to the point of making the USB installer. No problem with holding the Option Key and getting choice of HDD and Flash drive. Problem comes when the USB Installer boots. It goes directly into OS X El Capitan install without giving me the OS X Utilities screen. Do I have to hold something else down as the system boots?
Great article, but for some reason I am stuck on the las step. I’ve formatted the USB, transferred the installer app via the terminal syntax, and verified it is the only file on the USB. But when I test whether it works, I can’t get to the start up menu to choose the USB. I can guess two possible reasons: either the iMac doesn’t recognize the USB as a boot disk, or the procedure of holding the option key doesn’t work with a wireless keyboard because maybe the drivers aren’t loaded prior to start up? I could use some advice!
This is the best article so far especially for those who are having unusual situation:
1) brandnew HDD ( your purchased because you internal HDD stop working ).
2) you already have USB thumbdrive with bootable OSX Ei Captain.
3) you don’t want to connect to internet for OS install ( i.e you want to do offline because you care about security )
I’ve read so many article about how-to on my situation but they are flooded with backup/time machine/iCloud bs and the real technical info are missing or confusing. Your post solved my problem so congrats for a good write up.
I erase my MacBook Pro and I try to reinstall OS X but it shows me to download and restore OS X, your computer’s eligibility will be verified with Apple and I click yes then it shows me could not find installation for this machine. So please how can I do?
Reboot and hold down Command+Option+R keys to start Internet Restore
https://osxdaily.com/2014/12/14/reinstall-os-x-mac-internet-recovery/
You can also try normal Restore mode, but Internet Recovery is more likely to work if you get an error like that
https://osxdaily.com/2016/02/09/howto-reinstall-os-x-mac-recovery/
Another option would be to reinstall mac OS X with a boot disk if you have one.
Good luck!
Thanks! Upgraded mid 2012 Macbook to ssd drive and wanted a fresh install of os x. I replaced hard drive and memory; plugged in bootable USB with installer and started up, formatted new drive, and installed El Capitan from usb. No Time Machine, just uploaded photos and files needed New Mac in no time! Thanks for the clarification! I’d worked on upgrading Windows PCs before but this was a lot less hassle!
Hi,
I pressed OPTION right after I heard the chime and held it during boot, but nothing happened. Suddenly it came directly to the sign in screen. I didn’t see any boot loader menu. What did I do wrong? Is there any other way to bring out the boot loader menu?
while holding down the option button pres and release the power button while still holding option until you see the boot menu
When I get to the install it tells me that it cannot download do to an unknown error. What do I do?
I ran through your steps and have created the bootable OS X on a flash drive. I did not create a backup but have all my important pics and such in iCloud. When I go to the utilities to now boot a new OS, the once MacHD doesn’t allow anything including journaling for the clean install. Um, what’s my next step here? I’m at a loss. Terminal or something? Please help and thank you in advance
Hey guys,
When I boot up and hold option and then select El Capitan, my Mac does to a screen with the apple logo and a loading bar but it only loads to around 2/3 of the way and then just sits there and I don’t know what to do. From the article it didn’t seem like there should be a long wait between that screen and the disk utility options.
It would be super duper appreciated if anyone could please help me, I’m not sure what to do now.
You may want to try recreating the installer disk (format the Flash USB drive, create a new one with a new installer from Apple), or use a different flash USB key to make the drive out of it.
Also make sure the target Mac is compatible with El Capitan. The installation can take a while but should proceed and complete within a couple of hours.
So after doing this and having a fresh install (basically like a new computer), can I use Time Machine to restore and have it back to original? Is there a link to that tutorial? Thanks
I’m working on a network of several computers that I hope to begin updating to El Capitan. So, if I skip the disk utility section of this tutorial, I can still use the USB bootable drive to just update to El Capitan without a clean install and without having to download the installer files onto every device, right? Thank you for your help!
I did this tutorial and all seemed to work well right up to the point of clicking the install OSX button. Nothing happens when I click it, the “Continue” button just blinks. Everything up to that step worked flawlessly. Now i have a presumably correctly created USB with El Capitan install on it but the machine won’t install.
My problem exactly! Can anyone help us?
Did you find any solution?! I am installing Mavericks on my iMac right now and I have the same problem!
Please helppp!!
Not work, attempting to install El Capitain a wild PROHIBITED symbol appears
i tried doing the clean install from usb and suddenly my mac restarted. now it only goes to internet recovery mode. i cannot select boot menu on start up. Can you help me please?
Thank you
Followed every step. Started set up installation and when I tried to select the newly formatted HD I was told it has SMART errors that can’t be repaired (wouldn’t allow me to install). Went to Disk Utility and ran First Aid. It says the disk appears okay but still get the SMART errors message when I try to install. Advice please. Thank you.
Hi,
clean install done. Everything went easy. Now I wonder if I start doing Time Machine backups will new backup erase old OSX backups? I would like to save them for later use. How to start new backups with El Capitan and save old OSX backups?
sorry for the noob question…. does my warranty or apple care will be erase as well when i do a clean format? thanks!
Thank you very, very much for your tutorials. They are very clear. You saved me a trip to the Genius Bar, and now I know how to erase a hard drive and make a bootable disk. Thank you, thank you!!!!
Melissa – reboot and hold down the OPTION button then select the drive containing the El Capitan install files as described above?
Ok- so I got my Mac erased and when I try to reinstall it wants to install mountain lion- not El Capitan. I have a USB with El Capitan on it but I don’t know how to install it from there. Can someone help??
I want to clone my existing OS to a new SSD. Is there a way to do it?
I have it connected via USB and after copying I would just change the SSD´s.
Does it work with Capitan?
Thank you
You can clone an existing OS to a new drive by using something like Carbon Copy Cloner or SuperDuper, both are third party pieces of software for Mac. That will not perform a clean install, it will perform a direct copy of the entire hard drive, however.
Hi folks, for the non-tech savvies, pls advise;
The above article says: “Remember, a clean install will erase everything, format the hard drive, and then install OS X El Capitan with nothing else on the Mac.”
So, what about the Bootcamp drive ?
Is this considered as a separate hard-drive, and will not be erased during a clean install ?
Or will Boot Camp users also need to back-up and migrate the contents of their Bootcamp partition ? (Especially proprietary docs and precious MS Office licences etc).
Much obliged.
Joeri
(Muscles from Brussels)
By the way, Bootcamping Windows may involve a Windows Migration program (“program” is Redmond, Washington language and translates to “app” in Earth Midpoint Cupertino language)
Joeri,
You ask: “for the non-tech savvies, pls advise.”
The answer to your question is found at the end of the same paragraph you quoted from: “This is generally best for advanced users. If you don’t know what you’re doing with a clean install… don’t try this…”
Good advice.
That said… Regarding your question about Bootcamp, i think the answer depends on how you set it up. There could be a danger of losing your Bootcamp partition, depending on its configuration and how you choose to erase the drive.
Assuming you don’t lose your Bootcamp partition (or are able to restore it), then no “Windows migration program” should be required (because the Windows environment is essentially a “black box” contained on the Bootcamp partition, and thus unaffected by the version of OS X in use).
After the clean El Capitan install, after manually restoring files from Time Machine, how do you resume new Time Machine backups without deleting the old Time Machine backups? That is, so the old backups are “inherited.” Thanks.
I tried the clean install from a USB and it keeps looping. it skips over the language selection and the following message pops up:
To set up the installation of OS X, click Continue.
To repair your disk using Disk Utility, restore your computer from a Time machine backup, or perform other tasks using utilities, choose an option from the Utilities menu.
I ran First Aid on my hard drive and it is telling me its fine.
Any suggestions?
Thanks! You mention nothing about fusion drives – as if they do no exist in the mac world – I have one, and now I have my finger where I don’t want it.
Even if you had mentioned not to follow your process if one has a fusion drive, at least it would have helped!!!
Thanks so much!
There is no mention of cupcakes either, what’s the point?
Adding a note on Fusion drives would have made this article great. The point doesn’t need to be described actually.
A most excellent and hilarious response my good sir!
This article is missing two things:
The extra steps required if you have a Fusion drive (basically, you need to delete the core storage volume, and then create a new logical group and volume–detailed explanation here):
http://public.z-effects.com/CoreStorageTraining.pdf
Also, I found that multiple machines / drives appeared to hang when creating a bootable usb drive. Be prepared to wait a good hour (in my case, it appeared nothing else was being written to the USB for the last 20mins.) If you don’t wait, the USB drive won’t be bootable.
Thank you fir this.
I followed all the preparatory steps (downloaded installer, created bootable USB and formatted disk) but got an error during installation, something like: “This version of OS X El Capitan Installer can not be verified, it may have been damaged or tampered with during downloading”. What happened is that formatting the drive reset the system’s time and date settings.
Here’s how you can check if that’s the problem (and solve it!):
https://osxdaily.com/2015/01/19/fix-os-x-install-errors-cant-be-verified-error-occurred-preparing-mac/
To open a Terminal window go to Utilities > Terminal.
Hope this helps some of you!
You saved my life.
I was about to slam my face on the keyboard. Updated the date and now it’s finally installing. Can’t thank you enough.
Thanks mate.
You The Real MVP ^_^
What if I have the public beta of El Capitan do I need to install the official el capita ?
when i click on update in app store there is nothing.
how to direct download os x el capitan on pc
Using Migration Assistant undermines the entire process of a “clean install.” It’s the worst way to install a new version of OS X because it simply restores (i.e., “migrates”) all of the crap that has built up on your hard drive from the previous version of OS X on you Mac, especially in the User Library (e.g., vast amount of cache garbage, old, corrupt .plists). Although there are other ways of doing a clean install that don’t involve a “bootable version” and the use of Terminal, the bottom line is that wiping your hard drive and restoring only the files that matter–photos, videos, music, and documents–is the best way to put a new version of OX on your Mac. I’ve never lost a single piece of data after a clean install. After wiping my hard drive of all of the garbage that it has collected since the last install of OS X, I just go into Time Machine and drag over my photos, movies, music, and documents to their folders in Finder. Then install new versions of my apps (most of which have been updated to work best on El Capitan) from the Mac App Store. For those apps/sofware that I purchased on third-party websites, I just go to those sites and re-download them at no charge (assuming you still have you license information). Once you do a clean install, it’s like having a new (and much faster) Mac. Migration Assistant does nothing but migrate the crap from the previous version of OS X that a clean install is supposed to get rid of.
What about mail? Copying is enough?
For downloaded apps, I usually save their .dmg files in a folder called “Sources” (also when I update an app). That gets backed up along with everything else. After a clean install – which I wholeheartedly agree is the only way to go – I reinstall the apps from there. Usually a bit faster than re-downloading everything.
I’m in agreement that using Migration Assistant in tandem with the installation of a new OS is asking for trouble, or for at least in my case, it is.
My current OS X device, a 5-year old Macbook Pro, began with Snow Leopard. The only other upgrade done to it was Mavericks, which it’s on now. I recall doing what I thought was a ‘clean’ install of a later version of Mavericks but mucked it up by bringing in all the flotsam and jetsam accumulated along the way, saved in SuperDuper. It’s my desire to go with El Capitan, but a persistent issue with com.apple.appkit.xpc.openAndSavePanelService in TextEdit, which eventually winds up with me having to force quit it along with Finder (which it also seems to effect) leads me to believe that there is something definitely rotten in one or many of my user files and I’m convinced that following the same path as that last update with Mavericks is inviting the same headaches, only this time with a new GUI.
Funny thing; I visited a local authorized Apple repair business yesterday and after describing my concerns was told that their defacto OS upgrade policy, which they highly recommend, involves Migration Assistant as a vital part of the process.
As you mentioned, reinstalling apps, while admittedly tedious and time-consuming, is by no means an insurmountable task. Heck, my local library has Maserati-quick WiFi so it shouldn’t take all that long, and I keep all prior serial numbers and registration info in an encrypted text file on a thumb drive.
And while I do not by any means look forward to tweaking all of my main admin user’s library files to my taste, I think it pales by comparison to attempt to successfully decipher old crash and hang reports to try and determine which of a countless number of files may be the perpetrators.
A clean install was traditionally the only smart way to install a new OS9 system. And it didn’t involve erasing the volume. It installed a brand new, clean system, renamed the old system but left it on the volume. You then decided what control panels, extensions, fonts, etc. you wanted to import into the new system.
This is how a clean install should work for OS X. The risk of erasing an entire drive is ludicrous (I have heard too many horror stories relating to file recovery). A clean install followed by relinking to your home folder through Migration should you want (or create a new account) would be infinitely simpler and less risky.
You posted that once before.
It was wrong then, too. He’s describing an upgrade install. What part of ‘clean install’ does not imply nuking the disk from orbit…? You want to preserve settings? Upgrade to El Cap, don’t use a bootable USB disk to wipe your HDD.
After installed, I applied Monolingual and it works fine, followed by removal of Voice packages which I didn’t use it since Mountain Lion.
However, system apps like iTunes, Game Center, Mail, Maps, FaceTime, etc were unable to be removed which used to work in earlier versions (with administrative rights). Anyone managed to successfully removed these apps?
You are likely running into restrictions from System Integrity Check which is new to OS X El Capitan and prevents the removal or editing of root and core data if it’s enabled.
Yes, that is what I suspect. Somehow there must be a way to remove these space-hogging apps which I never use for the last few years.
Very nice tutorial, thank you!
Why not just use the Recovery HD after first doing the upgrade?
Much less chance something goes wrong (and you are stuck with the infamous question mark).
Tools such as DiskMakerX don’t tend to be foolproof as I have experienced first-hand
Hi,
Thanks for this, when i tring to install it and booting and choose os x el capitan it’s take a long long time and not finish to!!!
Is there any way to get notes between iOS8 and El Capitan working? Seems iCloud notes doesn’t synchronise between those? :/
If you clicked in “Upgrade” in the Notes app, it now requires both Mac OS X 10.11 and iOS 9.x.
How do I go back to the previous iOS? After installing El Capitan, I do not have access to my firewire connected drives.
I’d need a method to keep my settings files, too. It would take me days to re-configure apps like mail & outlook, re-enter passwords and re-register all apps I’ve bought. Afaik there is no method for that, or is there?
/Kurt
There’s an option for this in Migration Assistant. I still can’t believe they left that out of this article. Read the link I provided in another comment for more on Migration Assistant.
Option Key does not show that screen. Only a “choose network” and click on boot drive (only) screen.
Option key does show the boot menu, but you must have the bootable OS X El Capitan installer USB drive connected to the Mac when you reboot with the Option key, if you don’t have the bootable OS X El Capitan installer USB flash key connected, you will not see it to boot from.
The new Disk Utility sucks.
because……..???
Migration Assistant – https://support.apple.com/el-cy/HT204350
When I clean installed Yosemite I made a Numbers spreadsheet listing all the apps I had in Mavericks including source (App Store or developer) and username/password if needed.
I also have a drive where I keep, among other things, the installer for each app I got directly from a developer if it’s available. Yes, it was a little bit of work, but I still have everything. I expect I’ll clean install whatever OS comes next so most of the work is already done.
I can’t imagine the same procedures wouldn’t work for El Cap.
Mark: no.
With few exceptions, applications require installation, where the installer places necessary files throughout the Mac, not just the single app file located there in the Application folder. So, all 3rd-party apps will need to be downloaded and reinstalled again from scratch. The best way to deal with this is take screenshots of your Application folder, sorted A-Z, as a reminder of which apps need to be installed.
Note: a fresh install of any OS will include the installation of all Apple apps that come with it: Safari, Mail, Contacts, etc. So these will not have to be installed again.
A clean install was traditionally the only smart way to install a new OS9 system. And it didn’t involve erasing the volume. It installed a brand new, clean system, renamed the old system but left it on the volume. You then decided what control panels, extensions, fonts, etc. you wanted to import into the new system.
This is how a clean install should work for OS X. The risk of erasing an entire drive is ludicrous (I have heard too many horror stories relating to file recovery). A clean install followed by relinking to your home folder through Migration should you want (or create a new account) would be infinitely simpler and less risky.
Not the way I remember it. Not sure what the point of a clean install would be if you didn’t wipe the disc before starting. In fact, what you’re describing is not a “clean install “, but just a reinstall.
If i do this will i be able to drag apps from my backup to the clean install or will they have to be re-downloaded.
No, you can drag files from a file-based backup, but you’d need to re-install apps or download them again.
A clean install is not needed for 90% of Mac users, a lot of work for little return
In my limited experience I have found that copying and pasting, or dragging apps into the application folder works okay mostly. I still use iDVD (to make sideshows for a relative who insists on having these) which has been copied in this way since Snow Leopard but the “Themes” folder needs to be placed in “Application Support” folder.
You can use Migration assistant after installing the fresh copy of El Capitan. It may start up on it’s own, or you can find it in the Utilities folder inside the Applications folder. It’ll give you several options to transfer your old data from whatever backup method you chose – it might be good to do some research on these options before proceeding.
And shame on this article for not mentioning Migration Assistant!