How to Increase Color Saturation of a Picture in Mac OS X with Preview
![]() An images color saturation is expressed by the intensity of the color of a picture, thus a picture modified with higher saturation will appear with vivid colors, and a picture with the lowest saturation winds up turning a picture to black and white. Adjusting saturation is a common photo editing technique to both enhance or decrease the vividness of a pictures color, and for the purposes here we will show you how to increase (or lower) the color saturation of any image in Mac OS X using the built in Preview app.
An images color saturation is expressed by the intensity of the color of a picture, thus a picture modified with higher saturation will appear with vivid colors, and a picture with the lowest saturation winds up turning a picture to black and white. Adjusting saturation is a common photo editing technique to both enhance or decrease the vividness of a pictures color, and for the purposes here we will show you how to increase (or lower) the color saturation of any image in Mac OS X using the built in Preview app.
How to Adjust Color Saturation of Images with Preview for Mac OS X
The picture used in this example here is the default Lake.jpg wallpaper found in modern versions of Mac OS X. It’s a beautiful image on it’s own, but we’re going to increase the saturation to further emphasize the colors in the picture to demonstrate how this feature works, the result will be a more vivid version of the same lake image.
- From the Mac OS X Finder, locate a picture you want to change the color saturation for, you may want to make a copy of the picture before editing it but that is up to you, then double-click to open the picture into Preview app of Mac OS X, the default image viewer and editor
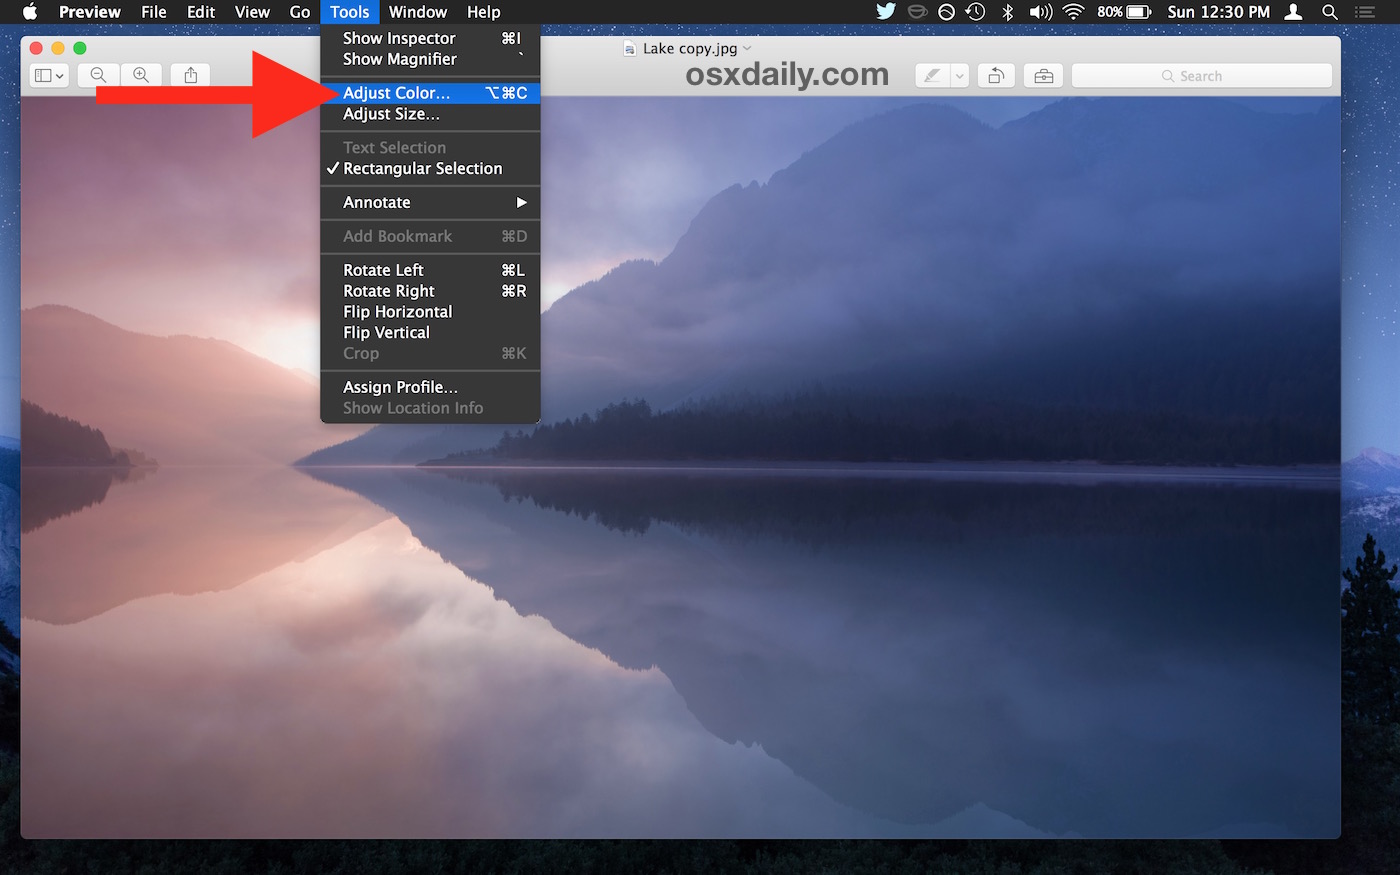
- Once the picture is open in Preview app, pull down the “Tools” menu and choose “Adjust Color” to bring up the color adjustment panel
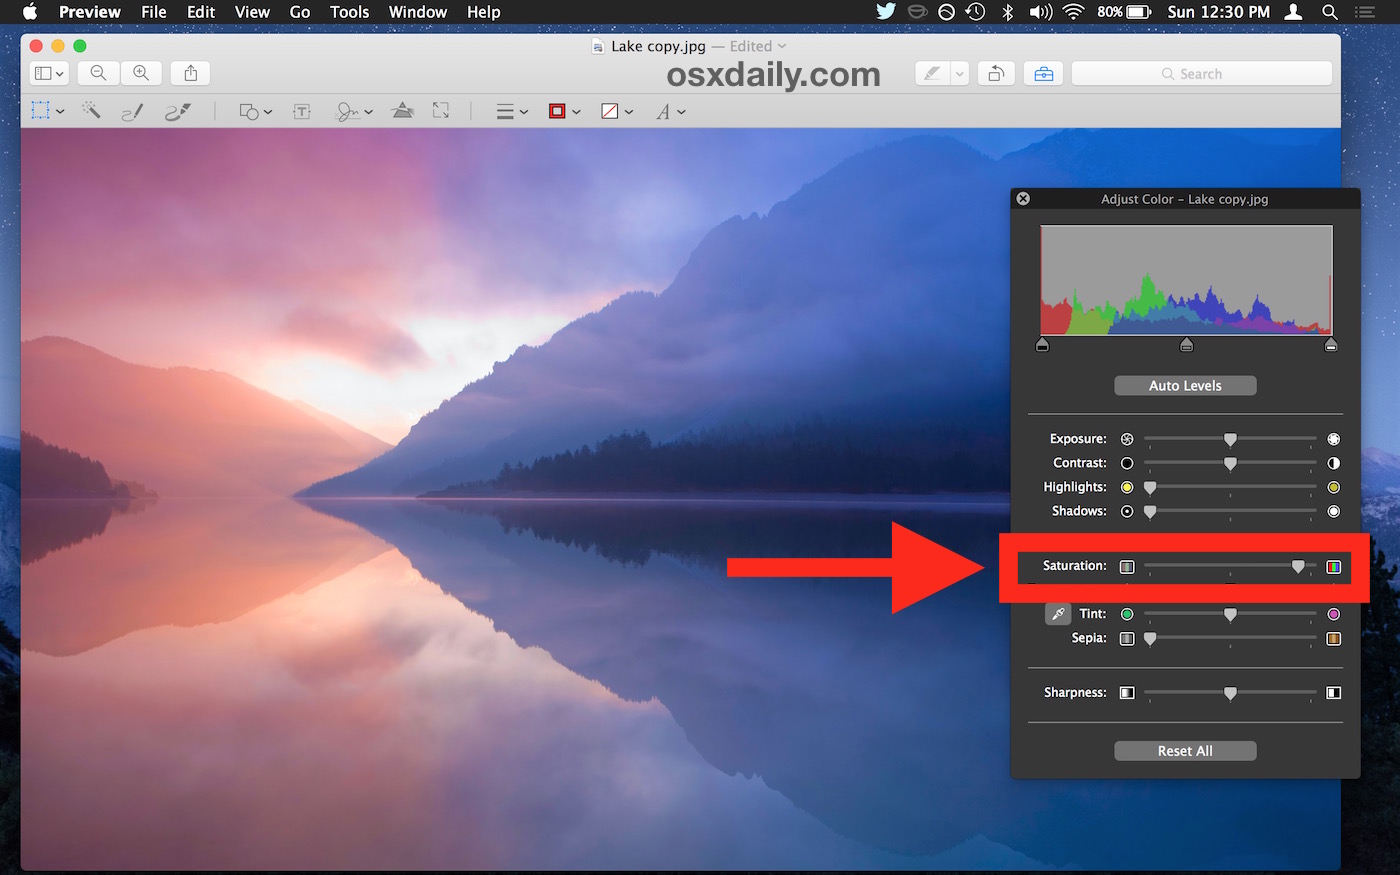
- Locate the “Saturation” slider, to increase the images color saturation, slide the indicator to the right, and to decrease an images saturation, move the sliding indicator to the left
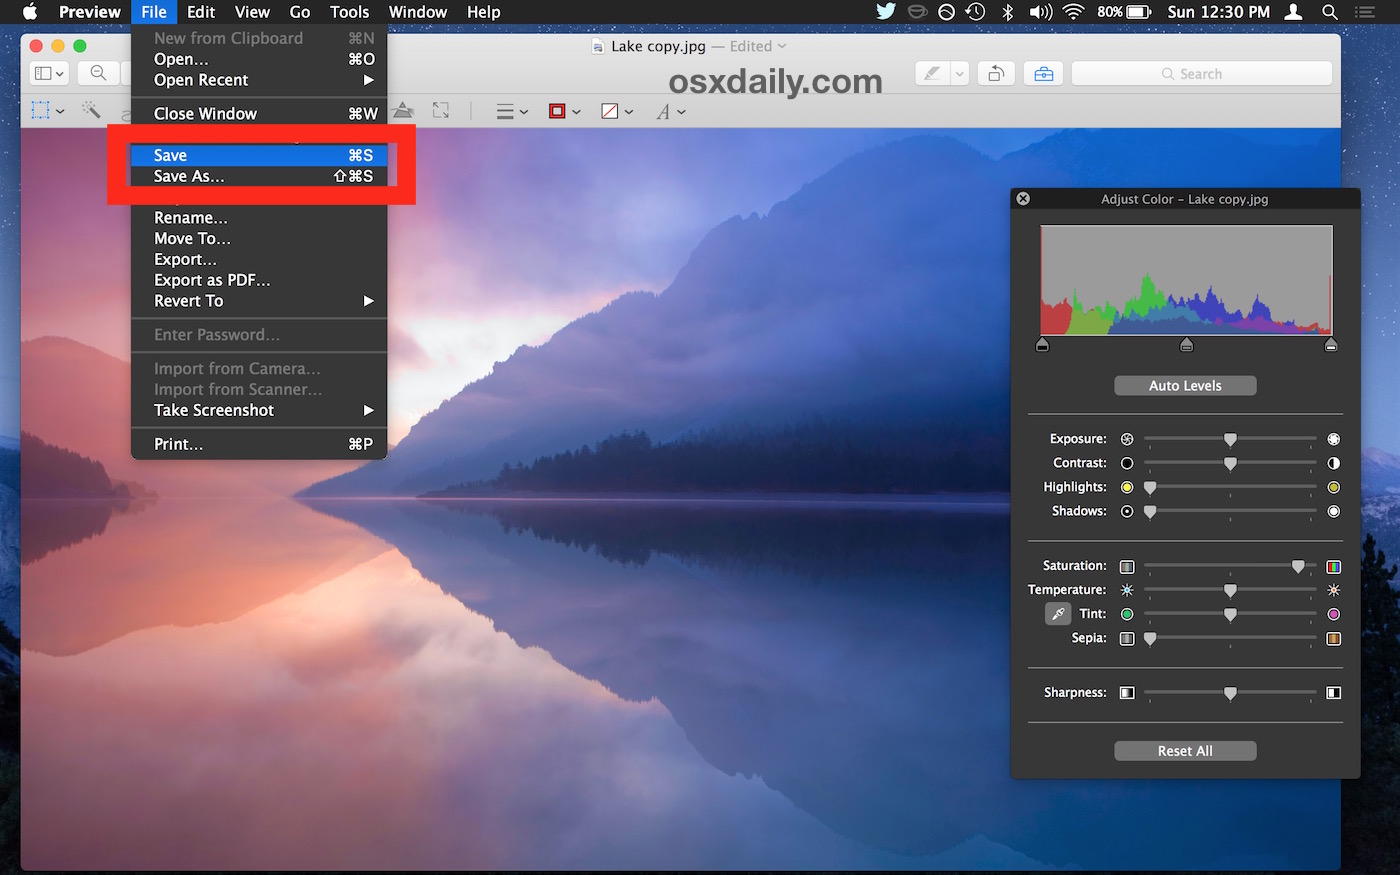
- When satisfied with the color saturation adjustment, go to the “File” menu and choose “Save” to save the changes to the existing file, or choose Save As to save the adjusted color profile image to a new file
How much to increase or decrease saturation depends entirely on the picture and the intended result, there is no right or wrong adjustment.
The video below walks through the process, as you can see it is quite fast to adjust color this way in Preview:
You’ll notice if you move the saturation slider all the way to the left at it’s lowest setting, the picture turns black and white. If you move the image saturation slider all the way to the right, the colors become extremely vivid and really pop out, which, depending on the images color starting point, can make a picture look brighter and more colorful, or completely garish.

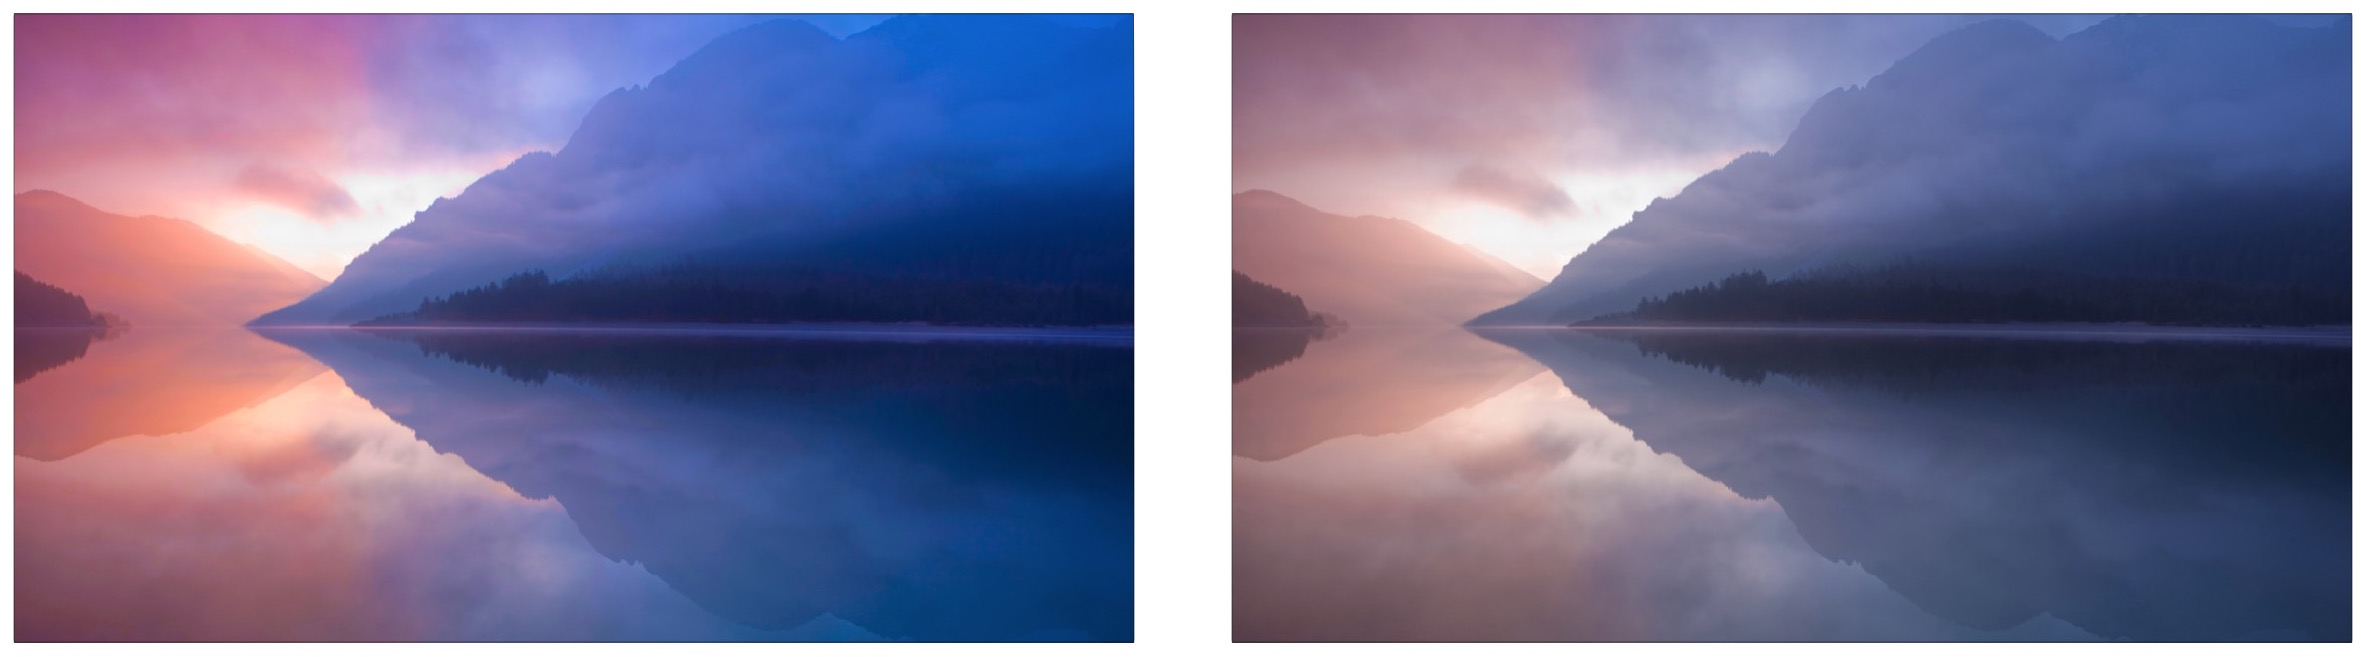
In the image below, the left side picture has an increase in color saturation, and the right side picture is the original version.
For those wondering, yes, you can also adjust color saturation through the Photos app of Mac OS X, and you can also adjust color saturation in Photos for iOS on the iPhone and iPad too, but Preview for Mac is lightweight, fast, multifunctioned, and some may argue it’s even easier to use than the Photos app as a result.
Personally, I like Preview a lot, and it’s my preferred tool for quickly making adjustments and crops to any picture in Mac OS X. There are tons of other powerful features available in Preview too, so be sure to check out more Preview tips for Mac.

I have found that I can have a grand ol’ time adjusting color settings in a Preview duplicate photo, but then when I save or export, the file that saves/exports bears little resemblance to the modifications I’ve made; for example, all the green is missing, or only the top 2/3 of the image saves and the rest is empty. Does this happen to anyone else?? Why does this happen? How can it be fixed within Preview (I’ve learned I can work around this problem using iPhoto, but i don’t want to have to maintain libraries in iPHoto of all files I want to edit–I want Preview to work the way it supposed to…)?
Preview is one the greatest apps Mac OS X has to offer. If there is a single reason to use Apple’s OS, Preview is it. It trounces anything that Windows or KDE or Unity or even the good old Gnome have to offer. Its abilities to display, inspect (⌘I), edit, annotate, import and scan, convert, print images and PDF files, take desktop or window or selection screenshots are unrivaled, sometimes even by expensive specialized apps.
Hi All,
I was a big fan of ‘Save As’ since it’s something you can do anytime in the work process (as opposed to having to duplicate a file before you start). I guess not a lot of people know this, but ‘Save As’ still exists. Click on ‘File’ in the menu bar. While the dropdown window is open, click on the ‘Option’ key. You’ll see ‘Duplicate’ change to ‘Save As’ among other things. This isn’t just something that Preview does; there are extra key commands that are hidden most everywhere until you click ‘Option’. Don’t know if they were trying to get rid of clutter or what – I’m just glad to have ‘Save As’ back :)
Andrew, You can chose Export from the menu bar : File (no short cut listed in my drop down menu) or use command + shift +S to save a copy. Preview calls it Duplicate but most applications call it Save As. Then you have to choose save or cmd S to save the duplicate with a new name (Preview adds the word COPY) so you don’t over write the original) If I am worried about a overwriting a master copy I will save with a new name BEFORE I make any changes.
Barb, Your photos can be anywhere for Preview. On the desktop, in a folder or on another hard drive. You can drag the picture’s icon on to the Preview icon in the dock and it will open Preview.
You can enable Save As keyboard shortcut in OS X as well, here is how to do so in all modern versions of Mac OS X system software, Mountain Lion to El Capitan:
https://osxdaily.com/2012/08/27/enable-save-as-os-x-mountain-lion/
Wow. I didn’t know that Preview had these abilities. I experimented with a photo on my desktop, and I’m surprised to see the photo-editing features I was missing. I even changed the size. But I have a couple of questions. Where do my photos have to be in order to open them in Preview? How does this relate to editing in Photo (which I hate, compared to iPhoto). (For your information, I’m not a very tech-advanced person.) I really appreciate your reply.
Thanks a lot.
Pictures can be anywhere on the Mac to be edited in Preview app, which makes it great for users who like to manage their own images in the file system (Finder) rather than using an app like Photos or iPhoto (I also hate those apps).
So it’s a little bit more advanced in that sense, it’s not a manager, it’s an editor and viewer, but the image editing options are easy, fast, and efficient, it’s my preferred image editor on the Mac for basics. Then I use Pixelmator for advanced image manipulation. I keep all my pictures in the Pictures folder, arranged by directories. I import them directly to the file system with Image Capture, and I avoid Photos app and the like entirely.
While you’re thinking about Preview:
The latest version of Preview overwrites an image with any changes I have made, it does not give me the option of not doing it. The result is that I have lost my original image. I always want to keep the original, even if I make changes to it. The older version of Preview did not automatically overwrite the image, I could save to a different file name. Is there any way to prevent Preview 8.1 from overwriting the image?
Thanks…
Andrew,
To save as just press Option (alt) and you get the alternative to save as.
This way you keep your original and have the edited one under a new name.
Apple menu > System Preferences > General > “Ask to save changes when closing documents”
And use Save As rather than Save.
Apple auto-saving is helpful but can be frustrating.
Andrew, you can try ‘File’, ‘Revert to’, ‘Browse All Versions…’
This should present a TimeMachine-like interface that will allow you to go back in time to the original file.