How to Add Text to Photos on iPhone & iPad with Markup

Did you know that you can annotate photos on your iPhone and iPad? Thanks to the built-in Markup feature in iOS, you don’t even need to install a third-party application like Annotable or Skitch from the App Store.
This tool can come in handy when you have to annotate your screenshots, sign documents or add a caption to your photos. It was first introduced in iOS a few years ago, but Apple has kept improving it over time by adding more features and making incremental changes to the interface. From adding texts to sketching with brushes, Markup offers a variety of tools for users to play with.
Are you keen on making use of this tool to sketch your photos and screenshots? Well, you’ve come to the right place. In this article, we’ll be discussing exactly how you can add text to a picture on iPhone and iPad with Markup.
How to Add Text to a Picture on iPhone & iPad with Markup
The Markup tool is baked into the stock Photos app on iOS devices. Simply follow the steps below to add captions to any of the pictures in your photo library.
- Head over to the default “Photos” app from the home screen of your iPhone or iPad and open any picture in your library that you want to annotate.

- Tap on “Edit” which is located at the top-right corner of your screen.
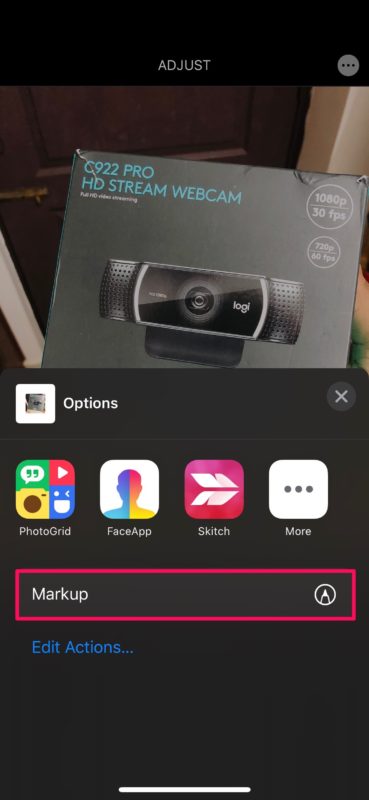
- Now, tap on the “triple-dot” icon which is also known as the “more button” within iOS.
- A menu will pop up from the bottom of your screen showing a list of third-party apps that you can use to edit or annotate your picture. However, you’ll see the “Markup” option right below that. Tap on it.
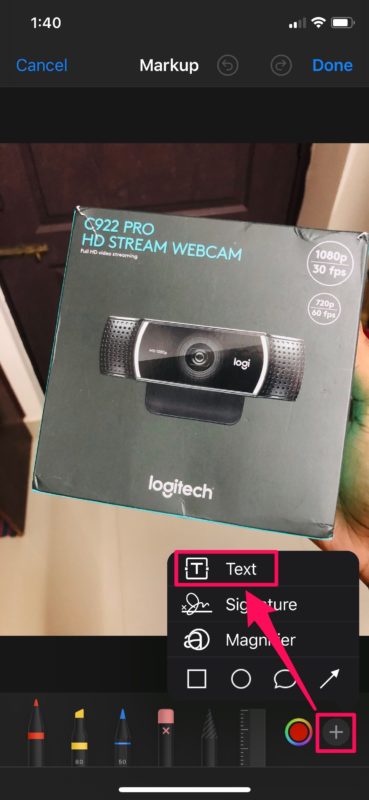
- You’ll see a bunch of tools at the bottom, but ignore all of them for now and tap on the “+” icon at the bottom-right corner of the screen. Now, tap on “Text” as shown in the screenshot below.
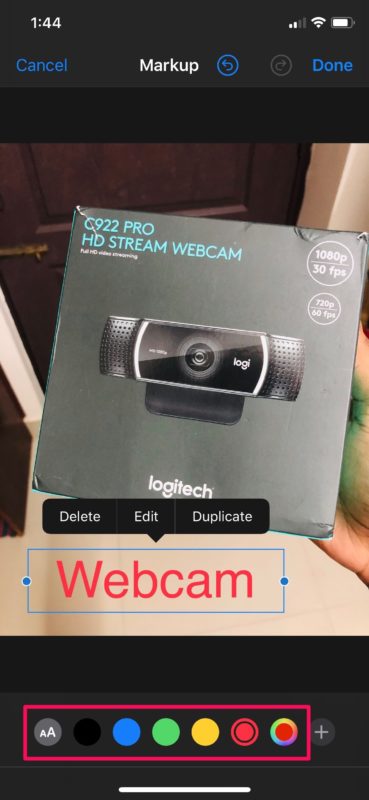
- Now, tap anywhere within the “Text” box to bring up the keyboard and type whatever you want to. Here, you can adjust the size of your text by simply tapping on the “aA” icon at the bottom bar. Additionally, you can also change the color of the text according to your preference, as shown below.
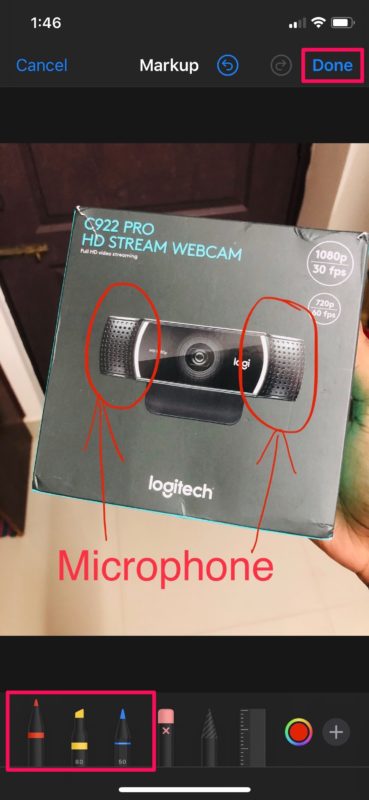
- Once you’re done typing, tap anywhere outside the text box to utilize other tools that Markup has to offer. If you want handwritten text on the picture, you can use the pen, marker or pencil tool to write or draw with your finger.
- When you’ve added your desired text, tap “Done” at the bottom-right corner of the screen to save this markup to your photo library.


These are pretty much all the required steps to properly annotate your photos using the built-in Markup feature on iOS.
This tool is often used by people to annotate screenshots and then share it with their friends. Some people also use this feature to draw in emails on the iPhone and iPad, and you can also use this feature to doodle and draw on pictures in iOS and ipadOS too.
In addition to being able to add captions to photos, Markup tool can also be used to sign PDF documents and even allows you to save multiple signatures for quick access.
Something to understand is that when you add markups to a picture and save it, the image gets overwritten instead of creating a duplicate. However, you can always revert the markup with a single tap in the edit menu, so that’s not necessarily a dealbreaker.
Not quite content with the Markup tool? Don’t fret, because the App Store offers plenty of third-party annotation apps for both the iPhone and iPad, like Annotate, Skitch, LiquidText, PDF Viewer to name a few. Some of them even offer more features and flexibility than the built-in Markup tool, so if you have more demanding needs you can use a third-party app instead.
Did you have fun adding captions to your photos using Markup on your iPhone and iPad? What do you think about this nifty markup tool that’s baked into the Photos app? Care to point out some negatives? Let us know your opinions in the comments section down below.

How do you write an article about something that won’t be released for 5 more years?
The best part is you’re full of it…AGAIN. There ain’t no edit anywhere and those dots are as useless as chest on a nun…you incredible geniuses.
This feature has been on iPhone and iPad for years now, you can doodle and draw on your photos with Markup
If you haven’t updated your device, or if your iPhone or iPad are too old to have modern iOS / iPadOS software, that may be your problem
I have an image to prove it but you morons apparently don’t want to be proven wrong with a thousand words.
Bottom line:
There is no EDIT and the … does not include Add Tags
I would also like to know that. I’m having trouble figuring that out I had it once before but now I can’t figure it back out
Is there any way to change the available fonts? I’m looking to add something a little “spookier.” Mine only has 3 very boring ones. I use this more on the iPad than on my iPhone. Thanks
How can I move the newly annotated text box on the photo ? Seems like it’s fixed to the center of the pic ?
Is is possible to mark up photos on a MacBook Laptop using macOS Big Sur?
Yes you can use markup with Photos app on Mac
https://osxdaily.com/2017/07/21/how-draw-on-photos-mac/
You can also apply text and basic markups with the Preview app on Mac
Thanks!
How do you change the color of the text box itself? For example, I want a
Black textbox with white text…
Great info. Love it!
It may be a good idea to make a duplicate photo before starting to markup one of them. Then you have both. ‘Duplicate’ is a menu option.
How to edit what you have written. How to erase
Marks when using Markup.