How to Block & Unblock Senders on Gmail (via Gmail.com)
Are you receiving unwanted emails from a person or organization? Maybe it’s an annoying individual sending you obnoxious stuff, or perhaps it’s even promotional or spammy emails for companies, all of which may be showing up unwanted in your Gmail inbox? No worries, because you can block email addresses in Gmail and make sure your inbox is clean and clear of unwanted senders. And of course, you can unblock senders in Gmail too.
Similar to social networking platforms, email services also allow users to filter out people who’re giving a hard time by simply blocking them. However, blocking in Gmail differs from blocking in a social network like Facebook or Twitter in more ways than one. Sometimes, a person just won’t leave you alone, or unsubscribing from promotional and other emails just doesn’t work, and if you’re in a similar situation, blocking the email sender is the next step you can take.
Keen on taking advantage of the blocking feature that Gmail has to offer? Look no further because, as we’ll be discussing how you can block and unblock email addresses on Gmail.
How to Block Email Senders on Gmail
For this procedure, we’ll be using the browser client of Gmail to block and unblock contacts. Therefore, regardless of whether you’re using a Mac, Windows PC, iPad, or Android device, you should be able to follow these steps.
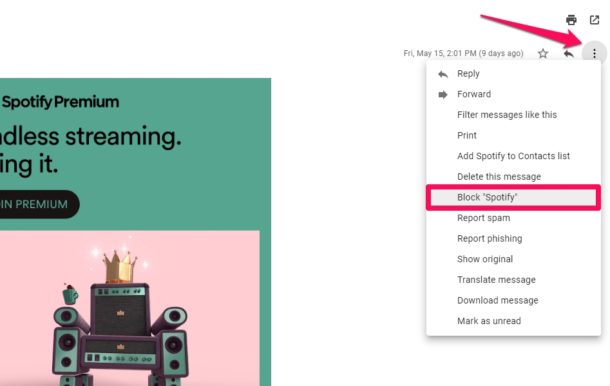
- Head over to mail.google.com from any desktop-class web browser and sign in with your Google account. Open any mail from the email address that you want to block and click on the “triple-dot” icon located right next to the “reply” button as shown below. Now, click on the “Block” option.

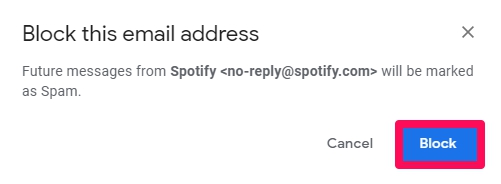
- You’ll receive a pop-up on your screen to confirm your action. Click on “Block” again.
- That’s it. You’ve successfully unblocked this email address.
Blocking an email sender takes effect immediately.
Of course you’ll also want to know how to unblock an email sender too.
How to Unblock Senders in Gmail
Now, in order to unblock email addresses or Gmail contacts that you’ve blocked previously simply do the following:
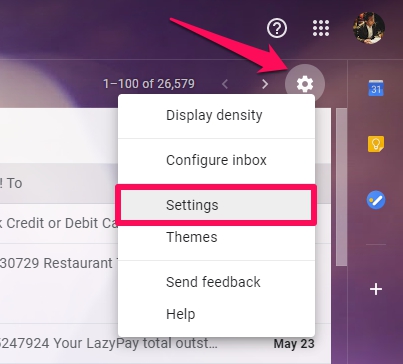
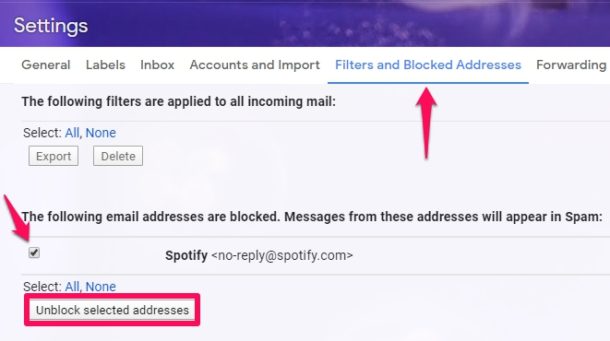
- Open Gmail.com and then click on the same “gear” icon located below your profile icon, as shown in the screenshot below. In the drop-down menu, choose “Settings”.
- In the Gmail settings menu, head over to the “Filters and Blocked Addresses” category and check the email addresses that you want to unblock, as shown here. Once you’re done with the selection, click on “Unblock selected addresses”.
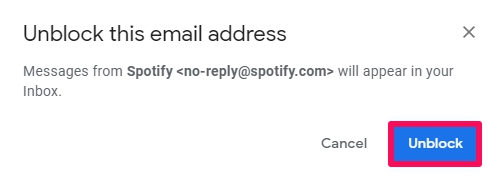
- You’ll get a prompt on your screen to confirm your action. Click on “Unblock” to complete the procedure.
There you go. Now you’ve learned how to block email senders in Gmail, and how unblock email addresses on Gmail too.
Blocked emails will no longer appear in your Gmail inbox, and that will persist until you unblock the email address or sender.
If you use Gmail in the Mail app or in another mail client, the blocking rules set up on Gmail.com will carry over and apply to the mail client app as well, including Mail on iPhone, iPad, Mac, and even other email clients too. Speaking of blocking on iPhone, don’t forget you can also block contacts on iPhone from reaching you via any method, including texts, calls, messages, and not just emails.
It’s important to note that blocking someone on Gmail does not necessarily stop them from being able to send you emails. This is contrary to the blocking feature that’s available on social networking platforms which prevents all sorts of communication. However, any future emails that you may receive from a blocked Gmail contact will be automatically marked as spam, so you wouldn’t see their emails in your inbox.
If you use the Gmail app that’s available for iOS and Android devices, you can easily block any of your contacts and other email addresses in a very similar way. Or, if you have linked your Gmail account to the stock Mail app that’s pre-installed on an iPhone or iPad, you can block senders and make sure any future emails from them are sent to the Junk folder automatically.
We hope you were able to tidy up your inbox by blocking email addresses that send you unwanted promotions and other spam emails. Have you tried any other methods to minimize the clutter in your inbox? Do share your thoughts and experience in the comments section down below, and feel free to check out more Gmail tips here.

Is there a maximum number of blocked senders that Gmail allows at any given time?
Thank you very much for the detailed article.
A few days ago you had an article describing how to block senders via the iPhone Mail app in IOS. Now you have a article describing how to block email via google.com. But what are the differences between the two processes. This article could have been far more interesting and informative if you had described the differences / advantages / disadvantages between these two processes.
Fair point.
Blocking a sender via Gmail(.com) blocks the email at the server level, it will block the email on Gmail.com as well as prevent the emails from ever arriving on the iPhone, iPad, or Mac.
If you block a sender on the device, the email is still downloaded to the device but sorted out locally, and it will still appear in the server-side of emails (for example if you logged into Gmail.com on the web).
So if you truly want to block someone completely, blocking them at the server level is more thorough and absolute.
You meant “BLOCKED” not “UNBLOCKED” on Step #3, correct??