How to Get Your Mac Ready for MacOS Ventura
If you’re excited about installing macOS Ventura onto your Mac, you certainly are not alone. The official release date for macOS Ventura is Monday, October 24, so whether you’re going to jump right into the software update the moment it’s available, or wait a bit, is entirely up to you. Whichever you choose, you’ll probably want to take a few moments to get your Mac ready for installing macOS Ventura 13.
Let’s take a look at some tips and considerations for installing macOS Ventura.
How to Prepare for MacOS Ventura
Covering some basics, here’s how you can get your Mac ready for Ventura.
1: Check macOS Ventura Compatibility
The first and obvious question is; does your Mac actually support running macOS Ventura?
The system requirements for macOS Ventura are more strict than prior macOS releases, including Monterey, so if you’re wondering about Ventura system compatibility you should first check to confirm you can run the operating system.
- iMac (2017 and later)
- MacBook Pro (2017 and later)
- MacBook Air (2018 and later)
- MacBook (2017 and later)
- Mac Pro (2019 and later)
- iMac Pro
- Mac mini (2018 and later)
As you can see, basically any Mac from 2017 onward supports macOS Ventura.
You will also need to make sure the Mac has at least 20GB of free storage available so that you have enough capacity to be able to install macOS Ventura onto the machine. It doesn’t necessarily take up that much space, but it needs to be able to download the installer, install the new software, and restart, which requires having available storage capacity.
2: Update Mac Apps
Updating Mac apps regularly is good habit in general for keeping up with bug fixes and new features, but when installing major system software updates it’s extra important for compatibility reasons.
Typically most major software developers will have their apps ready and tested to be used with the latest macOS versions, so go ahead and update your Mac apps.
Installing updates from the Mac App Store is really easy. Open the App Store, then go to the Updates tab to find available app updates.
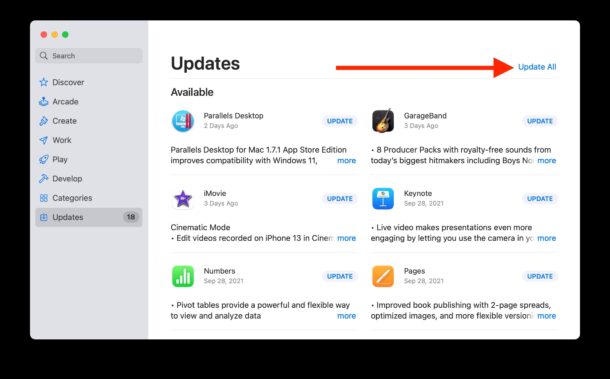
If you downloaded apps from outside the App Store, like Chrome, VirtualBox, Microsoft Office, or similar, you’ll often need to update those apps manually through the app itself, or through the developers website.
3: Backup the Mac
You will want to backup your Mac and all data on it before installing any system software update, but that’s particularly true for any major system software upgrade like Ventura.
![]()
This allows you to not only preserve your data, but also to downgrade and revert and downgrade if you change your mind about wanting to run the latest MacOS vesrion.
Backing up the Mac using Time Machine is easy and the recommended route for most users. You will need an external hard drive of at least 2x the capacity of your internal drive for best Time Machine performance.
4: Consider waiting for macOS Ventura 13.1
A common strategy for installing system software is to delay beyond the initial release, and wait for the first major bug fix update, which is typically released as .1, so in the case of Ventura it would be macOS Ventura 13.1.
Yes that means you’ll likely be waiting at least another month or two, but it also may allow some additional bugs and kinks to be ironed out before you jump into the new system software pool.
Some users even wait until later releases, so perhaps you’ll wait for macOS 13.2, 13.3, 13.4, 13.5, or skip Ventura entirely, that’s up to you.
5: Ready? Install macOS Ventura
So you checked system compatibility, updated your apps, backed up your Mac, and made the decision to go ahead with installing macOS Ventura.
MacOS Ventura can be installed from Apple menu > System Preferences > Software Update.
–
Do you have any particular approach to installing new major system software releases, like macOS Monterey? Are you installing Monterey right away, or or waiting a bit? Let us know your own experiences and thoughts in the comments.

Click the apple in the top left corner of your desktop, then click about this Mac. The model and year of your MacBook will be amongst the info there.
I’m not sure if my MacBook Pro is older than 2017. How do I check, and how safe is my MacBook if I can’t upgrade because my Mac was bought before 2017?
Hi!
Just click on the black Apple icon in the top left corner of your screen, then click “About My Mac” in the dropdown menu. It will have the year & model number, etc. about your Mac including the Mac OS version your Mac is currently on.