How to Use Network Locations in MacOS Ventura

Network Locations are a prominent feature in MacOS since the very beginning of Mac OS X, allowing users to have different network settings profiles that can be used for different locations and networks. For example, a network location for home, and a network location for work. But with MacOS Ventura, Network Locations have either been moved or removed, depending on which version of system software you are running.
The Ventura Network Locations feature is just one of the many exciting and curious things about the redesigned System Settings experience in MacOS Ventura, which continue to keep users on their toes wondering if some particular settings and preferences have either been moved, hidden, buried, or removed entirely, and you won’t always know which is the case until you start poking around.
So, can you use and change Network Locations in MacOS Ventura? The answer is both yes and no, making the feature a bit like Schrodinger’s Network Locations, with yes being if you’re on a newer version of MacOS Ventura, and no for earlier releases that removed the feature.
Before getting started, let’s eliminate some of the uncertainty about whether or not the Network Location feature exists on your MacOS version or not. To do that, if you’re running MacOS Ventura, update to the latest version of MacOS Ventura available, because if you aren’t running a newer version, you won’t find Network Locations at all. Install at least MacOS Ventura 13.2.1 or later.
How to Use / Add / Remove Network Locations in MacOS Ventura
Again, make sure you’re running the latest version of Ventura, since Network Locations were removed for a few versions for no obvious reason.
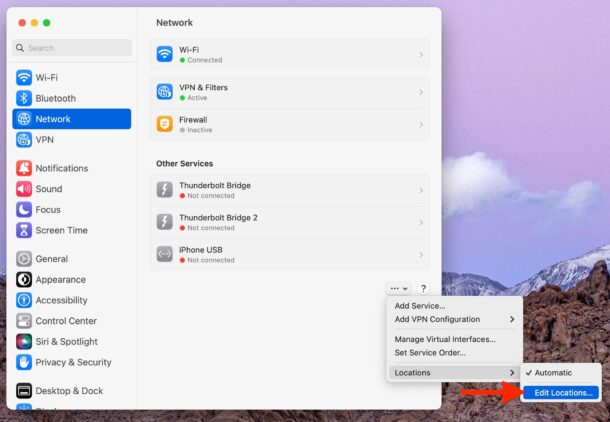
- Go to Apple menu and choose “System Settings”
- Go to “Network” in the list of settings
- Click the intriguing “…” button in the bottom right corner of the Network window
- From the action pop-up menu, choose “Locations”
- Choose “Edit Locations” from the list
- Click on the + plus button to add a new Network Location
- Give the network location a name, then configure your network settings as needed here to set them for that Network Location
- To use a different network location, click the “…” button > Location s> Choose the Network Location you wish to use
- To remove a network location, go to “…” > Locations > click the Network Location you wish to delete, then click the – minus button

There you go, now you know how you can add new Network Locations in MacOS Ventura, delete Network Locations in MacOS Ventura, and how to use different Network Locations in MacOS Ventura.
Once you have added at least one additional Network Location in MacOS you will then have access to the super easy to use and access Locations menu option from the Apple menu.
It’s unclear why the popular Network Location feature was removed from the initial versions of MacOS Ventura, or if it was simply forgotten about in the System Settings transformation of System Preferences, but from MacOS Ventura 13.2 onward the feature definitely exists again.

Now if it would only remember what default printer to use with each network, that would be helpful.
i use controlplane for this